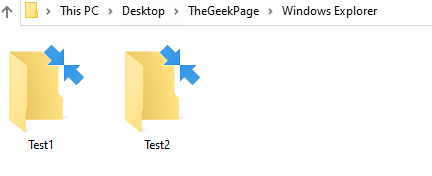
Many users have reported that some folders and shortcuts are being compressed. The compressed folders would have two blue arrow marks at the top right corner of the icon. For details, refer to the below image,

Furthermore, it is seen that any new file or folder created will be compressed automatically. Even when we decompress the files and folders, it is seen that the files and folders are compressed again after reboot.
The issue is seen when:
- There is very little space left in the Hard disk
- Corrupt Icon cache Database
- Compression has been enabled
- Compact OS feature is enabled
If you have encountered this issue, then read along. In this article, we have compiled some working solutions that will help you fix this issue.
Fix 1: Turn Off Compression on the Folders / Drivers
In order to Disable compression on the Folders do the following,
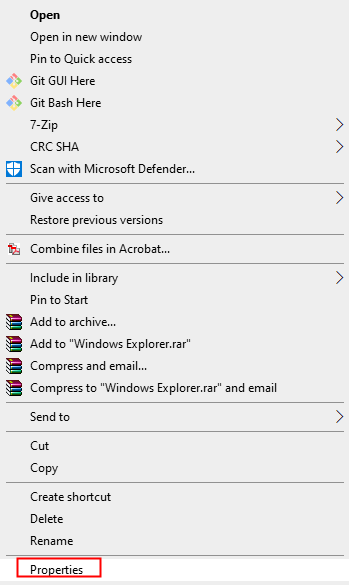
Step 1: Right-click on the folder and choose Properties

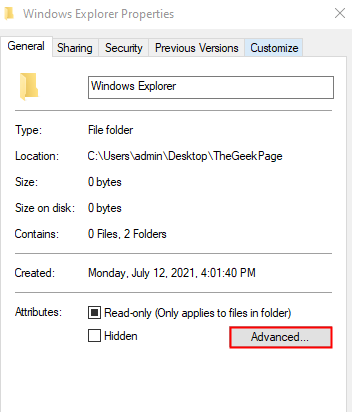
Step 2: In the Properties window that opens, make sure you are in the General tab
Step 3: Click on the Advanced button

Step 4: The Advanced Attributes window opens.
Step 5: Under the Archive and Index attributes section, untick the option Folder is ready for archiving
Step 6: Under the Compress or Encrypt attributes section, untick the option Compress contents to save disk space.
Step 7: Click on the OK button

Step 8: In the folder properties window, click on the Apply button
Step 9: You will see a Confirm Attribute Changes dialog popping up, select the Apply changes to this folder, subfolder, and files and click on the OK button.

Step 10: Finally, click on the OK button in the Properties window.
Step 11: Reboot the system and check if the issue resolved
In order to Disable Compression in Drivers, do the following:
Step 1: Right-click on the Driver and select Properties
Step 2: Untick the option Compress this drive to save disk space
Step 3: Click on the Apply button and then click on the OK button

Step 4: Restart the system and check if the issue fixes.
Fix 2: Disable Compression using Command Prompt
Step 1: Holding the keys Windows+R, open the Run Dialog
Step 2: Enter cmd and hold the keys Ctrl+Shift+Enter to open the Elevated Command Prompt.

Step 3: If you see a UAC opening up asking for permission, click on Yes.
Step 4: In the Command Prompt window that opens, copy-paste the below command and hit Enter
fsutil behavior set DisableCompression 1

Step 5: Restart the system
NOTE:
In order to decompress the folders of drivers that are already being compressed, copy-paste the below command and hit Enter
compact /U /S:"<DriverLocation>"
For example, let us say the folders within the C drive have been compressed, if you want to decompress all the folders within the C drive, run the below command:
compact /U /S:"C:\"
Fix 3: Disable Compact OS Feature using PowerShell
Compact OS is a feature in Windows 10 that lets you compress OS-related files like installation files, pre-installed application files, etc, so as to save space in the system drive. This could result in the compression of certain folders within the drive.
In order to disable the Compact OS feature do the following
Step 1: Holding Windows+R, open the Run Dialog
Step 2: Enter powershell and hold the keys Ctrl+Shift+Enter to open the PowerShell with Admin rights.

Step 3: If you see a UAC opening up asking for permission, click on Yes.
Step 4: In the PowerShell window that opens, copy-paste the below command and hit Enter
compact /compactOS:never
Check if this helps, if not try the next fix.
Fix 4: Rebuild the Icon Cache Database
Step 1: Right-click on the Taskbar, select Task Manager from the context menu

Step 2: From the list, right-click on Windows Explorer and select End Task

Step 3: Open Command Prompt with Elevated Status ( Refer Steps 1,2,3 from Fix 2)
Step 4: In the command prompt window, enter the below commands one after the other. Make sure to hit Enter after every command.
CD /d %userprofile%\AppData\Local
DEL IconCache.db /a
EXIT
Step 5: Press the Windows+E to open an explorer window again
Step 6: Once the Explorer opens, restart your System
Step 7: If you are still seeing the issue, Open Command Prompt with Elevated Status and run the below command:
ie4uinit.exe -ClearIconCache
Check if helps. If not, try the next fix.
Fix 5: Disable Compression using Group Policy
NOTE: This fix works only in Windows 10 Professional Edition.
Step 1: Open the Run Terminal
Step 2: Type gpedit.msc and hit Enter

Step 3: You can see that the Local Security Policy window opens.
Step 9: From the left-hand side menu, navigate to the below location. You can double-click on the selection to expand it.
Computer Configuration > Administrative Templates > System > Filesystem > NTFS
Step 10: From the right-hand side, double click on Do not allow compression on all NTFS volumes.

Step 11: In the appearing window, select the Enabled option
Step 12: Click on Apply followed by OK

Check if the issue resolves, if not try the next fix.
Fix 6: Disable Compression using Registry Editor
Step 1: Open the Run window by pressing the buttons Win Key+r from your keyboard
Step 2: Type regedit and press OK

Step 3: In the User Account Control window that opens asking for permissions, click on Yes
NOTE: Registry editing can have an adverse effect on the system even with the slightest mistake. It is advised to take the backup of the registry before proceeding. To take a backup, In the Registry Editor, go to File > Export > Save your Backup file.
Step 4: In the Registry Editor window, in the search bar at the top, copy-paste the following location
HKEY_LOCAL_MACHINE\SYSTEM\CurrentControlSet\Policies
If copy-pasting does not work, navigate to the above location from the left side panel.
Step 5: Now, right-click anywhere on the right-hand side, Choose New > DWORD(32-bit)

Step 6: Name the newly created key as NtfsDisableCompression

Step 7: Double Click on NtfsDisableCompression to modify its value
Step 8: In the Edit DWORD window, set the value to 1 and click on OK

Step 9: Restart the System.
Fix 7: Perform a Disk Clean up
Windows automatically compresses the files and folders when the disk is running out of space. If you see that, the free space on the disk is low, then try performing disk cleanup.
Step 1: Open the Run Window with keys Windows+R
Step 2: Type the below command and hit Enter
%temp%

Step 3: Then delete all the contents from that folder. You can do it by clicking anywhere within the window and then pressing Ctrl+A followed by the Delete key on the keyboard.
Step 4: Open the Run window again
Step 5: Type the below command and hit Enter
temp

Step 6: Delete all the contents from this folder. You can do it by clicking anywhere within the window and then pressing Ctrl+A followed by the Delete key on the keyboard.
Step 7: Open an Explorer window using Window+E
Step 8: From the left-hand side menu, scroll down and click on This PC
Step 9: From the right-hand side, Right-click on the drive (For example, Windows(C:) or Local Disk (C:))
Step 10: From the context menu, choose Properties

Step 11: In the Properties window, under the general tab, click on the Disk Cleanup button.

Step 12: Under the Files to delete section, tick on all the options except for the files that are required.
Step 13: Click on the Cleanup system files button as shown below

Step 14: Wait till the disk cleanup completes. Once done, check the free space remaining in the system. There should be at least 10% of free space left in the drive. If the total disk capacity is 500GB, there should be at least 50 GB of free space left in the drive.
Step 15: Once, you see that there is enough free space, decompress the compressed files using any of the above methods
Step 16: Restart the system and check if the issue resolves.
Fix 8: Update your Windows OS
Usually, the Windows updates are downloaded and kept in the system drive so that they can be fetched when the updates are to be installed. At times, a lot of space is required just to accommodate these updates. In such cases, updating the Windows OS to the latest build will free up space. In order to update your Windows OS, follow the below steps:
Step 1: Open the Run Dialog
Step 2: Type ms-settings:windowsupdate and press Enter.

Step 2: In the Settings > Update &Security > Windows Update window, Click on Check for updates.
Step 3: Windows will now check for any new updates. If any new updates are found, those will be downloaded and installed.
Step 4: Click on the Restart now button for the changes to take over.
Check if this helps.
That’s All
We hope this article has been informative
Kindly comment and let us know the fix that helped you solve the issue.
Thank you for Reading.