There are times when you feel that your Wireless connection is not performing up to the mark. You may realize that the pages are loading much slower than expected, uploads/downloads are taking a bit more time, or you may be getting disconnected quite often. So, do you feel that network signal not as fast as expected? Or, is it that you simply want the strongest network connection when you have quite a few hotspots in your office?
While for slower connections you can run a speed test on an internet speed checking website and check the connection status, it will not help you detect the signal strength. In such cases, you can use a 3rd party tool to check the network strength and also switch to the strongest WiFi signal. This is because, Windows 10 does not offer the option to automatically switch to the fastest internet by-default. However, you do have an option to manually configure the Windows 10 to automatically switch to the strongest WiFi signal.
Using the manual process, you enable the auto-switching function by making changes to the Roaming Aggressiveness value of your WiFi. This helps set a limit for the network strength followed by which the WiFi adapter starts a roaming scan for another candidate AP. However, even then, your system may not connect to the fastest WiFi.
In this article, we will show you how to automatically switch to the strongest WiFi signal in Windows 10.
Method 1: Through Wireless Properties
This method helps you to configure the Wireless Network Properties in a way that allows your system to constantly look for an available wireless network within the range. As soon as your system detects the strongest signal the adapter recommends the device to connect to that network.
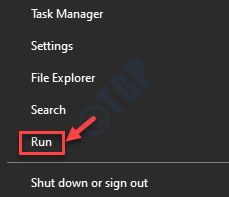
Step 1: Right-click on the Start menu and select Run to launch the Run command.

Step 2: In the Run command window, type ncpa.cpl and hit Enter.

Step 4: It takes you to the Network Connections window.
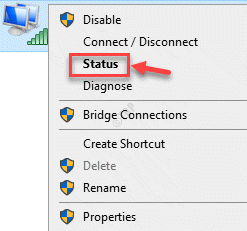
Here, right-click on the active WiFi adapter and select Status.

Step 5: It will open the WiFi Status window.
Here, press the Wireless Properties button.

Step 6: Now, in the Wireless Network Properties window, under the Connections tab, check the box next to Look for other wireless networks while connected to this network.
Press OK to save the changes and exit.

Step 7: Again press Close in the WiFi Status window to exit completely.
Step 1: Press the Win + R keys together on your keyboard to open the Run command window.
Step 2: In the Run command search field, type devmgmt.msc and hit Enter to launch the Device Manager window.

Step 3: In the Device Manager window, go to Network Adapter and expand the section.
Right-click on the built-in WiFi adapter and select Properties.

Step 4: In the WiFi Properties dialogue box, click on the Advanced tab.
Now, in the Property list, click on Roaming Aggressiveness.
Next, on the right side of the Property list, under the Value field, select Highest from the drop-down.
Press OK to apply the changes and return to the Device Manager window.

Exit the Device Manager window, reboot your PC and your Windows 10 system should now be able to automatically switch to the strongest WiFi signal.
Note: Roaming Aggressiveness is a function that helps to tweak the network strength limit as the WiFi adapter starts looking up for additional candidate AP. When the current AP network strength is already pretty good, selecting the maximum value will force start the roaming scan for extra candidate AP. This configuration helps the system to auto-switch to the strongest WiFi signals in your Windows PC. Let’s see how..
Method 2: Using a Free Third-Party Software
If you want to avoid making the changes manually to switch to the strongest Wifi signal in your Windows 10 PC, you can make things easier by using a third-party software, that’s completely free. One such tool is Wifinian that’s available in the Microsoft Store, as well as on Github as a free download. This utility offers a function on its interface that helps you to automatically switch to the fastest network. In addition, it also works with other devices that support WiFi and helps you manage any known networks.
Step 1: Open Microsoft Store and search for Wifinian.
Click on Get to download and install for free.

Step 2: Alternatively, you can download and install Wifinian from the Github link below:
https://github.com/emoacht/Wifinian/releases
Step 3: Click to open the downloaded Zip folder for the installer.
Double-click on the installer to open the Setup Wizard.

Step 4: Follow the on-screen instructions to complete the installation of the Wifinian app.
Step 5: Now, open the Wifinian app. It appears in the Taskbar.
Click on the icon to open it’s interface.
Now, go to the active WiFi network and click on Auto Switch to switch to the network you want to use.

Your system should now automatically switch to the strongest WiFi signal.