Creating a System Restore Point is one of the most crucial steps to ensure that you can revert back to an earlier state of Windows, if something goes wrong with your system and it can’t be fixed by any other means. The usual method of creating a system restore point is using the System Properties, and this should be especially done just after you have installed Windows 10 on your system and before you install any apps, drivers, etc.
You should create another system restore point once you have installed the drivers, apps, etc. In fact, you should also create restore points before installing any apps from unknown sources and doing this manually is the best option. You can create restore points manually using Command Prompt and Windows Powershell. Today we have a guide on how to create a system restore point manually for you.
Method 1: Using Command Prompt
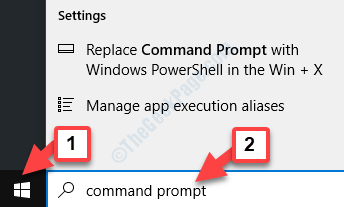
Step 1: Navigate to the Start option and type Command Prompt in the search box.

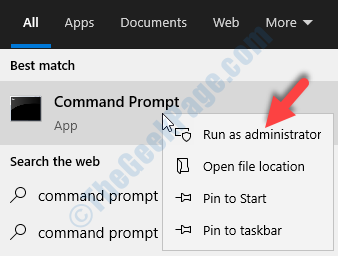
Step 2: Right-click on the result and select Run as administrator from the menu.
This will open Command Prompt in Admin mode.

Step 3: Run the below command in the Command Prompt (admin) window and hit Enter:
wmic.exe /Namespace:\\root\default Path SystemRestore Call CreateRestorePoint "RestorePointName", 100, 7
Make sure that you replace the RestorePointName (highlighted) in the above command with any of your desired name.

If the result generated says Method execution successful and ReturnValue = 0, t means the system restore point was created successfully.
Alternatively, you can follow the 2nd method to create system restore point manually.
Method 2: Using Windows PowerShell
Step 1: Right-click on the Start button and select Windows Powershell (Admin) from the menu.

Step 2: In the Powershell window, type the below command and hit Enter:
powershell.exe -ExecutionPolicy Bypass -NoExit -Command "Checkpoint-Computer -Description "RestorePointName" -RestorePointType 'MODIFY_SETTINGS'"

Make sure that you replace the RestorePointName (highlighted) in the above command with any of your desired name.
Wait for the process to complete. Once completed, you can exit Powershell.
*Note: However, if you have already created a restore point within the last 24 hours, it will display a warning and prevent you from creating a restore point unless 24 hours are over.