Some Windows 10 & 11 users are complaining about seeing a white bar at the top of the File Explorer window. If you are also seeing a single white horizontal white strip just under the address bar, this article is just for your help. This might be a case of misconfigured resolution or scaling or a simple case of wrong settings of Internet Explorer.
Fix 1 – Alter the resolution
There is a workaround for this problem.
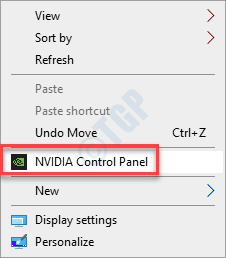
1. Right-click on the desktop and click on “NVIDIA Control Panel“.

2. When the NVIDIA Control Panel opens up, on the left-hand side, click on the “Change resolution” on the left-hand pane.
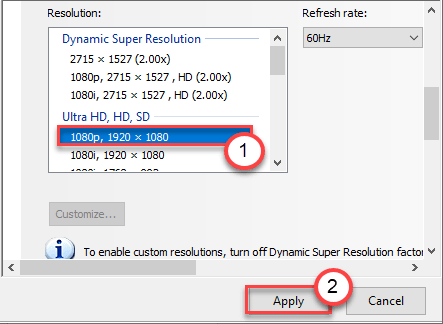
3. Then, on the right-hand side, you will notice several resolutions on your screen.
4. Here, select any resolution from your computer.
(As we are using a 1080p display, we have chosen the “1080i” option from the list. You can choose another resolution from the list)
5. After that, click on the “Apply” to apply the settings.

The display resolution will change. Your screen will go black once and re-lit within seconds.
6. If you see a prompt about the change of resolution, asking ‘Would you like to keep these changes?’, click on “Yes“.

7. Once your computer is set to another resolution, choose the resolution you want from the list of resolutions.
8. Then, click on “Apply“.

9. Don’t forget to click on “Yes” permitting the change.
Once you have done this, close the NVIDIA Control Panel.
Open the File Explorer and check if this has worked or not.
Fix 2 – Disable the Hardware Acceleration
You can use the registry editor to disable the Hardware Acceleration feature on your computer.
1. Press the Windows key+R keys together.
2. In the Run panel, write down “regedit” and click on “OK“.

NOTE –
Any unaccounted changes in the Registry Editor may lead to an unstable system. We request you to make a backup of the registry on your computer.
Once you have opened the Registry Editor, click on “File“. Then click on “Export” to make a new backup on your computer.

3. After taking the backup of the registry keys proceed to this location on the Registry Editor screen –
HKEY_CUREENT_USER\SOFTWARE\Microsoft\Avalon.Graphics
4. Once you are in a particular location, check on the right-hand side for the “DisableHWAcceleration” key*.
5. Then, you can double-click on the key to modify it.

6. Now, simply set the value to “1“.
7. After that, click on “OK” to save these settings.

[
*NOTE –
If you can’t locate the actual key on the left-hand side, try these steps –
a. On the right-hand side, right-click on the space and click on “New>“.
b. Choose the “DWORD (32-bit) Value” from the list.

c. Then, name this new value as “DisableHWAcceleration“.
d. After that, double click on this value to edit it.

]
Close the Registry Editor window.
Restart your computer just once. After restarting, open the File Explorer and check if you are still seeing the white line again.
Fix 3 – Intel HD Graphics
If you are using an Intel HD Graphics card, this solution is just for you.
1. First of all, open the Intel HD Graphics settings on your computer.
2. Once you have opened it, click on the “Display” settings.

3. Now, click on “General” settings on the left-hand pane.
4. Now, just check the option of “Scale Full Screen” option.
5. Then, check the box on the “Override Application Settings“.

6. Don’t forget to click on “Apply” to save these settings.

Now, close the Intel HD Graphics window.
Fix 4 – Lock the Toolbars
Try locking the Toolbars of the Internet Explorer to fix the issue.
1. Open the Internet Explorer window on your computer.
2. Once it opens up, right-click on the Toolbar and check the box beside the “Lock the Toolbar“.

3. Once you have done that, close the Internet Explorer.
Check if this works out.
Fix 5 – Restart the Desktop Windows Manager Process
Some users have detected that the Windows Manager Process is the main culprit behind this issue.
1. At first, press the Windows key+X keys together.
2. Then, click on “Task Manager” to access the Task Manager on your computer.

3. Go to the “Processes” tab.
4. Now, scroll down this tab, you will notice the “Desktop Window Manager” process in the ‘Windows Processes’ section.
5. Then, right-click on the process and click on “End task” to kill the process.

Close the Task Manager window. Sign out of your account and then sign in again.
Fix 6 – Editing Locked value in Registry
1 – Press Windows key and R key together from keyboard to open run.
2 – Now, write regedit in run command box and click OK.
3 – Now, go to the following path in registry editor.
HKEY_CURRENT_USER\SOFTWARE\Microsoft\Internet Explorer\Toolbar
4 – Now, in the right side , double click on locked and make sure the value is 1.
5 – Once you set the value to 1, close the registry and restart your PC.

This should help you resolve the problem.