In some recent updates, Windows has introduced a new information header for their Windows 10 Settings screen that highlights Windows Update status, Default browser choice, etc. But some users are in despise with this new Settings modification and want to disable/remove or at least hide it. In this article, we are going to show how to remove, disable or hide this Settings header very easily.

How to remove, disable or hide Windows 10 Settings Header
Follow these steps to get rid of this annoying banner in the Windows 10 Settings.
Method 1 – Use Mach2Tools or Vive Tool
You have to use either Mach2tools or the Vive tool to uninstall the Windows 10 Settings header, depending upon the version of Windows 10 you are using.
Step 1 – Check which Windows 10 version you are currently using
You have to know which version of Windows 10 you have. To do so, follow these easy steps.
1. First of all, press the Windows key+I keys together.
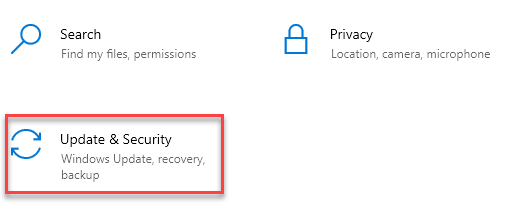
3. After that, click on “Update & Security” settings.

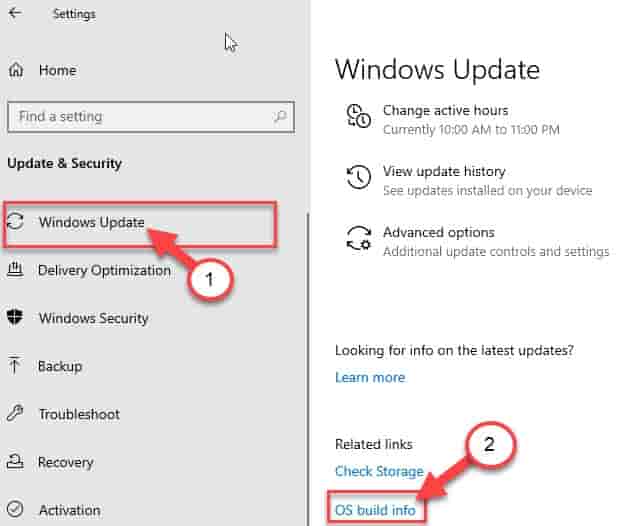
4. After that, click on the “Windows Update“.
5. Then what you need to do is to click on the “OS build info” option.

6. Check for the ‘Windows specifications‘.
7. Note down the Windows “Version“.

Once you have noted the exact version of your computer, proceed to the next step.
Step 2 – Use relevant tool according to your system
There are two options.
For Windows version 2004 or below –
You have to download Mach2tools to do this.
1. Go to the Mach2tools GitHub repository.
2. In the ‘Assests’ section, click on the “mach2_0.7.0.0_x64.zip” to download it.
[
*NOTE – If you are using a 32-bit system, click on “mach2_0.7.0.0_x86.zip” to download it.
]

3. Once you have downloaded it, double click on the “mach2_0.7.0.0_x64” zip file to open it.

It will open up in WinRAR.
4. Once it opens up, select all the contents in the zip file.
5. After that, right-click on the files and click on “Copy the files to the clipboard“.

Close the WinRAR.
6. Then, press the Windows key+R keys together.
7. Type “system32” there and hit Enter.

8. In the System32 folder, press the Ctrl+V buttons together to paste the files.
9. You will see a prompt warning about the denial of access. Just click on “Continue“.

Close the File Explorer after doing this.
10. Now, right-click on the Windows icon and click on “Windows PowerShell (Admin)“.

11. When the PowerShell opens up with the administrative rights, execute the command according to your requirements.
To display configured features run this code.
mach2 display
To Enable banner feature, execute this command –
mach2 enable 18299130
If you want to disable the banner feature, copy-paste this command and hit Enter.
mach2 disable 18299130
To set the default banner feature, run this line in the PowerShell terminal.
mach2 revert 18299130
To back all the modified features to the default state.
mach2 revert 0

After executing the command, you will see the message ‘OK‘ has appeared in the terminal.
Close the PowerShell window. Close and open the Settings window.
Restart your computer once.
You will see the banner feature is disabled in the Settings.
For Windows 10 v20H2 or newer
If you are using a Windows 10 v20H2 or of a newer build, try this approach.
1. Go to the ViveTool v0.2.1 on GitHub.
2. Now, here, in the ‘Assets’ section, click on the “ViVeTool-v0.2.1.zip” to download it.

3. Go to the downloads folder.
4. Then, double click on the “ViVeTool-v0.2.1” zipped file.

5. Select all the contents inside the zipped file.
6. Right-click on the selected files and click on “Copy files to clipboard“.

7. Now, open the File Explorer window.
8. Go to this directory in the File Explorer.
C:\Windows\System32
9. Here, right-click on the space, click on “Paste” to paste these files.

10. You may see a warning prompt. Click on “Continue“.

After that, close the File Explorer.
10. Then, right-click on the Windows icon and click on “Windows PowerShell (Admin)“.

11. Then, according to this guide, execute the command to get the effect you want on the banner settings.
To enable the banner feature, run this command.
vivetool addconfig 18299130 2
If you want to disable this annoying feature, type and hit Enter.
vivetool addconfig 18299130 1
To set the default banner feature, execute this command.
vivetool addconfig 18299130 0
To delete the banner feature, run this code.
vivetool delconfig 18299130 0
If you want to disable the rewards feature specifically, just copy-paste this command and hit Enter.
vivetool addconfig 19638787 1

Close the PowerShell terminal. Then, restart your computer.
That’s it! Open the Settings window and check further.
Additional Tips –
1. Some users have suggested using the F11 key from the keyboard can toggle the banner feature. Follow these steps –
a. Press the Windows key+I keys to open the Settings.
b. Then, press the F11 key. Check whether it toggles the banner or not.
Additionally, if you have an Fn key on your keyboard, you can press the Fn+F11 keys together.
2. Another alternative approach to this is using the Control Panel. All the settings can be accessed from Control Panel.
a. Click on the search box and type “Control Panel“.
b. Then, right-click on the “Control Panel” and click on “Pin to Start“.

You can use Control Panel from Start directly.