Wacom tablet users quite often come across this issue, where they see an error message “No device connected” on their Wacom Desktop Center. You may experience this error when your PC fails to identify and discover the Wacom tablet. This is a common issue with Wacom tablet users and sometimes it can be fixed by simply plugging your device to the correct port. So, you can change the ports and see if it’s working. Just make sure that the cable is connected in the correct manner and is working properly. It can can be fixed by reinstalling or rolling back drivers, or by fixing some hardware problems. We have compiled some possible solutions for the Wacom tablet’s “No device connected” issue. Let’s see how to fix it.
Method 1: By Restarting the Wacom Service
Step 1: Press the Win + R keys together on your keyboard to open the Run command box.
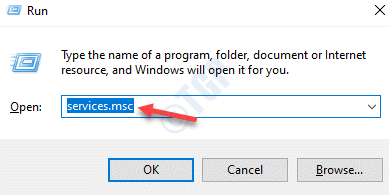
Step 2: In the Run command search field, type services.msc and hit Enter.

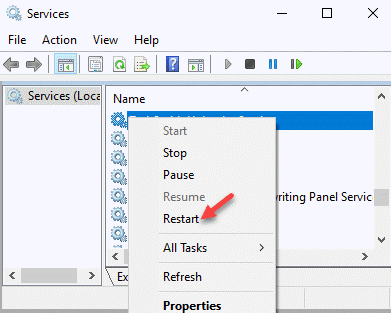
Step 3: This will open the Service manager. In the Services window, go to the right side and look for Wacom Professional Service or TabletServiceWacom.
Right-click on it and select Restart.

Now, try connecting your Wacom tablet and you should not see the error again.
Method 4: By Disabling Driver Signature Enforcement Feature
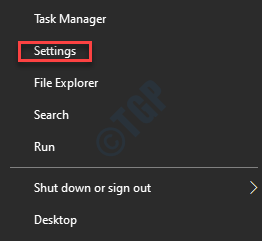
Step 1: Right-click on Start menu and select Settings.

Step 2: In the Settings app, select Update & Security.

Step 3: In the next window, go the left side of the pane and click on Recovery.

Step 4: Now, go to the right side of the window and under the Advanced start-up section, click on Restart now.

Step 5: It will restart your PC and take you to the Choose an option screen.
Here, select Troubleshoot.

Step 6: Now, in the Troubleshoot screen, click on Advanced options.

Step 7: Once you have reached the Advanced Boot Options screen, click on Startup Settings.

Step 8: Next, click on Restart.
As the system restarts, select the 7th option – Disable driver signature enforcement.

Step 3: As Windows restarts, right-click on Start menu and select Device Manager.

Step 4: In the Device Manager window, expand the Human Interface Devices, right-click on the device with an yellow triangle or exclamation mark next to it and select Update driver.

Step 5: Now, follow the on-screen instructions to complete installing the driver. Restart your PC and repeat the process for any other related device with an exclamation mark next to it.
The Error 52 and the “No Device Connected” issue should be gone now.
Method 2: Update/Re-install Wacom Drivers
Step 1: Right-click on Start menu and select Run to open the Run command window.

Step 2: Now, type devmgmt.msc in the Run command search box and hit Enter to open the Device Manager window.

Step 3: In the Device Manager window, expand the Human Interface Devices section.
Right-click on your Wacom Tablet device and select Uninstall device.

Step 4: In the Uninstall Device prompt, press the Uninstall button to confirm the action.
Step 5: Now, press the Win + R hotkey on your keyboard to open the Run command box.
Step 6: Now, type appwiz.cpl in the Run command search field and press Enter to open the Programs and Features window in the Control Panel.

Step 7: In the Programs and Features window, go to the right side of the pane and under Uninstall or change a program, find an application related to Wacom.
Make sure that you remove WebTablet FB Plugin 32 Bit and WebTablet FB Plugin 64 Bit.
Right-click on the application and select Uninstall.
*Note – If these applications are uninstalled properly, the C:\Program Files\tabletplugins\WacomIE.dll path should not exists anymore. However, still go to the File Explorer (press Win + E shortcut key) to double-check that the WacomIE.dll file has been completely removed from the C:\Program Files\tabletplugins path.

Repeat this for all or any application related to Wacom. Once all the related applications are uninstalled, move to the next step.
Step 8: Right-click on Start and select Run.

Step 9: Write cmd in the Run command search field and press the Ctrl + Shift + Enter keys together on your keyboard to open Command Prompt in elevated mode.

Step 10: Copy and paste the below command in the Command Prompt (admin) window and hit Enter:
mklink /j “C:\Program Files\Tablet” “C:\Program Files\Tablet”
*Note – in our case, the the default location for Program files is C drive, however, the location may differ for you, so simply replace the highlighted part with whatever drive is in your case.
Step 11: Now, visit the Walcom official website, download the latest drivers and save them to your preferred location.
Step 12: Now, press the Win + R keys together again on your keyboard to open the Run command search box.
In the Run command window, type devmgmt.msc and press OK.

Step 13: This will open the Device Manager window. Here, go to the Human Interface Devices section and expand it.
Now, look for the Wacom Tablet device in the list, right-click on it and select Update driver.

Step 14: Next, in the Update Drivers window that pops up, select the Browse my computers for drivers option.

Step 15: Now, browse to the location where you saved the downloaded latest drivers as shown in Step 11. Install them.
Now, restart your Wacom device and connect it again with your system. It should start working now.
*Note – Alternatively, you cam delete the tablet.dat and pen_tablet.dat files from anywhere on the hard disk. Here’s how to delete the files:
1. Press Win + E keys together on your keyboard to open the File Explorer.
Now, go to the View tab, click on the Show/hide option and check the box next to Hidden items to unveil any hidden files or folders.

2. Now, check for any Wacom files ending with tablet.dat and pen_tablet.dat, and delete them
3. Also check for wintab file in WINDOWS\SYSTEM32 and WINDOWS\SysWOW64 folders and remove them.
You can now proceed to update the driver through Device Manager as shown in Step 13 above.
Method 3: By Reinstalling the Visual C++ Redistributable Packages
Step 1: Click on the Microsoft’s official download link below to download and install the Visual C++ Redistributable for Visual Studio 2015:
https://www.microsoft.com/en-in/download/details.aspx?id=48145
Click on the Download button to start downloading the packages.

Step 2: Next, under Choose the download you want, select the .exe file based on your system architecture (32 bit or 64 bit).
*Note – to find out if your Windows 10 PC is 32 bit or 64 bit, refer to this article.

Step 3: Once the file is downloaded, save it in your preferred location.
Once the installation is over, reboot your PC and the problem should be resolved now.