The VPN Error 691 is one of the most common issues that troubles VPN users in Windows 10. The error message shows up while connecting to VPN and users are unable to access internet through the VPN.
There are various reasons that could lead to Error 691 to occur on your PC. When the VPN is unable to confirm the authenticity of the connection, you will get this error. You will also get this error if you are using a wrong User ID or Password to logon to VPN. Using a Public VPN Domain or a domain that isn’t correct or allowed could lead to this issue as well. At times, this error may also trouble you if the Network Security Settings are not right.
Whatever the issue be, here we take a look at some of the solutions that have been tried and tested by several users to fix VPN Error 691 in Windows 10.
Solution 1: Make sure to use Correct Login ID and Password
One of the main reasons why you may be getting the Error 691 in VPN could be wrong Login ID or Password. Make sure you are using the correct user ID and typing in the password correctly. Before logging in to VPN, use the view password option to see if the password is correct. It might be possible too that the Caps Lock is on, causing you to enter wrong password.
If you are not sure whether you are entering the correct password, go ahead and reset your password and login again.
If the error still shows up, try the next solution.
Solution 2: Remove .local extension from Domain name
When you login to VPN, along with entering your Username and Password, you also get a field to enter Domain name. Here, you can try to remove .local extension if it’s added with the Domain name. After removing the .local extension, try to login to VPN. If this doesn’t fix the issue, try the next solution.
Solution 3: Keep the Domain Name blank during VPN logon
If the above solution of removing the .local suffix did not work, here’s another thing that you can try. Go ahead and clear out the Domain name field from the VPN login screen and login with just your user ID and password. Were you able to login to VPN without getting the Error 691?
Solution 4: Enable Microsoft CHAP Version 2
Enabling Microsoft CHAP Version 2 in the VPN connection properties can help you get rid of this issue. Here is how to do it:
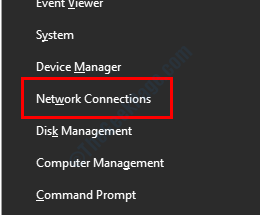
Step 1: Open the Windows menu by pressing the Win + X keys. In the menu, select the Network Connection option.

Step 2: A new window will open with the list of connections on your PC. Here, identify and make a right click on the VPN connection, then from the menu that opens, select the Properties option.

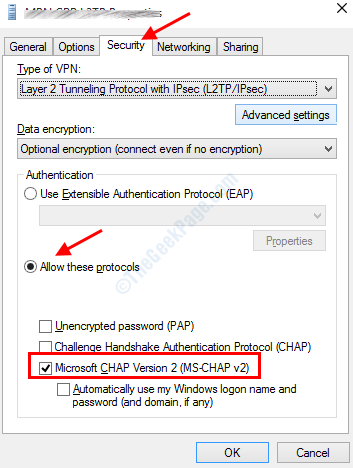
Step 3: When the Properties window, go to the Security tab. Here, make sure that the Allow these protocols option is selected, then select the Microsoft CHAP Version 2 (MS-CHAP v2). Select Ok to save the settings.

Once the settings have been save, see that the VPN Error 691 is still troubling you.
Solution 5: Disable “Include Windows Logon Domain” Option
Another change that you can make in the VPN Network Settings to fix the Error 691 issue is disable the Include Windows Logon Domain option. Let us checkout the steps:
Step 1: Select the Network Connections option from the Win + X menu.

Step 2: Make a right click on the VPN Network in the new window and select the Properties option.

Step 3: Go to the Options tab. There, under the Dialing options section, deselect the Include Windows logon domain option.

Now, click on Ok to save the settings. Exit the VPN properties window and check whether the VPN issue was fixed.
Solution 6: By Changing LAN Manager Parameters
Using the Group Policy Editor in Windows, you can make a couple of LAN Manager Parameter changes. This method has worked for various users facing the VPN Error 691 in Windows 10.
Step 1: Open group Policy Editor. For this, Press the Win + R keys, then in the Run box, type gpedit.msc and press the Enter key.

Step 2: The Group Policy Editor will open. Here, go to the left panel and navigate to the location mentioned below, then go to the right pane and double click on the Network security: LAN Manager authentication level option:
Computer Configuration > Windows Settings > Security Settings > Local Policies > Security Options

Step 3: A properties window will open. Here, click on the drop-down and select the Send LM & NTLM responses option. Click on Ok to save changes.

Step 4: Now, go back to the Group Policy Editor and double click on the Network Security: Minimum Session Security for NTLM SSP option available on the right pane.

Step 5: A new Properties window will open. Here, unselect the Require 128-bit encryption option and select the Require NTLMv2 session security option. Click on Ok to save the settings.

Once the changes have been made, restart your PC and see if the Error 691 was fixed.
Solution 8: By Updating the Network Driver
If the Network Device Driver in your PC is not up to date, you may face a number of issues, including VPN issues. You will need to make sure that the Network Driver is updated. Checkout the steps below:
Step 1: Press Win + X keys on your keyboard. From the menu, select the Device manager option.

Step 2: In the Device Manager window, expand the Network adapters device, then make a right click on the Wi Fi receiver driver and select the Update Driver Software option.

Step 3: A new window will open now. Here, select the Search automatically for updated driver software option. Now, the PC will begin a lookout for updated version of the network driver you are trying to update. If a newer version of the driver is found, you will be prompted about the same.

Follow the on-screen instructions to complete the update process. In order to successfully apply the driver update settings, restart your PC. After restarting the PC, you will be able to access internet through VPN.
Solution 9: Use resphone command for your VPN connection
Another method that worked for many users in order to fix VPN Error 691 in Windows 10 is the resphone command. You need to run this command in Command Prompt with Admin privileges. Follow the steps below:
Step 1: Press Win + X keys. The Windows menu will open; here select the Command Prompt (Admin) option.

Step 2: In the Command Prompt window that will open, type the following command and press the Enter key:
rasphone -d VPNname
Now, in the above command, replace the VPNname with the name of the VPN connection on your PC. You can open the Network Connections from the Win + X menu and look for the name of the VPN connection.
Once the command runs successfully, go ahead and checkout whether the VPN issue was fixed.
Solution 10: Check if another VPN Connection is Active
This solution is for those users who use more than 1 VPN on their PC. It might be possible that one of the VPNs is already running on your PC. When you try to run another VPN on top of the other, you can possibly get this error in your PC.
Make sure than only one VPN is active at a time. If you do not remember turning on any VPN after you switched on your PC, then it is possible that one of the VPNs can start on its own. In such case, do a clean boot on your PC. Doing so will ensure that only essential Windows services start as you turn on your PC. Try to connect to VPN now and see if you are getting the same error.
Solution :11 Re-register the VPN Connection
Windows 10 comes loaded with in-built VPN. If you are using the Windows VPN service, you might want to delete the VPN connection you are using and add it back again in the settings. Let us checkout how to do this:
Step 1: Open the Settings app in your PC. For this, press the Win + I buttons.
Step 2: In the Settings app, select the Network and Internet option.

Step 3: When the new window opens, go to the left pane and select the VPN option. Now, go to the right pane and select the VPN connection. From the options that will appear, select the Remove button.

Step 4: Once the VPN connection has been removed, select the Add a VPN Connection option. On the next window, fill up all the mandatory fields required to add the VPN connection back.

After the VPN connection is re-registered on your PC, see if the issue was fixed or not. You may even try to restart your PC before you try out the new VPN connection.
Closing Words
Although the above solutions are sufficient to fix VPN Error 691 in Windows 10, if you still aren’t able to get rid of the issue, do let us know in the comments and we will get back to you. We would also really appreciate it if you would let us know which of the solutions did the job for you.