Are you experiencing a Bluescreen error tagged with the stop code “HYPERVISOR ERROR“? As the Hyper-V feature gets used extensively to manage virtual machines on Windows 11, 10, these types of Hypervisor errors are not uncommon. So, we have assembled some of the easiest solutions to tackle this Hypervisor error in your Windows 11 device.
Fix 1 – Does the machine support Virtualization
Does your computer support the Virtualization feature? If it doesn’t support the feature, you can’t use the hypervisor-based virtual machines.
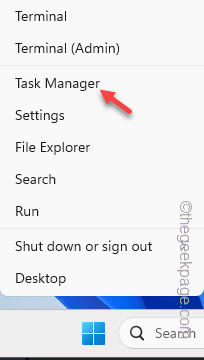
Step 1 – All you have to do is right-tap the Windows button and choose the “Task Manager” option to open the Task Manager.
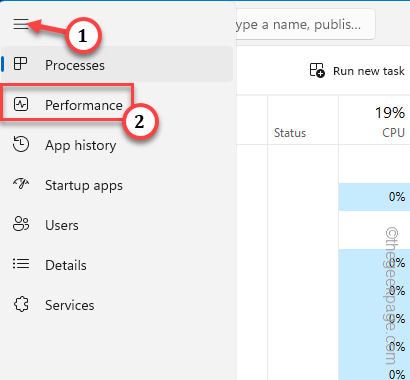
Step 2 – In the Task Manager page, tap the “≡” and click the “Performance” pane.
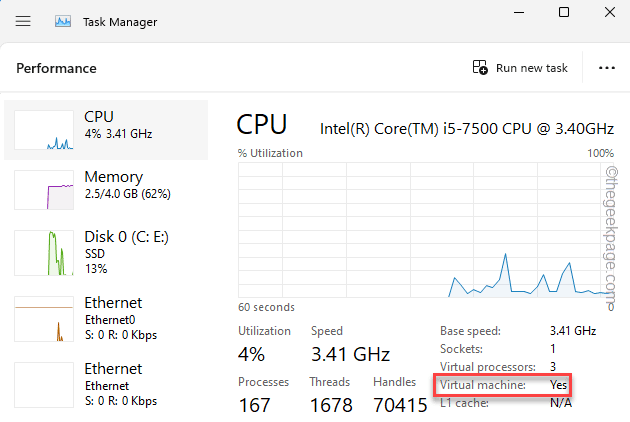
Step 3 – Look for the “Virtualization” or “Virtual machine” setting on the right-hand pane.
Step 4 – If it says “Disabled“, the virtualization feature is disabled on your system.
You have to enable the virtualization on your device and you can only do this from the BIOS page.
Step 5 – Go to the system Settings. Using the Win+I keys together, you can do that.
Step 6 – Tap the “System” pane.
Step 7 – Open the “Recovery” option to view that.
Step 8 – Find the “Advanced startup” menu and tap “Restart now” to restart the computer.
Your computer should boot into the RE mode.
Step 9 – Now, tap the “Troubleshoot” mode to access it.
Step 10 – Next, tap the “Advanced options” option.
Step 11 – Choose to open the “UEFI Firmware” on your computer.
Your computer will reboot and the BIOS page should load up.
Step 12 – Go to the “Advanced” pane as the BIOS page loads up.
Step 13 – Find the “Intel (R) Virtualization Technology” or any other setting related to the Virtualization and set it to the “Enabled” mode.
Save the changes in the BIOS and let the system start up automatically.
When you have logged in, try to create or run virtual machines and test it.
Fix 2 – Switch the hypervisor launch prompt
It would help if you used the terminal to control the hypervisor on your computer.
Step 1 – Just hit the Windows button once and type “command” in there.
Step 2 – Later, when you see the “Command Prompt” in the search results. Next, you have to tap “Run as administrator“.
Step 3 – Copy this line and input this in the terminal. Finally, hit the Enter key to switch the launch mode settings to automatic.
bcdedit /set hypervisorlaunchtype auto
After this, you may close the terminal.
Now, this won’t work until you have restarted the system. The hypervisor will be started up automatically.
Fix 3 – Reboot Hyper V services
The Hyper-V feature does depend on several other system services.
Step 1 – You can start by searching for “services“.
Step 2 – Then, tap “Services” to access that to open up the Services.
Step 3 – Locate the first Hyper-V feature (it is “Hyper-V Data Exchange Service“) in the list of services and double-tap that to access it.
Step 4 – If the service is running, tap “Stop” to stop the service. Wait for a few seconds.
Step 5 – Next, tap “Start” to start the service.
Step 6 – Run through all the Hyper-V services and restart those.
Finally, you can quit the Services page. Next, try to log into a virtual machine and see it for yourself.
Fix 4 – Disable the Hyper-V using a terminal
If you are using third-party virtualization software like Vitrix, VMWare, Hyper-V can come into conflict and cause the HYPERVISOR BSOD error.
Step 1 – To do this, you will need a terminal. So, press the Windows key and the R keys together.
Step 2 – Next, write down and press the Ctrl, Shift, and Enter keys at once.
cmd
Step 3 – Directly, paste the command and hit Enter to disable the Hyper-V feature.
dism.exe /Online /Disable-Feature:Microsoft-Hyper-V
Now, as you have disabled the Hyper-V, restart the system and try to use the other third-party applications.
If you can create and control other virtual machines using other virtual applications, continue to use it.
Step 4 – If you want to activate the hyper-V ever again, you can use this code just to do that.
dism.exe /Online /Enable-Feature:Microsoft-Hyper-V /All
Check if this solves the HYPERVISOR Blue Screen of Death issue.
Fix 5 – Update the Hyper-V drivers
You should update the Hyper-V device drivers on your machine to their latest version and then, test.
Step 1 – Just right-click the Windows button and tap “Device Manager“.
Step 2 – Once you open the Device Manager page, expand the “System devices” device.
Step 3 – Next, right-click the “Microsoft Hyper-V Virtualization Infrastructure Driver” driver and click “Update driver“.
Step 4 – Tap the first option “Search automatically for drivers” on the following page.
If there is an update pending for the device driver, Windows will automatically update this Hyper-V-related driver.


