Fatal error in a Windows 10 PC usually means a Blue Screen of Death (BSOD) which can force the entire system to shut down all of a sudden. One such fatal error is the VIDEO DXGKRNL FATAL error, that has started showing up off-late after the latest Windows 10 1809 update and quite frequently. So, what does the error mean?
Apparently, the error arises due to a violation in the Microsoft DirectX graphics kernel subsystem and the reason for the violation could be due to a faulty driver (mostly the graphics drivers) forcing it to break down the graphics. Besides, to check if this issue is related to any external device connected to your PC, you can try removing these devices and restart your PC. If it’s a driver related issue, the issue should be resolved.
However, if it does not, then you may try the below methods to fix the Video Dxgkrn Fatal_Error In your Windows 10 system.
*Note – If your system is restarting very frequently, not allowing you to log in and check which is the problematic driver, you may boot your system into safe mode. This will help start your system using the default drivers allowing you to continue with the fix.
Method 1: Check if the Windows is Updated to the Latest Version
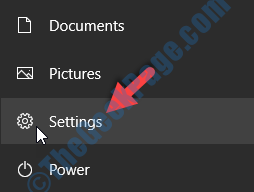
Step 1: Go to Start, click on it and select Settings from the menu.

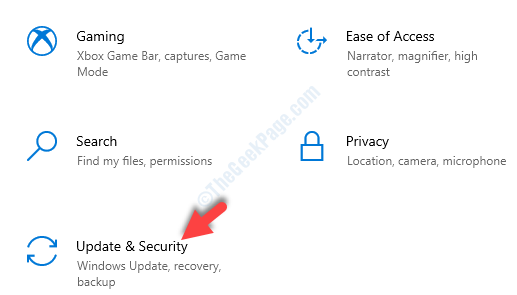
Step 2: In the Settings window, click on Update & Security.

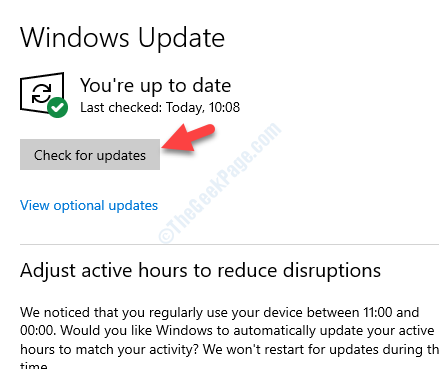
Step 3: It takes you straight to the Windows Update section. On the right side of the pane, press the Check for updates button.

Step 4: Windows will download and install any updates available, automatically. You can then restart your PC for the updates to be applied.
If this method does not help get rid of the error, follow the next method.
Method 2: By Updating/Reinstalling any Outdated Drivers
Since the BSoD or the Blue Screen of Death could be due to outdated graphics drivers, you would need to update those drivers or reinstall the latest version to fix the issue. Let’s see how.
Solution 1: By Updating the Display Driver
Step 1: Right-click on Start and select Device Manager from the right-click menu.

Step 2: In the Device Manager window, go to Display adapters and expand it.
Then, right click on the graphics driver below it and select Update driver from the menu.

Step 3: Next, click on Search automatically for drivers.

Step 4: It will start looking up for driver updates and if available, it will automatically download the update and even install it.
But, if there’s no available update, it will display a message “The best drivers for you are already installed“. Press Close to exit.
You can now restart your computer and the error should be gone. But, if you are still facing the issue, follow the below solution.
Solution 2: By Reinstalling the Current display Driver
Step 1: Right-click on Start and select Device Manager from the right-click menu.

Step 2: In the Device Manager window, go to Display adapters and expand it.
Now, right-click on the display driver below it and select Uninstall device from the menu.

Step 3: Click Yes in the prompt to continue with the uninstallation. Once complete, restart your PC. As you login, Windows will automatically install the original display driver.
If it doesn’t, then go to Device Manager as shown in the Step 1 and click on Action. Now, click on Scan for hardware changes. This will look up for the original display driver and install it.

Step 4: Then, navigate to Display adapters section and expand it.
Now, right click on the graphics driver and select Update driver from the menu.

Step 3: In the next window, select Browse my computer for drivers.

Step 4: In the next window, under Search for drivers in this location field, set the driver path that you downloaded from the official website.
Click Next.

Step 5: Now, the display driver will install and once that’s done, reboot your PC for the changes to be effective.
On restart, you should not experience the VIDEO_DXGKRNL_FATAL_ERROR anymore. But, if the problem persists, you may follow the next method.
Method 3: By Turning Off Fast Startup
The fast startup feature is known to considerably reduce startup time thus, making Windows perform faster. However, some times this feature can cause the fatal error and hence, turning this off can be the solution. Let’s see how.
Step 1: Go to Start and type Control Panel in the search box.

Step 2: Left-click on the result to open the Control Panel window.

Step 3: In the Control Panel window, go to View by and set it to Large icons. Then, look for Power Options and click to open.

Step 4: Next, on the left side of the pane, select Choose what the power buttons do.

Step 5: In the System Settings window, click on Change settings that are currently available.

Step 6: In the next window, under the Shut-down settings section, uncheck the box next to Turn on fast start-up (recommended).
Click on Save changes to save and exit.

Now, restart your computer and you should not see the fatal error anymore.
But, if you still see the error, then you can follow the below method.
Method 4: Using Command Prompt
You can try and repair any faulty Windows files by running the DISM/SFC command that may help recover any missing files or repair them.
Solution 1: By Running DISM Restore Health Command
Step 1: Go to the Windows search bar and type cmd.

Step 2: Right-click on the result and select Run as administrator to open Command Prompt in admin mode.

Step 3: In the Command Prompt (admin) window, execute the below command and hit Enter:
DISM /Online /Cleanup-Image /RestoreHealth

Step 4: Now, let the process complete as it takes some time. Once completed, run the 2nd command as shown below and hit Enter:
sfc /scannow

This process also takes a while, so have patience till it completes checking for any corrupt files and fixing them. Once done, you can restart your computer and the Video Dxgkrn Fatal_Error should be gone now.
However, if the problem still persists, you can try following the next method.
Method 5: By Uninstalling any Recently Installed Program
It may be possible that some program you installed recently is causing the issue, so, the best option would be to uninstall it and check if it’s working.
Step 1: Go to Start and type Control Panel in the search box.

Step 2: Left-click on the result to open the Control Panel window.

Step 3: In the Control Panel window, navigate to View by field and select Large icons from the drop-down. Now, select Programs and Features from the list.

Step 4: Next, go to the right side of the pane and under Uninstall or change a program, right-click on the program that you recently installed and and select Uninstall from the menu.

Now, wait for the program to be uninstalled and once completed, you can restart your system and the BSoD error should be gone now.
While these methods should most certainly resolve the issue, if the problem still persists, you can try running a virus scan using a trusted antivirus software that can detect malware and virus attacks efficiently. If the error still comes up, then the last and the best solution would be to perform a system restore. This can help your Windows system settings to go back to a previous state when the system was working fine.