Many Windows 10 users have reported that they are seeing the uninstalled applications in the windows search even when the apps are successfully removed from the system. If you are seeing this bug in your system, there is nothing to worry about. We have compiled some working fixes that will help you get rid of the uninstalled application from the windows search.
Fix 1: Delete the folder Microsoft Windows Cortana
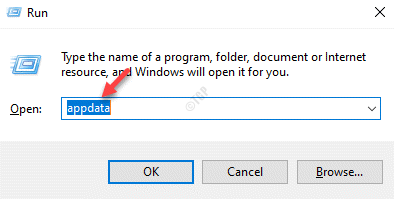
Step 1: Open the Run Terminal using the keys Windows+R
Step 2: Type appdata and hit Enter

Step 4: In the window that opens, double click on Local
Step 5: Within the Local folder, scroll down and locate the folder name Packages and double-click on it.
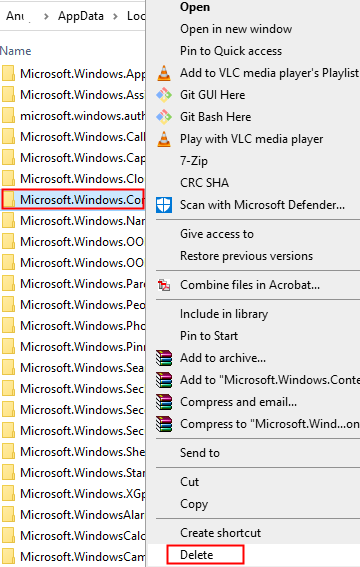
Step 6: Within the Packages folder, delete the folder named Microsoft.Windows.Cortana_cw5n1h2txyewy

NOTE: If you are not able to delete the folder, then get into the folder and try to delete as many sub-folders as possible.
Step 7: Logout from your account and log in again.
Check if this helps.
Fix 2: Delete the Application from the Programs Folder
Step 1: Click on the Start button(one with Window Symbol) on the taskbar
Step 2: Locate the application and double-click on it.
Step 3: Try and see if you can delete it. If yes, then this solve your problem
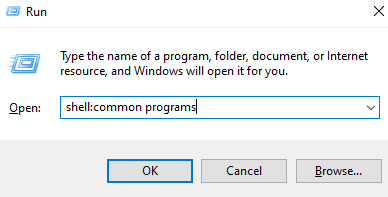
Step 4: If you are not able to delete the shortcut from here then open the Run Dialog
Step 5: Type shell:common programs and press enter

Step 6: In the window that opens, locate the application and delete it

Step 7: If this does not help, then open the run dialog again.
Step 8: Type shell:programs and hit Enter

Step 9: In the opening window, locate the application and delete the folder

Hopefully, this should help you fix the issue.
Fix 3: Create a new local administrator account
Step 1: Create a new local user account. For Details Refer to the link How to Create a New Local User Account in Windows 10
Step 2: Once the account is created, click on the Account that was just created. Let’s say the account was created as Test
Step 3: Now, click on the Change account type button

Step 4: In the Change account type window that appears, choose Administrator from the Account Type drop-down and click on the OK button.

Step 5: Logout from the main account and log in from the Test account.
Step 6: Open run using Windows and R from your keyboard
Step 7 – Now, type appdata in it and click OK.

Now, go to folders named below
- Local
- Packages
- Microsoft.Windows.Search_cw5n1h2txyewy
- Settings
Step 7: Delete all the files from this folder
Step 8: Restart the system
Step 9: Login from the main account and check if the issue has been resolved.
Fix 4: Run the Search and Indexing Troubleshooter
Step 1: Open the Run dialog by pressing the Shortcut keys Windows+r
Step 2: In the appearing window, type the command ms-settings:troubleshoot and just click on OK

Step 3: In the Settings–> Update & Security –> Troubleshoot window that appears, Click on Additional troubleshooters

Step 4: Scroll down and press the on Search and Indexing
Step 5: Now, click on the Run the troubleshooter button

Step 6: Troubleshooter runs and detects the problem. Follow the on-screen instructions and solve the problem
Fix 5: Restart Windows Search
Step 1: Right-click anywhere on the taskbar and choose Task Manager from the Context Menu
Step 2: Go to the Details tab
Step 3: Under the Name column, scroll down and right-click on SearchUI.exe
Step 4: Choose End Task from the context menu

Step 5: In the confirmation dialog that shows up, click on End Process
Step 6: Restart the system
Fix 6: Reset Windows Search
Step 1: Open the Run Dialog using Windows+R
Step 2: Type ms-settings:about and hit Enter

Step 3: In the Settings > System > About window that opens, scroll down and check the OS build under the Windows specifications section
If the OS build version is 1809 or earlier follow the below steps. ( For OS build 1903 and above, move to step 8)
Step 4: In the windows search bar, type Cortana
Step 5: Now, click on Cortana on the left-hand side
Step 6: Then, Click on App Settings from the right-hand side

Step 7: From the window that opens, scroll down and click on the Reset button as shown below

If the OS build version is 1903 and above follow the below steps
Step 8: Visit the link Reset Windows Search PowerShell script
Step 9: Scroll down and click on the Download button

Step 10: Now, right-click on the downloaded script and choose Run with PowerShell

Step 11: In the UAC prompt that shows up, just click on Yes
Step 12: In most cases the script runs successfully. In case you see any error while running the script, follow the below steps and then try running the script
Step 13: Open Run Dialog again
Step 14: Type powershell and hit Enter

Step 15: Copy-paste the below command and hit Enter
Get-ExecutionPolicy
If you see that the value is Restricted, then run the below command:
Set-ExecutionPolicy -Scope CurrentUser -ExecutionPolicy Unrestricted
Step 16: You will see a warning message, press the Y button from the keyboard.

Step 17: Now, run the PowerShell script again (Steps 10, 11)
Step 18: Once, the script has been executed successfully, revert back the execution policy with the below command
Set-ExecutionPolicy -Scope CurrentUser -ExecutionPolicy Restricted
Check if this helps.
Fix 7: Run DISM and SFC Scan
NOTE: Make sure you have a steady Internet connection before proceeding
Step 1: Open Run Dialog. Use the shortcut Window+r
Step 2: In the Dialog, type cmd and press Ctrl+Shift+Enter

Step 3: In the command prompt window that opens, Enter the following commands. Please don’t forget to hit Enter after each command.
Dism /Online /Cleanup-Image /ScanHealth

Dism /Online /Cleanup-Image /RestoreHealth

sfc /SCANNOW
Step 4: Restart your system
Check if this helps. If not try the next fix.
Fix 8: Repair all the Windows Apps
Step 1: Pressing the keys Windows and R, open Run Dialog
Step 2: Type powershell and press the keys Ctrl+Shift+Enter

Step 3: In the window that opens enter the below commands one after the other. Make sure to hit Enter after very command.
Get-AppxPackage Microsoft.Windows.ShellExperienceHost | foreach {Add-AppxPackage -register "$($_.InstallLocation)\appxmanifest.xml" -DisableDevelopmentMode}

Get-AppXPackage | Foreach {Add-AppxPackage -DisableDevelopmentMode -Register "$($_.InstallLocation)\AppXManifest.xml"}
NOTE: If you see any red errors, ignore them.
Step 4: Restart the system
Fix 9: Try Repair Upgrade
If you see that none of the above fixes worked, try repair upgrading your PC.
Step 1: Visit this page and download the Windows 10 Installation Media tool from the link
Step 2: Once the download is complete, right-click on the file and choose Run as Administrator

Step 3: In the Windows 10 Setup Window, you will see a license agreement, click on the Accept button

Step 4: In the window, when you are asked What do you want to do, tick on Upgrade this PC now and click on the Next button

Step 5: Follow the onscreen instructions in the upcoming wizards
Step 6: In the Ready to install window, click on the Change what to keep the option

Step 7: Tick on the Keep personal files and apps and press the Next button

Step 8: Finally, in the upcoming wizard window, click on the Install button and complete the Upgrade process
Step 9: Restart the system
That’s All
We hope this article has been informative. Thank you for Reading
Kindly comment and let us know which of the above fixes helped you solve the issue.