Are you seeing the Direct3D11 Error 0X087A0001 (Can’t Set Video Mode) error on your PC? Many users have reported that they are seeing this error when running certain resource-demanding games or various benchmarking tools. Basically, this is a runtime error, that pops up on the screen anytime Direct3D is run.
This particular issue can occur due to varied underlying scenarios that trigger this error code. Some of the potential reasons for it are as below:
- Unstable/Outdated GPU driver
- Windows 10 optimization parameters not used
- The application doesn’t support the system’s color mode
- High DPI scaling is not supported by the application
- Unsupported resolution
- Game incompatibility with Windows
Based on the reasons causing the error, we have listed the troubleshooting strategies below in this article that the users have used to successfully fix this error.
Fix 1 – Enable Reduced Color Mode
Some users have noticed that a game that was not designed to support 32-bit color depth ( which is forced by default in Windows 10) is one of the reasons for triggering the Direct3D11 error. Users dealing with this issue managed to fix it by changing the properties screen of the executable that is used to launch the game.
1. Open File Explorer. Go to the location that contains the executable to launch the game.
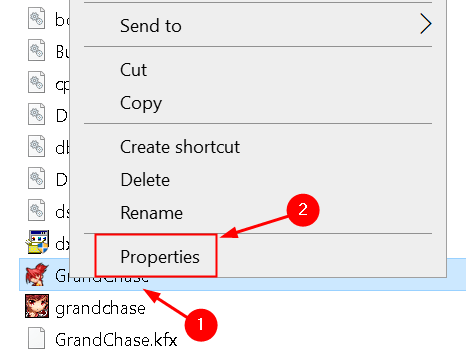
2. Right-click on the executable and select Properties.

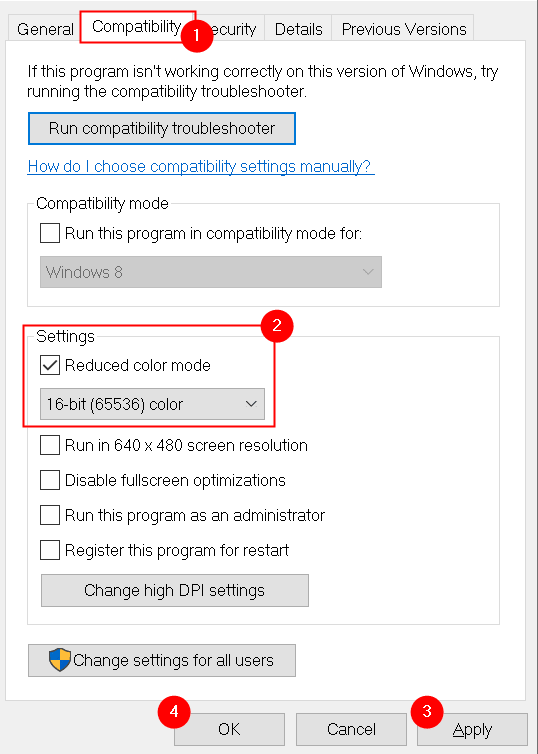
3. Select the Compatibility tab.
4. Check the box next to Reduced color mode under Settings.
5. In the dropdown box set the value to 16 bits.
6. Click on Apply to confirm and save the changes. Launch the game again and check if the issue is fixed.

Note: Newer applications do not support the modification of default color mode, in that case, the option will be greyed out.
Fix 2 – Override High DPI Scaling
If reducing the color bit mode did not help or the game architecture did not allow to make changes, then you should try to modify the high DPI settings of the game.
1. Locate the game’s executable using File Explorer.
2. Right-click on it and choose Properties.

3. Go to the Compatibility tab in the Properties window.
4. Click on Change high DPI settings button.

5. Under the High DPI scaling override tab, check the box next to Override high DPI scaling behavior.
6. In the dropdown menu for Scaling performed by: select System(Enhanced) and click on OK.

7. Click on Apply to save the changes. Launch the application and see if the problem is solved.
Fix 3 – Modify Application Resolution
There have been cases reported by users that this particular Direct3D11 error occurs when the application was not designed to support the resolution that the system is currently configured to run the game on. They have been successful in resolving this issue after modifying the behavior of the app’s executable so that at startup it is forced to open with the lowest resolution.
1. Using File Explorer, find the location where the application is installed.
2. Right-click on the app’s executable and click on Properties.

3. In the Properties window, go to the Compatibility tab.
4. Check the box associated with Run in 640 x 480 screen resolution.

5. Click on Apply to save changes.
6. Open the application and check if the issue is now solved.
Fix 4 – Run Program in Compatibility Mode
If none of the above fixes helped you in resolving the Error 0X087A0001, you should consider the game’s old age as a problem due to the incompatibility with Windows 10. Changing the perceived Windows version on which the game is running has fixed the issue for some users.
1. Right-click on your game’s executable and select Properties.
2. Move to the Compatibility tab.
3. In the Compatibility mode, check the box next to Run this program in compatibility mode for:.
4. Once you check the above box, it will show a list of Windows versions, select Windows 95 in that list.

5. Click on Apply to confirm your changes.
6. Launch the game and see if the error code is fixed.
Fix 5 – Install the Latest GPU Driver Version
According to a lot of users, the issue is caused by either an outdated graphics card driver or an unstable GPU driver. In most cases, they have been able to resolve the issue by reinstalling GPU drivers that are been used currently.
The steps differ based on your GPU manufacturer. Here we have listed the steps for reinstalling AMD and NVIDIA graphic cards.
A . Reinstalling GPU drivers on NVIDIA
1. Press Windows + R to open Run. Type appwiz.cpl to open Programs and Features.

2. Now click on the Publisher tab to order the list of programs based on their publisher.
3. Look for entries published by NVIDIA Corporation. Select one item at a time and click on Uninstall button at the top.

4. Wait for the uninstallation process to complete.
5. Once every NVIDIA driver is uninstalled, reboot and wait for the next startup to complete.
6. Visit the NVIDIA GeForce download page and click on Download Now button to install the GeForce Experience.

7. Once you have installed GeForce Experience, sign in with an account and install the recommended drivers from the Drivers page.

8. After all the recommended drivers are installed, reboot your system. Launch the game previously throwing the Error 0X087A0001 and check if it is resolved now.
B. Reinstalling GPU drivers for AMD
1. Go to the download page for AMD Cleanup Utility and download the latest version.
2. Once downloaded, double-click on the executable and click on Yes to run the utility in safe mode and uninstall the AMD drivers.

Note: This utility removes the installed AMD drivers, registry entries, and driver store signatures completely from the system reducing the work of searching and uninstalling every driver file.
3. Click on OK at the second prompt to start the AMD cleanup process. Now the utility will run in the background. During this operation, your display may flicker or turn black for a few seconds as the display components are being removed.

4. Click on Finish on the prompt that indicated completion of this process.

5. Reboot your system manually if you are not prompted to do so by the utility.

6. Once the system startups after reboot, visit the download page of the Auto-Detect GPU page.
7. Go to the Auto-Detect and Install Radeon Graphics Drivers and Ryzen Chipset for Windows and click on the Download Now button.

8. Double-click on the downloaded executable and follow the instructions to install Radeon Adrenalin.
9. Once installed, the utility will automatically launch itself to detect the installed AMD graphics device and OS.
10. Install both the Recommended and Optional driver packages that are displayed after the tool detects the system OS and drivers.
11. Accept the EULA after reviewing the terms and conditions and click on Install.
12. Restart your PC after every needed driver is installed. Launch the game and check if the issue is resolved now.
Fix 6 – Launch the Game through the Launcher
If the above fix did not work for you, then you need to ensure that you launch the game through the launcher from where you purchased the game (for example, Steam, GoG, Origin, Epic Games, etc.).
This is important as the launcher makes the game renderable on Windows 10 using a series of parameters that stabilizes the game for the Windows version.
1. Open Steam, or GoG Galaxy, or Epic Games.
2. Launch the game that triggered the error via the Library menu of your launcher.

3. Check if the problem is now resolved.
If you still see the error after launching the game through the launcher, move to the next fix below.
Thanks for reading.
We hope this article might have helped you to clear the Direct3D11 error and continue playing the legacy games without any interruption. Comment and let us know the fix that worked for you.