If you are here to know how to turn on or turn off Microphone in your Windows 11 PC, we are here to guide you.
The “Microphone” in Windows is a basic audio input device that can help communicate and record sound. You can use this device with any application that supports recording from an audio input device. In most cases, you don’t have to configure anything for it to work automatically—most applications will just automatically pick up the default recording device with no customization necessary.
But, for some apps you may need to enable the Microphone individually even if the Microphone access is turned on for all apps. It could also be possible that the Microphone got disabled accidentally or due to some glitch causing issues while communicating with your team online and that can be really frustrating. Also, sometimes, you may need to disable the Microphone access for some apps individually if they are causing any disturbance.
However, with the changes in features and settings in Windows 11, users may find it challenging to enable or disable the Microphone access on their PCs. Therefore, whatever may be the reason, we are here to guide you on how to turn on or turn off Microphone access in Windows 11. There are a couple of ways you can, so let’s see how:
Method 1: Enable/Disable Microphone Access Through Privacy Settings
This method allows you to enable or disable the microphone access on your Windows 11 PC through the Privacy settings. Follow the below instructions to proceed:
Step 1: Press the Win + I keys simultaneously on your keyboard to launch the Settings app.
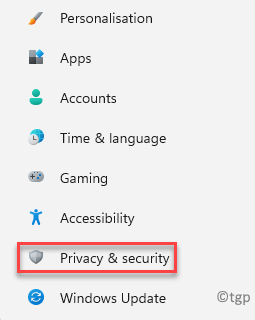
Step 2: In the Settings window, click on Privacy & security on the left side.
Step 3: Now, navigate to the right side, scroll down and under the App permissions section, click on Microphone.
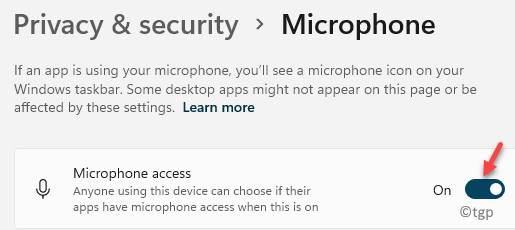
Step 4: Next, in the Microphone settings screen, go to Microphone access and move the slider to the right to enable it.
*Note – To disable the Microphone, move the slider the left.
Step 5: Now, go to Let apps access your microphone option and move the toggle to the right to enable it for all apps to have microphone access.
Step 6: You can also turn on or turn off microphone access for individual apps in the list.
For example, I wanted to disable the microphone access for the Xbox Game Bar, so I moved the toggle to the left and only that specific app was disabled.
Now, you have successfully enabled or disabled Microphone access for all apps or individual apps.
Method 2: Set Default Microphone Through Sound Settings
You may also need to check if the Microphone is set as default, because, if not set as default, it can cause issues. Let’s see how to set default microphone through sound settings:
Step 1: Go to Start, right-click on it and click on Settings.
This will open the Settings app.
Step 2: In the Settings window, go to the left side of the pane and click on the System option.
Step 3: Now, navigate to the right side of the window and click on Sound.
Step 4: Next, in the Sound settings window, on the right side, scroll down and under the Input section, click on the drop-down next to Choose a device for speaking or recording and select Microphone.
The microphone on your Windows 11 PC is now set to default and this will allow microphone access to all apps.
Method 3: Enable/Disable Microphone Through Sound Settings
This method allows you to turn on or turn off the microphone audio through the Sound settings. Here’s how it may help you to fix any microphone audio issues:
Step 1: Press the Win + I keys to open the Settings app.
Step 2: In the Settings window, click on System on the left side of the pane.
Step 3: Now, navigate to the right side of the window and click on Sound.
Step 4: Next, in the Sound settings window, on the right side, scroll down and under the Input section, click on Microphone.
Step 5: In the next window, go to the right side and in the Properties screen go to the General section.
Here, select Allow from the drop-down next to Audio to enable the microphone access.
*Note – You can also select Don’t allow from the drop-down next to Audio to disable the microphone access.
The microphone access on your Windows 11 PC is now successfully enabled or disabled as per your requirement.
Method 4: Enable/Disable Desktop Apps to Access your Microphone
While you are allowed to select which Windows apps should have access to the microphone on your Windows 11 PC, you can also control the microphone access for the Windows desktop apps. Let’s see how:
Step 1: Right-click on Start and select Settings from the context menu.
Step 2: In the Settings window, on the left side, select Privacy & security.
Step 3: Next, travel to the right side of the window and click on Microphone under the App permissions section.
Step 4: Now, in the next screen, scroll down to reach the Let desktop apps access your microphone option.
Move the slider to the left to disable or to the right to enable this option.
Now, all your desktop apps can have access to your microphone.
Method 5: Enable/Disable Microphone Through Device Manager
Enabling the Microphone through the device manager is one of the quickest way to resolve the issue, however, sometimes it may not work based on your microphone settings. However, you can try enabling the microphone voa device manager once and check if it helps fix the issue. Let’s see how:
Step 1: Press the Win + R keys together on your keyboard to launch the Run command window.
Step 2: In the Run command window, type devmgmt.msc in the search bar and hit Enter to open the Device Manager window.
Step 3: In the Device Manager window, expand the Audio inputs and outputs section.
Here, right-click on the Microphone and select Disable device.
Now, close the device manager window, restart your PC and the changes should be effective.
*Note – Follow the Steps 1 and 2, and then right-click on the Microphone and select Enable device to turn off the Microphone. restart your PC for the changes to be applied.
Method 6: Enable/Disable Microphone Through Sound Properties
Another easiest method to enable or disable the microphone access directly is through the Sound control panel. Here’s a shortcut way to turn on or turn off the microphone access on your Windows PC:
Step 1: Go to Start, right-click on it and select Run to open the Run command window.
Step 2: In the search field, type mmsys.cpl and press OK to open the Sound properties window.
Step 3: In the Sound properties dialogue box, select the Recording tab, right-click on Microphone and select Disable if you want to disable the Microphone.
*Note – Follow the Steps 1 and 2, and then right-click on the Microphone and select Enable to turn on the Microphone.
Method 7: Enable/Disable Microphone Through Registry Editor
If none of the above method works, you can try enabling or disabling the microphone access on your PC by editing the registry editor. Here’s how:
*Note – Before you proceed to make any changes to the Registry Editor, make sure you create a backup of the registry data, so that, in case of any data loss, it can be recovered easily.
Step 1: Press the Win + R shortcut keys on your keyboard to open the Run command box.
Step 2: In the Run command search bar, type regedit and hit Enter to open the Registry Editor window.
Step 3: In the Registry Editor window, navigate to the below path:
HKEY_LOCAL_MACHINE\SOFTWARE\Microsoft\Windows\CurrentVersion\MMDevices\Audio\Capture
Next, click on the Capture folder to expand the section.
Step 4: The Capture folder has a list of subkeys with GUIDs.
Now, double-click on each subkey and select its Properties folder.
Next, go to the right side of the window and check for any of the keywords (under the Data column) – HDAUDIO, IDT HighDefinition Audio CODEC.
Step 5: Repeat Step 4 for all the subkeys using trial and error method, till you find the description and name of the microphone you want to enable or disable.
Step 6: Once, you have found the correct subkey of your microphone, select the subkey folder on the left.
Now, navigate to the right side and double-click on the DWORD value DeviceState.
Step 7: Next, in the Edit DWORD Value dialogue box, change the Value data field to 10000001 and this will turn off the microphone.
Press OK to save the changes and exit.
*Note – To enable the Microphone access, set the Value data field to 1 and press OK.
You should now be able to enable or disable your microphone access on your Windows 11 PC.


