When Windows goes into the Sleep mode or Hibernate, it always turn off the connected peripherals to conserve power and battery. The users can take control of this automatic sleep setting from the Device Manager. But, in some cases, you may see the “Allow computer to turn this device to save power” is greyed out in there. Don’t worry. There is a definite solution to problem. So, stick to these fixes to quickly fix the issue.
Fix 1 – Alter the PnPCapabilities key
There is a definite solution to this problem and this is it. You have to toggle the PnPCapabilities key for the particular Hardware ID.
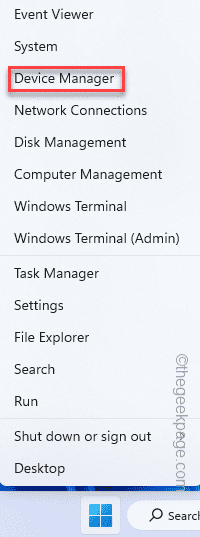
Step 1 – You have to know the actual driver ID of the hardware. So, use the Windows+X keys together.
Step 2 – Then, you can tap the “Device Manager” settings to access that.
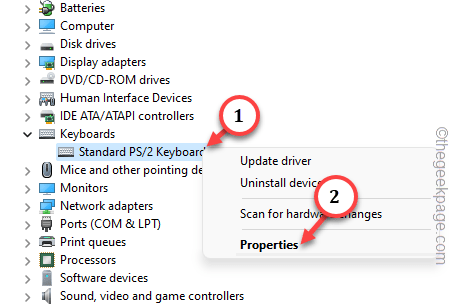
Step 3 – After getting into the Device Manager window, expand and reach the problematic device driver.
Step 4 – Next, right-tap that driver and tap “Properties“.
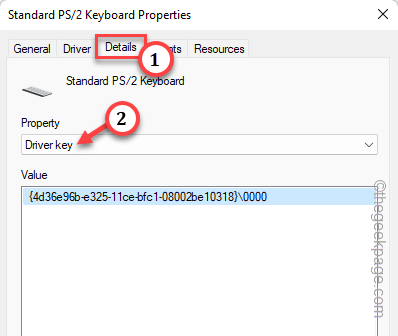
Step 5 – On the driver Properties page, go to the “Details” tab.
Step 6 – Next, choose the “Driver key” from the drop-down list.
This will show you the Driver key for that particular hardware.
Step 7 – Right-click that same driver key from there and tap “Copy” to copy the driver key from there.
Close the Properties window now.
STEP 2 – Using Registry Editor
Step 1 – Just tap the Windows key gently and begin to write “regedit“.
Step 2 – Then, open the “Registry Editor” in the search result.
Step 3 – The first thing you should do here is to create a system registry backup. To do that, you can go this way –
File > Export
Give the backup a name and store it on your system.
Step 4 – Next to creating the backup, follow this path –
HKEY_LOCAL_MACHINE\SYSTEM\CurrentControlSet\Control\Class\
Step 5 – After this, paste that copied Driver key in the address bar and hit Enter.
This will take you to the specific location of the Driver key.
Step 6 – On right-hand side of the pane, look whether you can find the “PnPCapabilities” D-Word value.
Step 7 – If you can’t find that value, right-tap on the space and choose “New>” and “DWORD (32-bit) Value” to create a new value.
Step 8 – Rename the value to “PnPCapabilities“.
Step 9 – Then, double-tap the “PnPCapabilities” value to edit that.
Step 10 – Put “0” in the box under the Value data: box.
Step 11 – Tap “OK” to save the change.
Once you have created this PnPCapabilities value, quit the Registry Editor.
Then, restart your computer. Now, you can take control over the sleep function as the ‘Allow computer to turn this device to save power‘ won’t be greyed out anymore.
NOTE – If you are having this problem with other device drivers as well, follow the same steps on the that driver as well.
Fix 2 – Run the Hardware & Device Troubleshooter
If this is a hardware fault. So, you can try to run the Hardware and Device troubleshooter.
Step 1 – Use the ⊞ Win+R keys to bring up the Run panel.
Step 2 – Next, copy-paste this. Finally, click “OK“.
msdt.exe -id DeviceDiagnostic
Step 3 – To start the Device Diagnostics, tap “Next“.
Windows will automatically analyze the problem with the hardware device drivers and recommend fixes accordingly.
Step 4 – Tap “Apply this fix” when the troubleshooter recommends a solution.
After the device restarts, you can take the control of the sleep function of the drive.
Fix 3 – Uninstall the particular driver
Uninstall that driver from your system and restart your computer.
Step 1 – Search for “device manager” from the search box.
Step 2 – Next, tap “Device Manager” to access it.
Step 3 – Simply find out the affected device driver in the same Device Manager window.
Step 4 – Then, right-click that specific driver and tap “Uninstall driver“.
Step 5 – If a warning message shows up, click “Uninstall“.
This way, uninstall the affected driver from your computer.
Just restart the computer after uninstalling the driver. Windows will reinstall when the system finally reboots.
Fix 4 – Try to update the faulty driver
USB drivers does receive updates on your device. So, try to update the faulty driver.
Step 1 – Just right-tap the Windows icon and tap “Device Manager“.
Step 2 – Go to the problematic device driver. So, right-tap that specific device driver and tap “Update driver“.
Step 3 – Opt for the “Search for automatically for drivers” option.
If Windows can’t detect the latest driver for that specific device driver, it will show you this message –
The best drivers for your device are already installed.
Step 4 – Tap “Search for updated drivers on Windows Update“.
This will take you to the Windows Update page.
Now, tap the “Check for updates” option once to check for any pending updates and install those on your computer.
Sometimes, these USB driver updates get delivered through the Optional updates channel. So, don’t forget to take a look at there as well –
1. On the Windows Update page, go this way –
Advanced options > Optional updates > Driver Updates
2. Check whether you can find any USB related updates there. Tick the driver update and tap “Download & install” to download and install the updates directly on your computer.
Hope these tricks have helped you resolve the issue. Once again, you can control the power settings of those device drivers!


