When accessing the Internet via popular web browsers like Mozilla Firefox, Google Chrome, Internet Explorer etc., many users face The Proxy Server Isn’t Responding problem. The main reason why this error might be showing up on your machine could be because of the incorrect proxy settings. The incorrect proxy settings can be corrected by disabling proxy and thus we can resolve the issue.
In this article, we explain through 3 different methods how you can easily disable the proxy in your machine and thus solve The Proxy Server Isn’t Responding issue. Read on, to learn this simple trick.
Method 1: Disable Proxy via Internet Properties
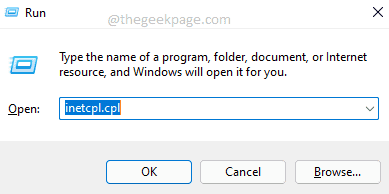
Step 1: Press the keys Win + R together to launch the Run dialog box.
When it opens up, type in inetcpl.cpl and hit the Enter key to launch the Internet Properties.
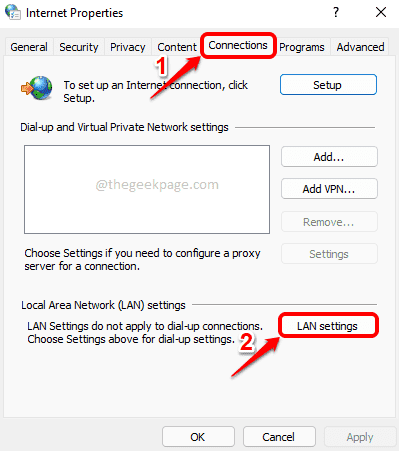
Step 2: Click on the Connections tab first.
As next, click on the button named LAN settings.
Step 3: In the Local Area Network (LAN) Settings window, check the checkbox corresponding to Automatically detect settings.
As next, uncheck the checkbox corresponding to Use a proxy server for your LAN.
Once all done, hit the OK button.
That’s it. You can try checking whether the issue is still there. If still present, please head on to the next method.
Method 2: Reset Internet settings
1 – Search and click on INETCPL.CPL in Taskbar search

2 – Now, Click on Advanced Tab
3 – Click on Reset to Reset settings

Method 3: Disable Proxy via Registry Settings
This method involves changing your registry settings. Incorrect registry settings can cause serious issues and it is always recommended to take a backup of your registry entries before you make any changes to them. So, please take a backup before you proceed.
Step 1: Open the Run window by pressing the Win and R keys together.
When it opens up, type in regedit and hit the Enter key.
Step 2: In the Registry Editor window, perform the following steps:
- Copy and paste the following URL and then hit the Enter key.
Computer\HKEY_CURRENT_USER\Software\Microsoft\Windows\CurrentVersion\Internet Settings
- Make sure the Internet Settings folder is selected on the left window pane, by clicking on it once.
- In the right window pane, right click and hit the delete option for all the following keys that are present in the below list.
- MigrateProxy
- ProxyEnable
- ProxyServer
- ProxyOverride
Note: In the screenshot below, ProxyOverride key is not present. But if it is present, it has to be deleted.
Please check whether your issue is resolved or not. If not, try restarting your machine.
If the issue is present even after restarting, please try the following method.
Method 4: Disable Proxy via Settings Application
Step 1: Press the Win + I keys together to open the Settings application.
On the left window pane, click on the Network & internet tile and in the right window pane, click on the tile named Proxy.
Step 2: Now under the Manual proxy setup section, click on the button named Edit.
Step 3: Now a new window will open by the name Edit proxy server. Here make sure the toggle button corresponding to Use a proxy server is turned Off. Hit the Save button.
Please tell us in the comments section which method worked for you. Thank you!


