Task Scheduler is one of the Microsoft Administrative Tools which execute a set of instructions when certain pre-defined instructions are satisfied. Usually Task Scheduler runs smoothly, but some Windows 10 users are experiencing some problem running Task Scheduler on their computer. If you are experiencing the same kind of problem at your end, don’t worry. There are fixes available to solve the problem for you. But before going ahead, try these workarounds to try some simpler solutions for your problem.
Workarounds–
1. If you are experiencing this issue for first time on your computer, a simple reboot of your system can do the trick.
2. Check if your Windows 10 is updated or not. If there is any updates are pending, wait for the Windows to download and install the updates. After updating, reboot and further try to launch Task Scheduler.
If any of these workarounds have’t work out for you, go for these solutions-
Fix-1 Start Task Scheduler service-
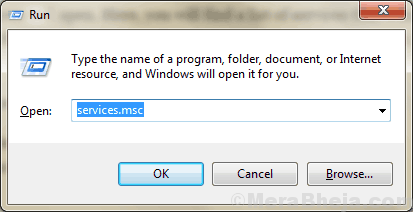
1. Press Windows key+R to launch Run, and then type “services.msc” and then hit Enter to launch Services.

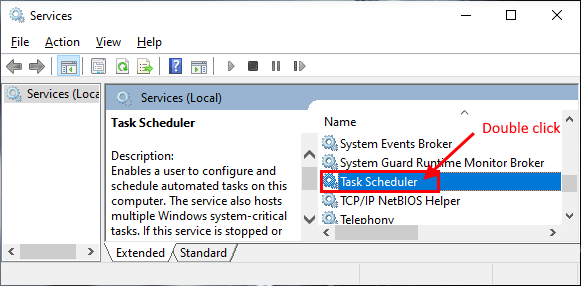
2. Now, in the list of services, find out the “Task scheduler” service. Now, double click on it to access the properties of it.

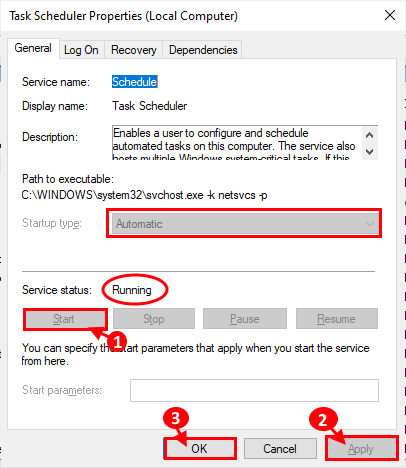
3. In Task Scheduler Properties window, check the “Startup type:” is set as “Automatic“.Otherwise, set it to “Automatic“. Then check if the “Service status:” is set to “Running“. If you notice that the service status is showing “Stopped“, then click on “Start” to start the service and then click on “Apply” and then click on “OK” to save the changes.

Now, close the Services window.
Reboot your computer and after rebooting, check if Task Scheduler working properly or not.
Fix-2 Start Task Scheduler with Command Prompt-
1 – Search Powershell in search box and then do a right click on Powershell icon and click run as administrator

2. Now, copy and paste this command in Command Prompt window.
net start Schedule
Close Powershell window. Task Scheduler should be running properly on your computer.
Fix-3 Modify Service Configuration-
1. Press Windows key+R to launch Run, and then type “cmd” and then hit Ctrl+Shift+Enter. Command Prompt will be launched with Administrator rights.

2. Now, copy and paste this command in Command Prompt window.
SC config schedule start= auto
If you receive “[SC] Change Service Config SUCCESS” message in Command Prompt window, then the service configuration is modified.
Fix-4 Reset the Registry
1. Press Windows key+R to launch Run, and type “regedit” and hit Enter to open Registry Editor window.

2. Now, navigate to this location in Registry Editor window, navigate to this location-
HKEY_LOCAL_MACHINE\SYSTEM\CurrentControlSet\Services\Schedule
Now, on the right pane of Registry Editor window, find out “Start” and double click on it to open its properties.

If you don’t find the “Start” key, follow these step to create a new key-
Right click on the empty space on the right hand side and then click on “New” and then click on “DWord(32-bit) Value“. Now, rename the key as “Start“.

3. Now, double click on “Start” and then set the “Value Data” to “2“. Click on “OK” to save the changes on your computer.

Close Registry Editor window. Restart your computer and after rebooting check if you can open the Task Scheduler on your computer.
Fix-5 Change the Task Conditions-
Sometimes, Task Scheduler doesn’t work properly due to incorrect pre-defined task conditions. Follow these steps to change the task conditions on your device-
1. Press Windows key+R to launch Run, and then type “taskschd.msc” and then hit Enter to open the Task Scheduler.

2. In Task Scheduler window, click on the “Task Scheduler Library” on the left pane. Now, you will be able to notice the tasks on the right hand side of the Task Scheduler window. Now, right click on the problematic task, and then click on “Properties“. Properties of that task will be opened.

3. Now, go to the “Conditions” tab. Now, check the “Start only, if the following network condition is available“. Now, just below, click on the drop-down and select “Any connection“. Now, click on “OK” to save the changes on your computer.

Reboot your computer. After rebooting, run Task Scheduler and check if you are still experiencing the issues on your end or not.
Fix-6 Delete corrupted Tree cache-
Cache of a particular Tree of a particular task can be corrupted and the process of sorting it out can be difficult. Follow these steps to recognize the problematic task from Registry Editor and delete that particular task-
1. Press Windows key+R to launch Run, and then type “regedit” and hit Enter.

2. Now, in the Registry Editor window, navigate to these location-
HKEY_LOCAL_MACHINE\SOFTWARE\Microsoft\Windows NT\CurrentVersion\Schedule\TaskCache\Tree
Now, rename the “Tree” as “Tree.old” in the right pane. If it asks for confirmation to change the name, click on “Yes“.

3. Now, run Task Scheduler and check if it is running correctly. If it runs smoothly, then any the task listed under the “Tree” is the reason you were experiencing the error. Go to the Registry Editor again.
4. In the Registry Editor window, rename “Tree.old” back to the “Tree” again.
5. In the Registry Editor window, under “Tree“, rename each of the tasks one by one (by adding “.old” after the name of task), and then launch Task Scheduler. Check if you are still experiencing the error message again. If the error message still appears, rename the key again to the previous name (remove “.old” from the name). Repeat this procedure till the error message in Task Scheduler disappears. (Example- We have renamed the “Adobe Acrobat Update Task” to “Adobe Acrobat Update Task.old”.)

6. Once the error message disappears (after renaming it with “.old“), you can be sure that this task is the main cause your problem.
7. In Registry Editor window, just right click on the task and click on “Delete“. This will delete the task from your computer.

Reboot your computer. After rebooting, you should not be facing the error in Task Scheduler anymore.
If you are experiencing this problem for a particular task, then these solutions will definitely help you out-
Fix-7 Enable the Task-
1. Press Windows key+R to launch Run, and then type “taskschd.msc” and then hit Enter to open the Task Scheduler.

2. In Task Scheduler window, click on the “Task Scheduler Library” on the left pane. Now, you will be able to notice the tasks on the right hand side of the Task Scheduler window. Now, right click on the problematic task, and then click on “Properties“. Properties of that task will be opened.

3. In Properties window, go to the “Triggers” tab and then click on “Edit“.

4. In Edit Trigger window, check the option “Enabled” and then click on “OK” to save the changes.

Now, close the Task Scheduler window. Reboot your computer and after rebooting, launch Task Scheduler and check if it is working or not.
Fix-8 Run with highest privileges-
1. Press Windows key+R to launch Run, and then type “taskschd.msc” and then hit Enter to open the Task Scheduler.

2. In Task Scheduler window, click on the “Task Scheduler Library” on the left pane. Now, we will be able to notice the tasks on the right hand side of the Task Scheduler window. Now, right click on the problematic task, and then click on “Properties“. Properties of that task will be opened.

3. In the Properties window, go to the “General” tab, and now check the “Run with highest privileges” and then click on “OK“.

Close Task Scheduler window, and check if the Task scheduler is working fine or not.
Fix-9 Run whether user is logged or not-
1. Press Windows key+R to launch Run, and then type “taskschd.msc” and then hit Enter to open the Task Scheduler.

2. In Task Scheduler window, click on the “Task Scheduler Library” on the left pane. Now, we will be able to notice the tasks on the right hand side of the Task Scheduler window. Now, double click on the problematic task to open the Properties of it.

3. Now, in the Properties window, go to the “General” tab and then check the “Run whether user is logged in or not“. Then, click on “OK” to save the changes on your computer.

Close Task Scheduler window. Now, reboot your computer. After rebooting, you should not be experiencing difficulties with Task Scheduler.
Fix-10 Check Conditions of Scheduled tasks-
To check conditions of the task, follow these steps-
1. Press Windows key+R to launch Run, and then type “taskschd.msc” and then hit Enter to open the Task Scheduler.

2. In Task Scheduler window, click on the “Task Scheduler Library” on the left pane. Now, we will be able to notice the tasks on the right hand side of the Task Scheduler window. Now, right click on the problematic task, and then click on “Properties“. Properties of that task will be opened.

3. In Properties window, go to the “Conditions” tab. Now, uncheck “Idle” to start the task immediately.Now, click on “OK” to save the changes.

4. Close the Task Scheduler window. Reboot your computer and after rebooting check if the Task scheduler is still creating same problem for you or not.
Fix-11 Check if the user access is granted or not-
1. Press Windows key+R to launch Run, and then type “taskschd.msc” and then hit Enter to open the Task Scheduler.

2. In Task Scheduler window, click on the “Task Scheduler Library” on the left pane. Now, you will be able to notice the tasks on the right hand side of the Task Scheduler window. Now, double click on the problematic task to open the Properties of it.

3. Go to the “General” tab and then click on “Change User or Group“.

4. Now, click on the “Advanced“.

5. Now, in Select Users or Groups window, click on “Find Now” and select your username from the Search results box. Now, click on “OK“.

6. Now, you will be able to see your selected username in the Enter the object name to select box. Now, click on “OK“.

7. In Properties window, under Security Options section, you should be able to notice your account. Now, click on “OK” to save the changes.

Close Task Scheduler window. Reboot your computer. After rebooting there should not be any error in Task Scheduler window.
Fix-12 Change Task Arguments-
1. Press Windows key+R to launch Run, and then type “taskschd.msc” and then hit Enter to open the Task Scheduler.

2. In Task Scheduler window, click on the “Task Scheduler Library” on the left pane. Now, you will be able to notice the tasks on the right hand side of the Task Scheduler window. Now, right click on the problematic task, and then click on “Properties“. Properties of that task will be opened.

3. Now, in Properties tab, go to the “Actions” tab and then click on “New“.

4. In New Action window, copy and paste this “C:WindowsSystem32cmd.exe” in the “Program/script” box.
In “Add argument (optional):” box, copy and paste /c start “” “C:location_to_batch_fileyour_batch_file.ffs” this command and then click on “OK” to save this action.

5. Now, coming back to the Properties window, click on “OK” to save the changes on your computer.
Close Task Scheduler. Reboot your computer. After rebooting, check if you are still receiving the error on your end. Your problem should be solved.