Is your Microphone isn’t working properly in the Xbox app? Several users have complained about this abrupt anomaly where they are unable to use their mic in the Xbox app. When the Xbox app doesn’t have the access to your microphone, this problem appears. You can fix this issue following these easy fixes on your computer.
Fix 1 – Toggle the Microphone permissions
Toggle the Microphone settings to allow Xbox to get the proper permissions.
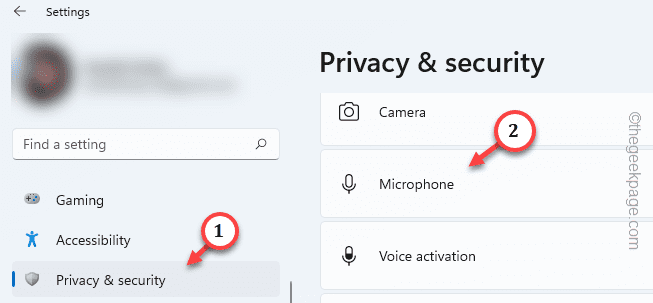
Step 1 – Open the Settings. Go to the “Privacy & security“.
Step 2 – Open the “Microphone” settings.
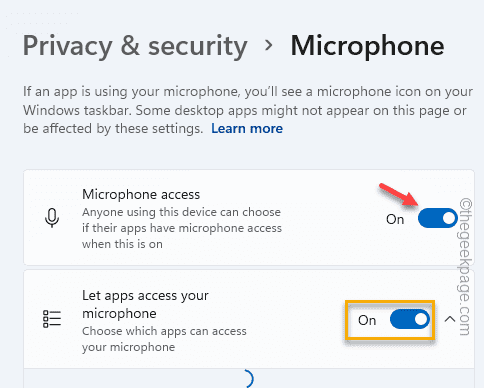
Step 3 – When you get there, set the “Microphone access” to “On“.
Step 4 – Switch the “Let apps access your microphone” to “On” mode.
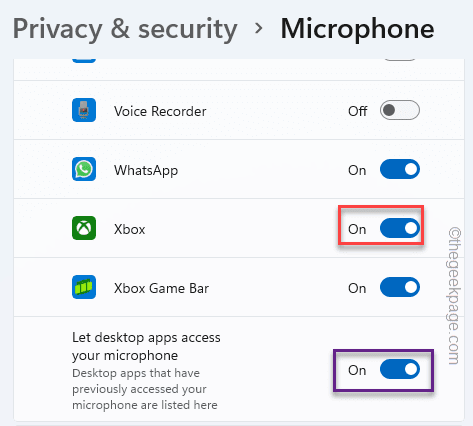
Step 5 – Give the Xbox app permission to the microphone.
Step 6 – Set the “Let desktop apps access your microphone” to On mode.
Quit the Settings window.
Check out the Xbox app once more.
Fix 2 – Clear the Xbox app cache
The next thing you can try is to clear the Xbox app cache on your system.
Step 1 – Type “xbox” in the search bar.
Step 2 – Right-tap the “Xbox” app when you see that on the search result and use the “App Settings“.
Step 3 – After getting into the Xbox app settings, scroll all the way down to the Reset option.
Step 4 – Tap the “Reset” option once. Then, click the same option to reset the app.
This way, all the Xbox stored data on the system will be cleared. But, as soon as you log in using your Microsoft account, Xbox app sync your account automatically.
Fix 3 – Set the microphone as the default device
Setting the microphone as the default device on your computer should fix this Xbox error.
Step 1 – The quickest way of opening the Run box is using the Win+R key combination.
Step 2 – Use to open the Sounds panel quickly.
mmsys.cpl
Step 3 – Go to the “Recording” tab. Here, you can find all your microphone devices.
Step 4 – Quickly right-tap the microphone and click “Set as default device“.
This way, Xbox app can use the microphone as the default device.
Launch a Xbox game and test the mic.
Fix 4 – Alter the Default Format
You can choose a different sample rate for the microphone and test.
Step 1 – Just right-tap the Windows icon and use the “Run” to open that.
Step 2 – Quickly write this in the blank box. Click “OK“.
mmsys.cpl
Step 3 – Head on to the “Recording” section.
Step 4 – There, right-click the microphone and use the “Properties” option.
Step 5 – On the Microphone Properties page, click the Default Format.
Step 6 – Select the DVD Quality from the drop-down.
Step 7 – To save the change, click “Apply“. After this, tap “OK“.
Check if this works.
Fix 5 – Uninstall the mic driver
Uninstall the microphone driver and restart the machine. This should help you resolve the issue.
Step 1 – Using the Win+R keys together, bring up a Run box.
Step 2 – Next, write this shortcut command and hit Enter.
devmgmt.msc
Step 3 – Go to the “Audio inputs and outputs“.
Step 4 – Simply, right-tap the microphone driver and tap “Uninstall driver“.
Step 5 – Click “Uninstall” to uninstall the driver from your system.
Restart your system after exiting the Device Manager.
Check if this helps.
Fix 6 – Install the Teredo adapter
The last option in the list is the option to install the Teredo adapter on your system.
Step 1 – Go to the Device Manager.
Step 2 – Open the “View” section and check the “Show hidden devices“.
Step 3 – Look for the Teredo adapter. If you can’t find it there, you have to manually add that.
Step 4 – Next, click “Action” and tap “Add legacy hardware” to open it.
Step 5 – Click “Next“.
Step 6 – Choose the “Install the hardware that I manually select from a list (Advanced)“. Click “Next“.
Step 7 – Then, choose the “Network adapters” and use the “Next” to proceed.
Step 8 – Just choose the “Microsoft” from the vendor list.
Step 9 – Select the “Microsoft Teredo Tunneling Adapter” and tap “Next” to start the installation process.
Follow the on-screen steps to ensure the driver installation.
Quit the Device Manager. Restart your machine. Check if this works.


