Google Chrome is the primary browser of many Windows users. There is a lot of dependency on Chrome and if Chrome has some issues, it hits users hard. Instead of going to a different browser, people always prefer getting their existing one fixed.
If you are a hardcore Chrome fan and is now facing the STATUS_INVALID_IMAGE_HASH issue and is in desperate need to get it fixed, you have come to the right place. In this article, we have listed out the best possible solutions that you can try to get the issue of STATUS_INVALID_IMAGE_HASH fixed, in a matter of seconds.

Solution 1: Disable RendererCodeIntegrity
Unsigned or malicious code can interfere with your browser’s rendering process and it can load webpages differently than how they should be. Chrome has introduced a feature called RendererCodeIntegrity that prevents this issue from happening. However, sometimes this very own feature can be the reason why you get the STATUS_INVALID_IMAGE_HASH error in your Google Chrome.
You can turn off the RendererCodeIntegrity feature through 2 different methods as explained below.
Note: Both the methods involve making changes to your registry settings. Incorrect registry settings can cause serious system instabilities and it is always recommended that you take a backup of your registry settings before you make any changes to them.
Method 1: From Registry Editor Window
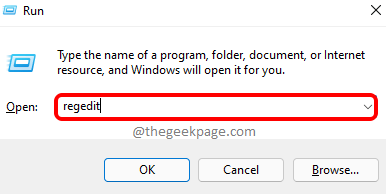
Step 1: Press the keys WIN and R together to bring up the Run window.
Once the Run window pops up, type in regedit and hit the Enter key to open the Registry Editor.
Step 2: As next, perform the following steps in order.
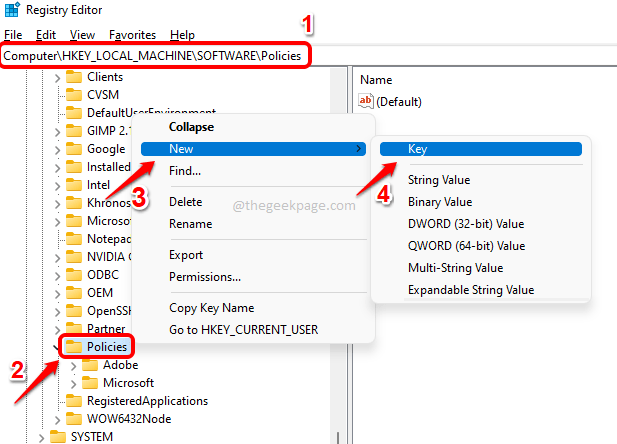
1. Copy and paste the following location in the navigation bar of the registry editor.
Computer\HKEY_LOCAL_MACHINE\SOFTWARE\Policies
2. Please note that you can jump to Step 4 if you already have a subfolder named Google under the Policies folder.
If you don’t have Google subfolder under Policies folder, we need to create it.
Right click on the Policies folder, click on New and then click on the Key option.
Step 3: Click on the newly created folder, press the F2 key and name the new folder as Google.
Step 4: Now if you already had the Google subfolder under the Policies folder and under Google, you have another subfolder named Chrome, you can jump to Step 6.
Else if you don’t have the subfolder named Chrome under Google, then right click on Google folder, click on New and then click on the Key option.
Step 5: Click on the newly created key and press the F2 key to rename it. Give the new name as Chrome.
Step 6: In the left window pane, make sure Chrome is selected by clicking on it.
Now in the right window pane, right click on an empty space, click on the New option and then click on the DWORD (32-bit) Value option.
Step 7: Click on the newly created DWORD value and press the F2 key to rename it.
Now, give the new name of the DWORD as RendererCodeIntegrityEnabled.
Step 8: Double click on RendererCodeIntegrityEnabled to open its properties window. Here, set the Value data as 0 and hit the OK button.
That’s it. Try restarting Google Chrome and check if your issue is gone. If the issue is still there, try restarting your computer once.
Method 2: From Elevated Command Prompt
Some people would find it difficult to manually change the registry settings. For them, always a workaround would be a blessing. Well, fret not, we have got another easy way using which you can easily disable the RendererCodeIntegrityEnabled feature.
Step 1: Click on the Search icon on the Taskbar.
Step 2: Type in cmd and choose the Run as administrator option against Command Prompt.
Step 3: When the command prompt launches open in the elevated mode, copy and paste the following command and hit the Enter key.
REG ADD “HKLM\Software\Policies\Google\Chrome” /v RendererCodeIntegrityEnabled /t REG_DWORD /d 0
That’s it. The above command would add the RendererCodeIntegrityEnabled key to your registry settings and would set its value to disabled.
Try relaunching Google Chrome and check for the issue. If it is still there, go for a system restart.
If the problem still persists, head on to try out the next solution.
Solution 2: Run Google Chrome in Compatibility Mode
Step 1: Press the keys WIN + D to instantly go to your Desktop.
Once at the Desktop, right click on the Google Chrome shortcut and click on the Properties option.
Step 2: In the properties window, click on the Compatibility tab first.
As next, under the Compatibility mode section, check the checkbox corresponding to Run this program in compatibility mode for.
Also, from the dropdown menu, choose Windows 8.
Click on the button Change settings for all users next.
Finally, hit the Apply button first and then the OK button.
Relaunch Google Chrome and check if your issue is resolved.
Solution 3: Edit Google Chrome Target Properties to Add ‘–no-sandbox’ Parameter
Sandbox is another security feature that Chrome has, to guard your machine against executing malicious code from the Internet. Though it is not recommended to disable this feature at all, sometimes this feature could cause the STATUS_INVALID_IMAGE_HASH error in your Chrome. So let us try removing this feature once, to check if the issue is caused because of that.
Step 1: Go to Desktop by pressing the Win & D keys together. Right click on the Google Chrome shortcut icon and then click on Properties.
Step 2: Click on the Shortcut tab first.
As next, click on the text field associated with the Target option. Now press the keys CTRL + End to go to the end of the text. Press the space bar once and then copy and paste –no-sandbox parameter at the end.
--no-sandbox
Note: Please make sure there is a space bar between the target location and the –no-sandbox parameter.
Once you are all set, hit the Apply button and then the OK button.
Please relaunch Chrome and check if your issue is resolved. If it is still not resolved, try restarting your machine once and check again whether the issue is gone. If still not gone, then remove the –no-sandbox parameter from the target property. The issue is not caused because of that.
Please try out the next solution if you are still stuck with this issue.
Solution 4: Disable Chrome Extensions
Chrome extensions are another reason why you might be getting the STATUS_INVALID_IMAGE_HASH error. Let’s try disabling the extensions to check if a particular extension is giving you trouble.
Step 1: Firstly, on the taskbar, click on the Search icon.
Step 2: Now in the search bar, type in chrome and click on the chrome application from the Best match results.
Step 3: Once the Chrome window launches, click on the extensions icon at the top right corner of the window.
Step 4: From the menu that expands out, click on the Manage extensions option.
Step 5: In the window that follows, you will be able to see all the chrome extensions that are installed in your chrome. Try removing each extension one by one and check if your issue is getting resolved at the removal of any particular extension.
Note: If you do not want to remove any extension that might not be the problem maker, instead of the Remove button, you can turn off the toggle button associated with an extension to disable it instead of removing it.
Solution 5: Try Disabling Antivirus
You could get the STATUS_INVALID_IMAGE_HASH error because of your antivirus software as well. You can try disabling your antivirus software once and check if you still get the issue.
Note: Please make sure not to visit any potentially malicious website or run any malicious code while your antivirus is turned off.
Solution 6: Clear Google Chrome Browsing Data
Another solution would be to clear your chrome browsing data and check for the issue persistence.
Step 1: Click on the Search icon on the taskbar.
Step 2: Search for chrome and launch Google Chrome from the Best match section.
Step 3: Now in the Chrome window, at the top right corner, click on the 3 vertical dots icon to expand the Chrome settings.
As next, click on More tools and then on Clear browsing data.
Step 4: You will instantly be able to view the Clear browsing data window. Make sure you are on the Advanced tab.
You can choose the Time range from the dropdown associated.
Now check the checkboxes corresponding to all the items you want to be deleted.
Note: It is recommended to delete everything for the most effective result.
Once you are all set, hit the Clear data button to proceed.
One of the solutions listed in this article should surely have solved your issue.
Please tell us in the comments section if you are still stuck with the STATUS_INVALID_IMAGE_HASH issue.


