Blue Screen of Death issues is nothing new in Windows. One of these issues is the “CLOCK_WATCHDOG_TIMEOUT” error code that can crash the system abruptly and restart the system. Though the actual reason behind this issue can vary from user to user, usually this is an issue of the processor. The irregularities of responses between the core threads are the root cause of this issue. But don’t worry. Just follow these easy fixes to quickly find a resolution.
Fix 1 – Use the Driver Verifier
If there is an unknown driver installed on your system, you have to use the verifier.
Step 1
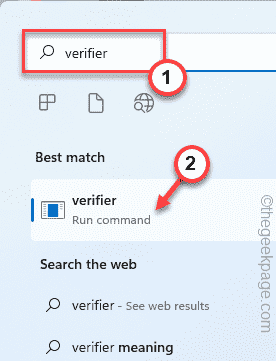
1. Press the Windows key and type “verifier” in the search box.
2. Then, tap “verifier” to access the Driver Verifier Manager.
3. In the Driver Verifier Manager screen, toggle the “Create standard settings“.
4. After that, just tap “Next” to proceed.
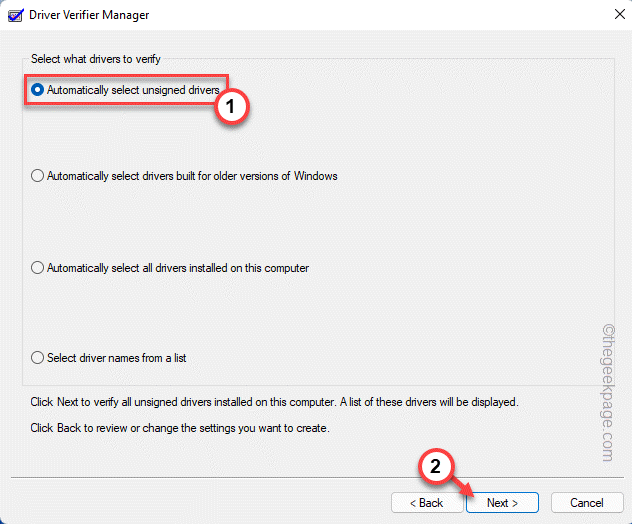
5. At the next step, select the first option “Automatically select unsigned drivers“.
6. Then, click on “Next“.
Now let Windows load all the drivers. If Windows can’t find any unsigned driver information, you will notice a “No unsigned drivers have been found.” message.
7. Tap “OK” to proceed.
Step 2 –
You have to manually detect the driver.
1. Press the Windows key+R keys together.
2. Then, type “verifier” in the Run terminal and hit “OK“.
3. In the Driver Verifier Manager screen, tap toggle the “Create standard settings“.
4. After that, just tap “Next” to proceed.
5. Now, select the “Select driver names from a list” option.
6. After that, tap “Next“.
This will show you the list of installed drivers on your system.
7. Now, just scroll down to see where you can see any “unknown” device drivers.
8. Just check all the unknown drivers one by one and tap “Finish” to commence the verification process.
9. Tap “OK” in the message.
Then, close the Verifier and restart your system once. After rebooting your device, check whether the BSOD message is re-surfacing or not.
Fix 2 – Check for pending Windows Updates
Windows send regular patches to address these BSOD issues.
1. At first, right-tap the Windows icon on the taskbar and tap on “Settings” to access it.
2. When Settings appears, click on the “Windows Update” on the left-hand side.
4. You can check whether an update is pending for your device with a tap on “Check for updates“.
Windows will detect the latest patch or feature update for your system.
5. Now, click on “Download Now“.
Windows will download the pending updates and install them.
Once Windows has finished downloading the pending updates and install them on your system.
6. Tap on “Restart now” to reboot the system.
As your device restarts, Windows completes the process. Now, test whether you are still seeing the CLOCK_WATCHDOG_TIMEOUT error code.
Fix 3 – Use the chkdsk
The disk checking tool can be used to fix the issue.
1. Just write “cmd” in the search box.
2. Then, right-tap the “Command Prompt” and tap “Run as administrator“.
Command Prompt will open up as an administrator.
3. When it does, just write this command and press Enter.
chkdsk C: /r /f
Just close the Command Prompt window. Then, restart the system and this will start the scanning process as your system boots up.
Check if this works out for you.
Fix 4 – Run memory diagnostics tool
Sometimes memory corruption can cause this issue.
1. You have to access the Windows key+R keys together.
2. Write this in the Run terminal and click on “OK“.
mdsched.exe
3. In the Windows Memory Diagnostic window, tap on the first “Restart now and check for problems (recommended)“.
This will automatically restart the system and commence the scan.
Once the memory test is complete, your computer will restart automatically.
Fix 5 – Update the driver
You can update the graphics driver.
1. At first, press the Windows key and the X keys at once.
2. Then, tap on the “Device Manager” once to open the Device Manager.
3. Then, you can click on the “Display adapters“.
4. Next, right-click on the display driver and tap on “Update driver” to update the graphics driver.
5. After that, tap on the “Search automatically for drivers” on the screen.
Windows will now perform a search for the latest version of the graphics card.
After this, just check whether this solves your issue.
NOTE –
{FOR DEDICATED GRAPHICS CARD USERS ONLY}
If you are using a dedicated graphics card, you can use the dedicated graphics card
1. At first, open the GeForce Experience app.
2. Just navigate to the “Drivers” tab.
3. Click on “Check for updates“.
4. Next, tap “Download” to download the latest version of the driver.
4. Once the downloading process is finished, tap on “Express installation“.
GeForce Experience will install the graphics card. You should restart your system once the installation process is complete.
Additional Fixes –
1. If you have plugged in a new device to your system and system may crash because of a corrupted driver.
After detaching all the unknown devices, test if this works out.
2. Uninstall any newly installed application that you are not completely sure of.
3. Additionally, if you are using an Asus machine, switch off the Asus Turbo feature in BIOS.
Check if this problem is solved.


