Whether you are working on Windows 10 or Windows 11, each one comes with its own set of problems. For instance, sometimes your Windows PC may run into some internal issue and it stops booting up. While the system may not allow you to sign in or may not boot up at all and at other times, it may just boot normally.
This issue can be either persistent or may show up occasionally, thus, causing difficulty for the user and create frustration. This erratic behavior of the Windows system usually arises due to corrupt system files that’s needed for the system to boot up.
If you are wondering how to fix this Windows boot issue, then Startup Repair is the answer.
What is Startup Repair?
Startup Repair is a built-in Windows feature that allow you to repair the corrupt core files that are crucial for Windows to run normally. Windows offers you different options to run the startup repair feature, for example. right from the desktop or from outside the Windows 11 or Windows 10. In fact, in situations, when the Windows 11/10 installation fails to work completely and you do not have the option to access the desktop, the startup repair feature can still be used to manipulate the Windows installation and complete the repair process.
This post will show you how to perform Startup Repair on Windows 11/10 PC in both the circumstances.
Method 1: Run Startup Repair from Settings app
This is the classic method of performing the startup repair process for any PC. However, for this, your PC needs to boot up and you should have access to the desktop. Follow the below instructions to run startup repair from the Settings app:
Step 1: Press the Win + I keys simultaneously on your keyboard to launch the Settings app.
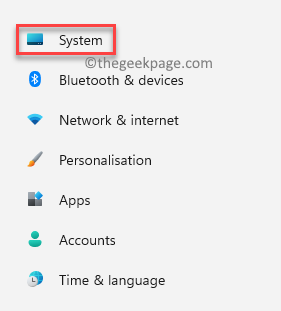
Step 2: In the Settings app, go to the left side of the pane and click on System.
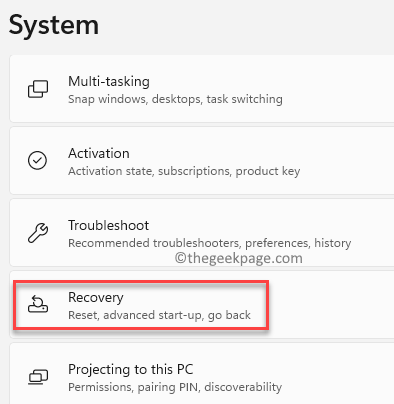
Step 3: Now, navigate to the right side, scroll down and click on Recovery.
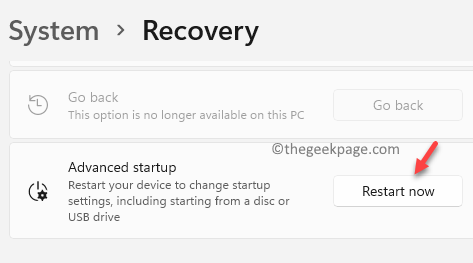
Step 4: Next, in the Recovery settings window, navigate to the right side, scroll down and go to the Advanced startup option.
Click on Restart now next to it.
Step 5: Now, your PC will restart into recovery mode and take you to the Choose an option screen.
Here, select Troubleshoot from the list.
Step 6: Next, in the Troubleshoot screen, click on Advanced options.
Step 7: Now, in the Advanced options screen, click on Start-up Repair.
Step 8: Next, confirm the action in the Start-up Repair prompt.
Now, wait for the repair process to get over and once done, your PC will boot up normally.
Method 2: Run Startup Repair from Desktop/lock screen
If your computer boots up sometimes and you have access to the desktop, you can also try running the Startup Repair process from the power options menu of your Windows PC. You can access this from the Start menu on your desktop or from the lock screen. Let’s see how to perform the startup repair from the power options menu:
Step 1: On your desktop, go to the Start button, click on it and then click on the Power button to open the power options.
Now, while keeping the Shift key (on your keyboard) pressed, click on Restart.
Step 2: Your PC will now reboot into the Advanced recovery options screen – Choose an option.
Here, select the Troubleshoot option.
Step 3: In the Troubleshoot menu, click on Advanced options.
Step 4: Next, in the Advanced options screen, select Start-up Repair.
Step 5: You will now see a prompt.
Click to confirm the action.
Your PC will now start repairing the corrupt core files and once done, it will reboot normally. You should not face any issues hereafter.
Method 3: Run Startup Repair outside Windows 10
This method is applicable when your system fails to boot up and you are unable to even reach the lock screen. Although, the Startup Repair process should run automatically at least once the fails to boot, but if it doesn’t run the Startup Repair automatically, you can follow the below steps to perform the startup repair outside your Windows system:
Step 1: Press the Power button on your system.
Step 2: As soon as you see the Windows logo, press the power button once more to shut it down.
Step 3: Repeat the above steps 3 to 5 times and as you see the message “Windows 11/10 failed to boot and is now running Startup Repair“, stop.
Now, wait till the startup repair process is complete.
Once done, your PC should restart normally and you should not encounter the problem again.
Method 4: Run Startup Repair from an installation disk
As discussed in Method 3, startup repair should start automatically trigger when your system fails to boot a couple of times, however, if it does not, you can also run the startup repair using a Windows installation disk. But in this case, you will need another working PC to create a Windows installation media. Once you have the media device ready, try the below instructions to run the startup repair:
Step 1: Power on your PC and immediately start pressing the F2 key or the related key based on your PC manufacturer to boot into the BIOS.
Once you reach the BIOS screen, select the first boot device as USB.
Step 2: Now, attach the installation device (USB) to your PC.
Step 3: Next, press the Power button of your system to turn it on and then wait till you see the Windows 11/10 installation screen to show up.
Step 4: In the installation screen, select the Windows 11/10 edition, desired language and the other requires selections.
Step 5: Once you have done that, click on the Repair your computer option towards the bottom of the screen and this will trigger the Startup Repair process.
Once the process is over, your PC will reboot automatically and you should not come across the boot issue anymore.


