Whether for work or for personal use, internet is lifeline these days, therefore, when the internet speed slows down, you are left helpless. However, the internet connection is not always the reason behind the slow network. In most cases, there could be an issue in the settings, certain apps, or due to some background processes that may lead to the slow internet speed issue.
While the immediate solution could be to upgrade the internet plan, changing the plan may not be able to fix the issue. We have come up with a few solutions that may help you boost the internet speed, for real. Let’s see how:
Method 1: Change DNS Server Address
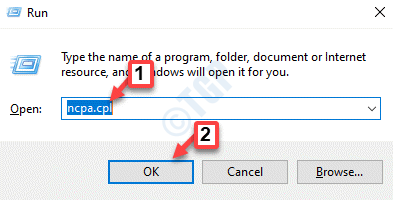
Step 1: Press the Win + R keys together on your keyboard to launch the Run command window.
Step 2: In the Run command search bar, type ncpa.cpl and hit Enter to open the Network Connections window.
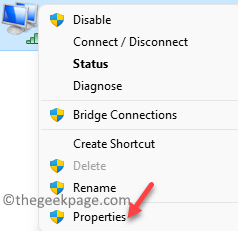
Step 3: Now, go to your active internet connection, right-click on it and select Properties.
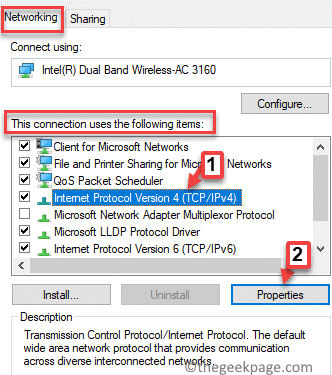
Step 4: Next, in the Properties window, under the Networking tab, go to This connection uses the following items field.
Here, select Internet Protocol Version 4 (TCP/IPv4) from the list.
Now, click on the Properties button below.
Step 5: In the Internet Protocol Version 4 (TCP/IPv4) properties window, select the radio button next to Use the following DNS server addresses option.
Now, type the below addresses in the Preferred and Alternative DNS server fields, respectively:
Preferred DNS server: 8. 8. 8. 8

Alternative DNS server: 8. 8. 4. 4
Now, press OK to save the changes and exit.
You can now check your internet connection and the speed should be faster now.
Method 2: Disable Auto-Tuning Feature Using Command Prompt
Step 1: Right-click on the Start menu and select Run to open Run command.
Step 2: In the Run command search field, type cmd and press the Ctrl + Shift + Enter hotkeys on your keyboard to launch the elevated Command Prompt.
Step 3: Now, execute the below command and hit Enter:
netsh int tcp set global autotuninglevel=disabled
This will disable the Auto-Tuning feature on your Windows system and the internet should speed up.
Method 3: Disable Allow Downloads From Other PCs
Step 1: Right-click on Start and select Settings to open the Settings window.
Step 2: In the Settings window, go to the left side of the pane and click on System.
Step 3: Now, go to the right side of the window and click on the Windows Update link at the top right.
Step 4: In the next window, on the right side, click on Advanced options.
Step 5: Next, in the Advanced options screen, scroll down and under the Additional options section, click on Delivery Optimisation.
Step 6: Now, in the Delivery Optimisation screen, turn off the Allow downloads from other PCs option.
Now, exit the Settings app and check if your internet speed has increased.
Method 4: Adjust the Internet Bandwidth Settings
Step 1: Press the Win + I shortcut keys on your keyboard to open the Settings app.
Step 2: In the Settings window, on the left side of the pane, click on System.
Step 3: Now, navigate to the right side and select Windows Update option at the upper right side.
Step 4: Now, on the right side of the pane, click on Advanced options.
Step 5: Next, in the advanced options window, scroll down and under the Additional options section, click on Delivery Optimisation.
Step 6: In the next window, scroll down and click on Advanced options.
Step 7: In the Advanced options page, go to the Download settings section.
Step 8: you can adjust the percentage bandwidth used by select the radio button next to – Percentage of measured bandwidth (measured against the update source).
Now, check both the boxes next to Limit how much bandwidth is used for downloading updates in the background and Limit how much bandwidth is used for downloading updates in the foreground.
Now, move the sliders to adjust the limit in terms of percentage to minimum.

Step 9: Next, you can adjust the upload limit by select the Upload settings section.
Here, check both the boxes next to Limit how much bandwidth is used for uploading updates to other PCs on the internet and Monthly upload limit.
Now, move the sliders for both the options to set the percentage upload limit and the monthly upload limit to minimum.

Once done, exit the Settings app and now your internet speed should have increased.
Method 5: Change Background App Permissions
Step 1: Press the Win + I keys simultaneously on your keyboard to open the Settings app.
Step 2: In the Settings app, click on Apps on the left.
Step 3: Now, go to the right side of the pane and click on Apps & features.
Step 4: In the Apps & features screen, scroll down and under the Apps list go to the app/apps one by one and click on the three vertical dots next to it.
Click on Advanced options.
Step 5: In the next window, on the right side, scroll down and go to the Background apps permissions section.
Here, under the Let this app run in background field, click on the drop-down and select Never.
*Note – You can do this for all the apps you don’t want to run in the background.
Now, exit the Settings app, restart your PC and now check if this speeds up the slow internet on your Windows 11 PC.
Method 6: Disable Windows Update Service
Step 1: Go to Start, right-click on it and select Run from the menu.
Step 2: In the Run command window that opens, type services.msc in the search bar and hit Enter to open the Service manager window.
Step 3: In the Services window, navigate to the right side and under the Names column and look for Windows Update service.
Double-click on it to open its Properties dialogue box.
Step 4: In the Windows Update Properties dialogue box, under the General tab, go to the Startup type field and select Disabled from the drop-down next to it.
Press apply and then OK to save the changes and exit.
Now, the internet speed should be up and you should be able to work normally.
*Note – Once work done, restart the Windows Update service back again. Simply follow the Steps 1 through 3 and then in the Properties window, under the General tab, go to the Startup type and set it to Automatic (Delayed Start). Press Apply and then OK for the changes to be applied.
Method 7: Get Rid of OneNote Using PowerShell
Step 1: Press the Win + R keys together on your keyboard to open Run command.
Step 2: In the search field, type Powershell and press Ctrl + Shift + Enter shortcut keys on your keyboard to open Windows Powershell in admin mode.
Step 3: In the elevated Powershell window, run the below command and hit Enter to uninstall it from your PC:
Get-AppxPackage *OneNote* | Remove-AppxPackage
Once done, the OneNote app is completely removed from the system. Now, the internet on your PC should speed up.
Method 8: Update your WiFi drivers
Step 1: Go to Start menu, right-click on it and select Device Manager.
Step 2: In the Device Manager window that opens, navigate to Network adapters and click to expand the section.
Here, right-click on your network driver/ WiFi driver and select Update driver.
Step 3: In the Update Drivers window, click on the Search automatically for drivers option.
Windows will now look for any latest update available, and if available it will update it automatically.
Now, close the Device Manager window and restart your PC. The internet speed of your system must have increased.
Method 9: Disable Large Send Offload
Step 1: Press the Win + R keys together on your keyboard to open the Run command box.
Step 2: In the search bar, type devmgmt.msc and press OK to open the Device Manager window.
Step 3: In the Device Manager window, click on Network adapters to expand the section.
Now, right-click on your WiFi adapter and select Properties.
Step 4: In the WiFi Properties dialogue box, select the Advanced tab.
Now, go to the Property field and select the Large Send Offload v2 (IPv4) option from the list.
Next, go to the Value field and set it to Disabled.
Press OK to save the changes and exit.
Now, exit the Device Manager window and check if your internet is running with an increased speed.
Method 10: Close Background Programs Consuming Too Much Data
Step 1: Right-click on Start and select Task Manager.
Step 2: In the Task Manager window, under the Processes tab, go to the Background Processes section.
Now, right-click on the apps that you don’t want running in the background and select End task.
Once the background apps are closed, the internet speed should boost up.
Method 11: Turn Off Metered Connections
Step 1: Right-click on Start and select Settings from the context menu.
Step 2: In the Settings app that opens, click on the Network & internet option on the left.
Step 3: Now, go to the right side of the pane and click on WiFi.
Step 4: In the next screen, click on your WiFi properties.
Step 5: Next, in the WiFi properties screen, scroll down a bit and turn off the Metered connection option.
Now that the Metered connection is disabled, the internet speed should increase.
Method 12: Disable Windows Defender Firewall
Step 1: Press the Win + R shortcut keys on your keyboard to open Run command.
Step 2: In the Run command search field, type firewall.cpl and hit Enter to open the Windows Defender Firewall window in the Control Panel.
Step 3: In the Windows Defender Firewall screen, click on Turn Windows Defender Firewall on or off.
Step 4: It will now take you to the Customize Settings window.
Now, go to the Private network settings section and select Turn off Windows Defender Firewall.
Repeat the above step for the Public network settings.
Press OK to save the changes and exit.
Now that you have successfully disabled the Windows Defender Firewall, you must find that the internet speed on your PC has increased.
*Note – Once you work is done, make sure that you turn on the Windows Defender Firewall back to continue protecting your PC.
In addition, you can run a virus scan using a trusted 3rd party antivirus software and check if any malware is slowing down the internet speed. Alternatively, you can either use a reliable VPN to check if it boosts your internet speed, or simply switch your browser to another one and sometimes that may help increase the internet speed.
You can also try power cycling your WiFi router by turning it off for sometime and then turn it on. If this does not help boos the internet speed, contact your internet service provider and try upgrading the internet plan to check if the issue was the plan after all.


