There are many applications that may need administrator access before you run them, like Windows PowerShell, Command Prompt, etc. It can be any other desktop icons as well. In such as case, all you need to do is to right-click on the application or the icon and select Run as administrator from the right-click context menu to grant permission and run in administrative mode. However, sometimes the Run as administrator may stop working and despite clicking on it, it may just not work. While you can try running an antivirus check using the built-in Windows Defender or a reliable 3rd party antivirus software to quarantine your system from any malware, most of the times this may not work. Fortunately, there area few methods that can help you fix the the right-click context menu run as administrator stopped working issue in your Windows 11 / 10 PC. Let’s see how.
Method 1: Delete Context Menu Items Using Regedit
This issue seems to appear when certain installed programs changes your context menu. Try to get rid of entries in context menu pushed after installing these programs.
To clean your context menu, you can use freeware context menu editing programs such as shellexview.
1. Download shellexview
2. Extract the software and and Click on shexview application to Open it.

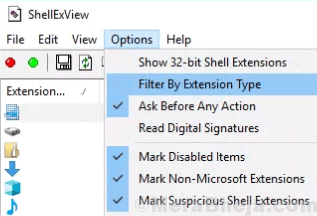
3. Click on Options > Filter By Extension Type

4. Select Context Menu and Click on OK.
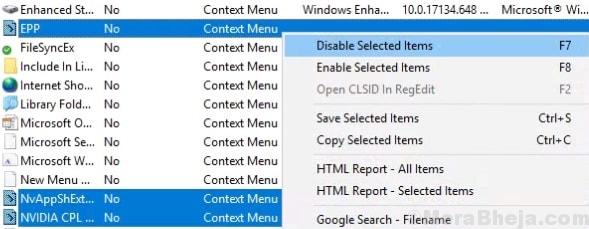
5. Press and hold CTRL key and keep selecting items you want to remove.
6. Do a right Click and Disable Selected Items.

7. Click on option and Choose Restart Explorer.
Method 2: Enable/Change User Account Control
Step 1: Right-click on Start menu and select Run to open the Run command.

Step 2: In the Run command search box, type useraccountcontrolsettings and hit Enter.

Step 3: In the User Account Control Settings window, on the left side, pull the slider down to the second bar from the bottom.
The message on the right will say ” Notify me only when applications try to make changes to my computer (do not dim my desktop)“.
Press OK to exit.

Now, restart your PC and try to run applications by clicking on the right-click context menu Run as administrator. It should work fine.
Method 3: Uninstall the Problematic Application
Sometimes, the issue can arise due to a 3rd party software. When you right-click on the program you want to run in the admin mode, you may notice that the 3rd party software added it’s own options to the right-click context menu. This interferes with the Run as administrator option and when you click on it, it does not work. In such a case, you can try uninstalling the 3rd party software and see if it works.
Step 1: Press the Win + R keys together on your keyboard to open the Run command.
Step 2: In the Run command search field, type appwiz.cpl and press OK to open the Programs and Features window in Control Panel.

Step 3: In the Programs and Features window, go to the right side of the pane and under Uninstall or change a program, right-click on the problematic application and select Uninstall.

Now, wait for it to complete the uninstallation. Once done, reboot your PC and you should now be able to use the right-click context menu Run as administrator normally.
Method 4: Edit the Group Membership Rules in User Accounts
Step 1: Press the Win + X hotkey on your keyboard and select Run to open the Run command.

Step 2: Now, type netplwiz in the Run command search box and hit Enter.

Step 3: In the User Accounts window that opens, under the Users tab, click on Properties.

Step 4: Next, in the Microsoft Account Properties window, go to the Group Membership tab.
Select the radio button next to Administrator.
Press Apply and then OK to save the changes and exit.

Now, restart your PC and right-click on the program you want to run in the admin mode. Click on Run as administrator in the right-click menu and it should work.
Method 5 : Through Advanced Properties of the Program
Step 1: Go to Desktop and right-click on any program. Select Open file location from the right-click context menu.

Step 2: It will open the file location of the program in the File Explorer.
Right-click on the program file and select Properties.

Step 3: In the Advanced Properties window that pops up, check the box next to Run as administrator.
Press OK to save the changes.
Once you are back to the program’s Properties window, press Apply and then OK to save changes and exit.
Now, try clicking on the Run as administrator on the right-click context menu of the program and it should run in the admin mode.
Method 6: Move the Original File from System32 to the Original File Location
Step 1: Go to the Windows Search bar and type the name of the program (that’s having an issue with the Run as administrator), right-click on it and select Open file location.

Step 2: It will take you to its original file location. Right-click on the program icon and select Open file location again.

Step 3: Now, copy the .exe file of the program from the System32 folder (location – c:\windows\system32\).

Step 4: Return to the original file location of the program and right-click on an empty space.
Select Paste shortcut to paste the copied .exe file here.

Step 5: Now, copy the name of the original file (for instance, here we copied the name – Command Prompt) and then hit delete to delete the original file.

Step 6: Then, go to the copied file, right-click on it and select Rename.
Paste the original file name that you copied in Step 5.

Now, the Run as administrator option in the right-click menu should work.
Method 7: Troubleshoot in Clean Boot
Step 1: Press the Win + X hotkey on your keyboard and select Run from the menu.

Step 2: It opens the Run command window. In the search field, type msconfig and hit Enter.

Step 3: In the System Configuration window, under the General tab, go to the Selective startup section and make sure that the boxes next to Load system services and Use original boot configuration options are checked.

Step 4: Now, go to the Services tab and check the box next to Hide all Microsoft services at the bottom left.
Then, click on the Disable all button on the bottom right.
Press Apply and then OK to save the changes and exit.

Step 5: Further, select the Startup tab and click the Open Task Manager link.

Step 6: In the Task Manager window, under the Startup tab, right-click on each of the apps in the list and select Disable for each of the apps one by one.

Step 7: Exit Task Manager and go back to the Startup tab in the System Configuration window.
Press Apply and then OK to save the changes and exit.

This will disable all the 3rd party applications and services. Your system will now enter into Clean Boot with minimal applications. You can troubleshoot your PC in the clean boot state. Now, go back and right-click on the app and click to check if the Run as administrator option is working.
Method 8: SFC Scannnow
Step 1: Right-click on Start and select Run to open the Run command.

Step 2: In the Run command window, write cmd and press Ctrl + Shift + Enter shortcut key on your keyboard to open Command Prompt in elevated mode.

Step 3: In the Command Prompt (admin) window, run the below command and hit Enter:
sfc /scannow

Wait for sometime as the process takes a while to scan any corrupted files. If any corrupted files found, it fixes them on the spot.
Now, restart your PC and the right-click context menu Run as administrator options should perfectly fine now.
Method 8: Boot Into Safe Mode with Networking
Step 1: Press Win + I shortcut key on your keyboard to open the Settings window.
Step 2: In the Settings window, click on Update & Security.

Step 3: In the next window, on the left side of the pane, click on Recovery.
Now, go to the right side of the pane, scroll down and under the Advanced start-up section, click on the Restart now button.

Step 4: As your system reboots into the Advanced recovery mode, follow the path Troubleshoot > Advanced options > Startup Settings.
Click on Restart.
Step 5: Once your PC restarts, you can see a choice of options from where you can select Safe Mode with Networking using the arrow keys on your keyboard.
Once your PC boots into safe mode, check if the Run as administrator problem still exists. If it’s working fine in Safe Mode, then chances are, your user account or the settings are creating the issue.
Method 9: Create a New User Account
Step 1: Right-click on Start menu and select Settings.

Step 2: In the Settings window, click on Accounts.

Step 3: Next, from the left side of the pane, select Family & other users.

Step 4: Now, go to the right side of the pane, scroll down and under the Other users section, click on Add someone else to this PC.

Step 5: In the Microsoft Account window, click on I don’t have this person’s sign-in information link.

Step 6: Next, under Create account, select Add a user without a Microsoft account.

Step 7: In the next window (Create a user for this PC), add a username and password.
Click Next to complete create the new user account.

Step 8: Once the user account is created, go back to the Settings window > Accounts > Family & other users.
Go to the right side of the pane and under the Other users section, select the newly created user account.
Click on the Change account type button below it.

Step 9: In the Change account type window, set the Account type field to Administrator.
Press OK to exit.

Now, sign-in with your new user account and check if the problem is solved. If not, then you can shift all your personal files and folders to the new user account and use them instead.