You are trying to launch a game or a program and bang comes an error message on your face either “D3dx9_42.dll Not Found” or “The file d3dx9_42.dll is missing“. Sometimes, you may also see the error message “The program can’t start because d3dx9_42.dll is missing from your computer. Try reinstalling the program to fix this problem.” This issue is generally caused problems with DirectX since it’s used in most of the Windows-base games and graphics applications. The good news is, we have a few workarounds for the D3dx9_42.dll missing error in your Windows 10 PC.
Method 1: By Installing the D3dx9_42.dll File
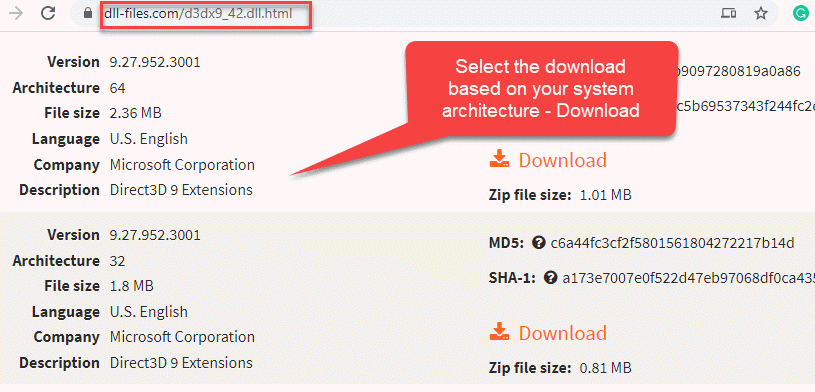
Step 1: Open your browser and visit the link below to download the D3dx9_42.dll File:
https://www.dll-files.com/d3dx9_42.dll.html
Then click on the Download link based on whether your system is 32-bit or 64-bit.
*Note – To find out your system architecture (32-bit or 64-bit), follow this process.

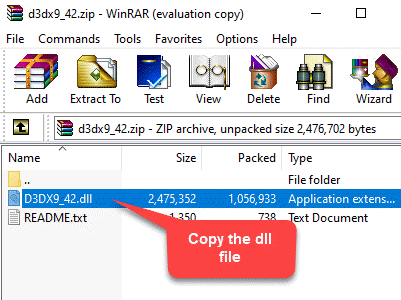
Step 2: Once downloaded, open the Zip folder and copy the dll file.

Step 3: Now, press Win + E keys together on your keyboard to open the File Explorer.
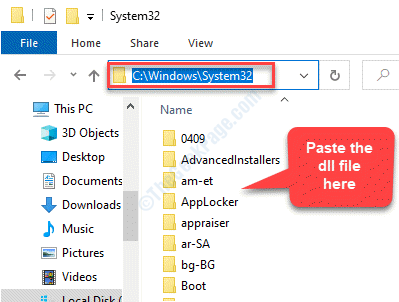
In the File Explorer window, follow the below path to reach the System32 folder:
C:\Windows\System32

Step 4: Press the Continue button to grant permission for administrator access and finish the process.

Now, you can try launching the program and you should not see the dll missing error anymore.
*Note – Alternatively, you can also copy and paste the file into the game (with which you are having the problem) folder. Follow the below steps.
Step 1: To go to the game folder, go to the game icon on your desktop, right-click on it and select Open file location.

Step 2: Now, paste the Dll file.
Step 3: Click on Continue to grant administrator permission and complete the process.

You can now try opening the game and it should work fine.
Method 2: By Installing DirectX End-User Runtimes Package
Step 1: Open your browser and go to the below link to download the Windows End-User Runtimes download page:
https://www.microsoft.com/en-us/download/details.aspx?id=8109

Step 2: Once the download is over, run the file and follow the instructions on the wizard to finish installation.
Once the DirectX file is installed, reboot your PC and try opening the game or the program you were having problem with. The error should be gone and the program should run normally.
Alternatively, you can also update DirectX to the latest version.
Method 3: By Reinstalling the Program or the Game
Step 1: Right-click on Start menu and select Run to open the Run command.

Step 2: In the Run command window, type appwiz.cpl and press OK to open the Programs and Features window in Control Panel.

Step 3: In the Programs & Features window, under Uninstall or change a program, right-click on the program that’s showing the error and select Uninstall.

Step 4: In the prompt that appears, click Yes to confirm uninstalltion.
No, reboot your PC and re-install the program. You can now launch the program without any error showing up.
Method 4: By Updating the GPU Drivers
Sometimes the D3dx9_42.dll missing error could be due to the outdated drivers and hence, updating the GPU drivers can solve the issue. Let’s see how:
Solution 1: Using the Device Manager
Step 1: Right-click on Start menu and select Device Manager.

Step 2: In the Device Manager window, expand the Display adapters section, right-click on your graphics driver and select Update driver.

Step 3: In the window that pops up, select Search automatically for drivers.

Now, wait for it to detect any available latest update. If available, it will install the latest driver for your system.
Alternatively, you can also install drivers from your local computer. Let’s see how.
Step 1: Right-click on the Start menu and select Run to open the Run command.

Step 2: In the Run command search box, type devmgmt.msc and press OK to open the Device Manager window.

Step 3: In the Device Manager window, expand the Display adapters section, right-click on your graphics driver and select Update driver.

Step 4: Now, in the Update Drivers window, select Browse my computer for drivers option.

Step 5: In the next window, go to the Search for driver software in this location field and click on the Browse button.

Step 6: Once you find the correct folder, click OK to confirm the folder and then press Next. Windows will now scan the folder for the updated and compatible drivers.
Once found, Windows 10 will install them automatically.
Restart your PC and you can now open the game or the program normally.
Solution 2: By Updating the GPU Driver Manually
Step 1: Press the Win + X keys together on your keyboard and select Device Manager.

Step 2: In the Device Manager window, go to the Display adapters section, click on the arrow next to it to expand the section, right-click on the graphics driver and select Properties.

Step 3: In the Properties window, select the Details tab.
Now, go to the Property field and select Hardware IDs from the drop-down.
Right-click and Copy the 1st value from the Value list.

Step 4: Now, open your browser and paste this copied value in the search engine. Search for the official driver support link and download the latest driver update accordingly.
*Note – Click on the Download link based on whether your system is 32-bit or 64-bit. To find out your system architecture (32-bit or 64-bit), follow this process.
Once you have installed the driver, reboot your PC and you should not see the error anymore while launching the game or the program.
Method 5: By Running SFC Scannow Command
If none of the above method works, you can try running a system file checker to find out aqnd repair any corrupt system files on your computer.
Step 1: Press the Win + R hotkey on your keyboard to open the Run command.
Step 2: In the Run command window, type cmd in the search field and press the Ctrl + Shift + Enter keys together on your keyboard to launch Command Prompt with admin rights.

Step 3: In the Command Prompt (elevated) window, type the below command and press Enter:
SFC /Scannow

The process takes some time. So, wait for sometime while it detects and repairs any corrupt files on your system.
Restart your PC and you can now launch your game or program without seeing the D3dx9_42.dll missing error.