Chrome is undoubtedly among the most popular browsers due to its advanced features and functions, but it comes with its own set of problems. You may sometimes come across errors, one of them being “An error occurred when trying to get access to Camera and/or Microphone: Hardware Access Error” while making video calls using Chrome. This error is most common with Facebook messenger, but can also occur with other websites. The error it seems, primarily occurs due to failed permissions, browser conflicts, outdated drivers, or incompatible applications. However, we have a few workarounds for you to fix the Hardware Access Error in Google Chrome. Let’s see how.
Method 1: Allow Camera and Microphone in Privacy Settings
Step 1: Press the Win + I hotkey on your keyboard to open the Settings app.
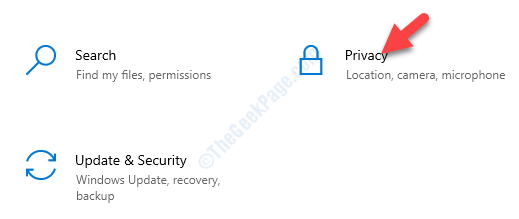
Step 2: In the Settings app, click on Privacy.

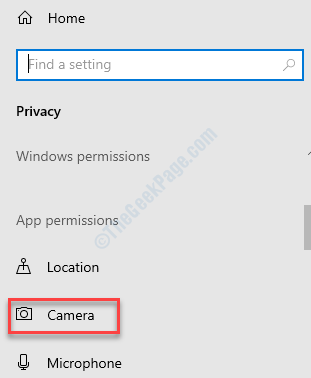
Step 3: In the next window, on the left side of the pane, click on Camera.

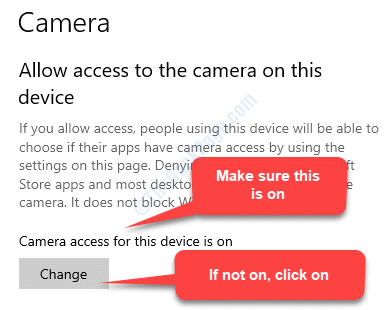
Step 4: Now, navigate to the right side of the window and under Allow access to the camera on this device, make sure that it shows Camera access for this device is on.
If it shows turned off, click on the Change button.

Step 5: In the pop up, move the slider to the right to turn on the Camera access for this device.

Step 6: Now, scroll down and under Allow desktop apps to access your camera, move the slider to the right to turn it on.

Step 7: Go to the Choose which Microsoft Store apps can access your camera section and check if the Camera app is turned on. If not, move the slider to the right to turn it on.

Step 8: Now, go to the left side of the pane and click on Microphone.
Repeat the Step 4 to Step 6 for to turn on your Microphone access.

Now, go back to the website on your Chrome browser and try making a video call. It should work fine.
Method 2: Allow Chrome to Use Camera and Microphone
Solution 1: Through Manage Option
Step 1: On the website page in Chrome, you can see the camera icon on the extreme right side of the address bar. Click on it and then click on Manage at the bottom of the pop-up.

Step 2: You are directed to the Site Settings page in Chrome.
Scroll down and under the Permissions section, click on Camera.

Step 3: In the Camera settings page, go to Ask before accessing (recommended) and move the slider to the right to turn it on.
At the same time, make sure that the website is listed under Allow.

Step 4: Repeat the Steps 2 and 3 for Microphone to enable it.
*Note – Whenever you open a website for calls or video calls, it will prompt you to allow Camera and Microphone. Make sure to press Allow to proceed.
The hardware access error should be gone now and you can make a video call normally.
Solution 2: Through Chrome Settings
Step 1: Click on three vertical dots (Customize and control Google Chrome) on the extreme right side of the Chrome screen and select Settings.

Step 2: In the Settings page, go to the Privacy and security section and click on Site Settings.

Step 3: Now, go to Permissions and click on Camera.

Step 4: Turn on the Ask before accessing (recommended) option.
Also, check if the site is listed under Allow.

*Note – Make sure that you press Allow when you see a prompt asking for Camera and Mic permission for a website.
Try making a video call now and you should not see the error anymore.
Method 3: Reset Site Permissions
Step 1: Go to the website on Chrome and on the left side of the address bar, click on the lock icon.
Select Site settings from the menu.

Step 2: In the Site settings page, click on Reset permissions.

Step 3: Once done, click on the Relaunch Chrome button to restart your Chrome browser.
You may be asked for camera and mic access. Press Allow to grant access and now, your video calls should be working fine.
You can now try making a video call and there should be no problem.
Method 4: Uninstall Problematic Software
Step 1: Press Win + X keys together on your keyboard ans select Run to open the Run command.

Step 2: In the Run command, type appwiz.cpl in the search box and press OK to open the Programs and Features window in the Control Panel.

Step 3: In the Programs and Features window, under the Uninstall or change program, right-click on the problematic software and select Uninstall.

Wait till the software gets uninstalled. Now, restart your PC and the hardware access error should be gone now.
Method 5: Disable Problematic Devices/IR Camera
Some of the devices that can create conflict with the camera are IR camera, Bluetooth devices, secondary microphone, etc. In case of the camera, the conflict usually arises due to a second camera or the IR camera. The Google Chrome tries to recognize two cameras and fails to initiate the video call. In that case, disabling the 2nd camera is the best option. Let’s see how.
Step 1: Right-click on Start menu and select Run.

Step 2: It opens the Run command window. Type devmgmt.msc in the search box and press OK.

Step 3: In the Device Manager window that opens, go to the Cameras/Imaging devices/Sound, video and game controllers section and expand it.
Right-click on the secondary camera (that’s causing the problem) and select Disable device.

You should now be able to make video calls normally.
In case it doesn’t work, you can enable it back again.
Method 6: Update System Drivers and Windows
Solution 1: Update Windows to Latest Version
Check if there are any latest updates available. If yes, then update your Windows to the latest version. You can update Windows manually like this:
Step 1: Press Win + I shortcut key on your keyboard to open the Settings window.
Step 2: In the Settings window, click on Update & Security.

Step 3: You are directed straight to the Windows Update page in Settings.
Go to the right side of the pane and click on Check for updates.

If there are any updates available, Windows will download and install automatically. Once your Windows 10 is updated, you can try making a video call and it should go through normally.
Solution 2: Update the System Drivers
You can try updating the system drivers through Device manager.
Step 1: Right-click on the Start menu and select Device Manager.

Step 2: In the Device Manager window, expand the Network adapters section.
Now, right-click on the device or devices whose drivers you want to update and select Update driver.

Step 3: In the Update Drivers window, select Search automatically for updated driver software.

Step 4: It will search for drivers and if any available, will update the driver automatically to the latest version.
Reboot your system and you should not see the hardware access anymore.
Alternatively, you can also download and install the system drivers manually, by visiting the manufacturer website for the updated driver version for camera or the mic.
Method 7: Uninstall and Reinstall Conflicting Drivers
Step 1: Press the Win + X shortcut keys on your keyboard and select Device Manager.
Step 2: In the Device Manager window, expand the Cameras/Imaging devices/Sound, video and game controllers section to find your camera.
Right-click on the camera device and select Uninstall.

Step 3: In the Uninstall Device pop up, click on Uninstall again to confirm.

Step 4: Once uninstalled, go to the Action tab on the top of your Device Manager window and select Scan for hardware changes.

Step 5: Repeat the process from Step 2 to Step 4 for your Microphone device.
Now, go to the website and try making a video call and it should work fine.
Method 8: Edit the Registry Editor
Before you make any changes to your Registry Editor data, make sure that you create a backup of the registry data, so that, in case you lose any data during the process, you can recover the same.
Step 1: Right-click on the Start menu and select Run to open Run command.
Step 2: Type Regedit in the Run command search field and hit Enter.

Step 3: In the Registry Editor window, navigate to the below path:
HKEY_LOCAL_MACHINE\SOFTWARE\WOW6432Node\Microsoft\Windows Media Foundation
Now, under Windows Media Foundation, select Platform key.
Then, go to the right side of the pane, right-click on an empty area, and select New > DWORD (32-bit) Value.

Step 4: Rename the new DWORD as EnableFrameServerMode and double-click on it.

Step 5: In the Edit DWORD (32-bit) Value dialogue box that opens, change the Value data to 0.
Press OK to save the changes and exit.

Exit registry editor and restart your PC. Now, visit the website and try making a video call. It should go through normally.
Method 9: Get Messenger App from Windows Store
This method is specially useful for those who are facing an issue making video calls using the browser-based Facebook messenger.
Step 1: Go to Start and in the Windows Search bar, type Microsoft Store.

Step 2: Left-click on the result to open the Store.

Step 3: In the Store, go to the search bar on the top right of the window and type Messenger.
Select the 1st result – Messenger app.

Step 4: Click on Get to download and then click on Install to finish installing the app.
Wait for the Messenger app to finish getting installed.

Now, open the Messenger app, sign-in and try making a video call through the app. You should face no more problem.
Method 10: Initiate a Voice Call and Change to Video Call
Step 1: Open Facebook in Chrome and select the contact you want to call.
Step 2: In the contact window, click on the phone icon to make a voice call.

Step 3: Now, while the voice call is on and both of you can hear each other, press the Camera icon to change to video call.
*Note – In case of a group video call, all the users should switch on their camera one by one.
This should solve the hardware access error issue and help you make a video call.
However, if none of the above method works, change from Google Chrome to another browser to make online video calls. You can also choose to reset the Chrome browser or simply try any other app like Skype to make video calls.