If you use MS word regularly, you might have seen that when you justify or align your document, there will be extra spaces added in the document. Refer to the below example, in the last two lines of the paragraph, we can see that there are few extra spaces added by the system when the user tries to justify the document.
If you are looking out for ways to remove these extra spaces from your document, read along. This article will illustrate different ways to remove extra spaces from a Justified document in MS Word.
Fix 1: Change the Hyphenation Settings
Step 1: Open MS Word and select the entire document
Step 2: From the top menu, click on Layout
Step 3: Click on Hyphenation
Step 4: Choose Automatic or Manual from the drop-down menu.
NOTE: If you opt for Manual in the above step, a dialog would pop up for every hyphenated word asking if the changes are to be done.
Fix 2: Use Kerning for Fonts
Step 1: Open MS Word and select the entire document
Step 2: From the top menu, click on Home
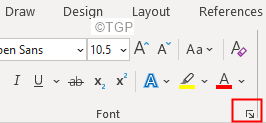
Step 3: From the Font section, click on the small arrow at the corner as shown below.
Step 4: From the Font window that opens, click on the Advanced tab.
Step 5: Tick on Kerning for fonts
Step 6: Now, you can see all the options enabled (Scale, Spacing, and Position).
Step 7: Experiment with these options and see what fits best for you.
Step 8: Once all the settings are done, click on the OK button
NOTE: Don’t press the Set As Default button. It is not advised to keep these settings by default on the documents.
Fix 3: Enable the option Don’t add character spaces
If you are seeing extra spaces only in the last line of the paragraph, this might be because the Word does not recognize it as the end of the paragraph and adds spaces to set the alignment. To fix this, follow the below steps:
Step 1: From the top menu, click on the File tab
Step 2: From the left-hand-side menu, click on More
Step 3: Choose Options from the pop-up menu.
Step 4: From the Word Options window that opens, choose Advanced from the left-hand side.
Step 5: From the right-hand side, scroll down and locate the section Layout options for
Step 6: Now tick on Don’t expand character spaces on a line that ends with SHIFT+RETURN
Step 7: Finally, click on the Ok button.
Fix 4: Remove the Line Break mark at the end of the paragraph
Step 1: From the top menu, click on the Home tab
Step 2: Now, click on the Paragraph symbol from the Paragraph section
Step 3: You will see where the Paragraph ends. Refer to the below image
Step 4: Now, select the line break symbol as shown below
Step 5: Simply delete it
You will see the extra spaces removed from the last line.
That’s All
We hope this article has been informative. Thank you for Reading.
Kindly comment and let us know the fix that helped you fix the issue.


