Many OneDrive users have reported an issue where OneDrive cannot be started in the system. For users where OneDrive already exists in the system, nothing happens even when one tries to manually start the application. That is when you
- Double-click on the OneDrive icon, nothing happens.
- One Drive Icon or files will not even be shown in the Explorer window.
- If you Uninstall the app and Re-install it back, again, you won’t be able to start OneDrive.
This weird issue is noticed both in OneDrive for Personal Use as well as in One Drive for Business. In this article, we will be looking at the potential ways to fix the One Drive not Opening, Starting, or Installing in Windows 10.
Fix 1: Enable OneDrive from Registry Editor
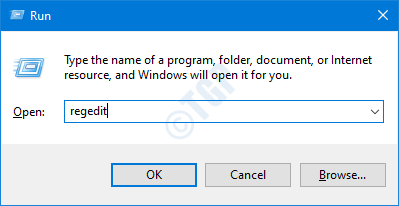
Step 1: Open the Run Dialog using the keys Windows+R
Step 2: Type regedit and hit Enter

Step 3: In the UAC window that opens asking for permissions, click on Yes
NOTE:
Registry editing can harm the system even with the slightest mistake. It is advised to take the backup of the registry before proceeding. To take a backup, In the Registry Editor–> Go to File –> Export –> Save your Backup file.
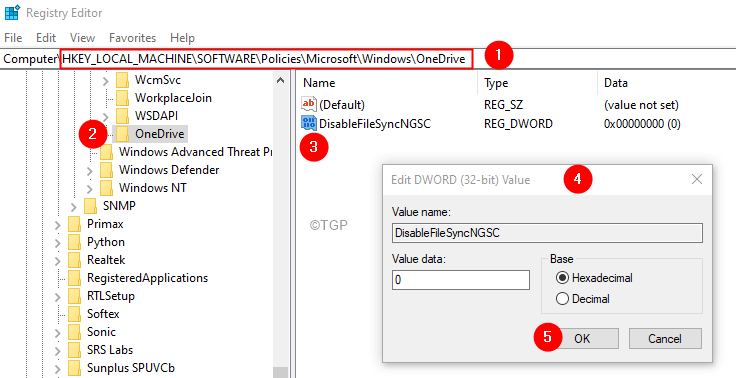
Step 4: In the Registry Editor window, on the search bar at the top, copy-paste the following location
HKEY_LOCAL_MACHINE\SOFTWARE\Policies\Microsoft\Windows\OneDrive
Step 5: From the right-hand panel, locate the key DisableFileSyncNGSC and double click on it
Step 6: In the Edit Dword window, set the value from 1 to 0
Step 7: Click on Ok
Check if this helps.
Note: – If you are still facing the issue, consider Resetting the One Drive using the following steps.
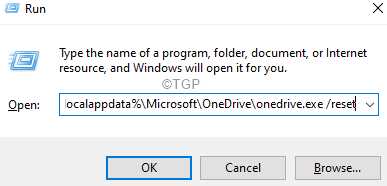
Step 8: With the keys Windows+R, open the Run Terminal
Step 9: Enter the following and hit Enter
%localappdata%\Microsoft\OneDrive\onedrive.exe /reset
NOTE: If you see any error, enter the below command in the Run dialog and hit Enter:
C:\Program Files (x86)\Microsoft OneDrive\onedrive.exe /reset
Step 10: In the search box located next to the Windows logo( Start Symbol), type OneDrive
Step 11: Now, click on the OneDrive App that shows up first in the Search Results.
Step 12: In the opening window, enter your sign-in credentials and set up OneDrive.
Fix 2: Enable One-Drive from Group Policy Editor
NOTE: This fix works only in Windows 10 Professional Edition.
Step 1: Open the Run Terminal
Step 2: Type gpedit.msc and hit Enter

Step 3: In the Group Policy Editor editor window, from the left-hand side menu, navigate to the below location. You can double-click on the selection to expand it.
Local Computer Policy>Computer Configuration>Administrative Templates>Windows Components>OneDrive
Step 4: From the right-hand side, check the value corresponding to Prevent the usage of OneDrive for file storage.
Step 5: The Value should either be Disabled or Not Configured.
Step 6: If the value is Enabled, double click on Prevent the usage of OneDrive for file storage option to modify its value
Step 7: In the appearing window, click on the either Disabled or Not Configured
Step 8: Click on Apply followed by OK
Check if this helps, if not consider resetting the OneDrive(Refer Steps 8-10 From Fix 1)
That’s All
We hope this article has been informative. Thank you for Reading.

