Are you experiencing any issue with the printer on your computer? Is it showing an ‘Error Code 1260‘ whenever you are trying to print something? If you indeed facing the issue on your computer, don’t worry. You can take care of this issue by simply following some quick and easy steps. But before going on ahead for the main solutions, check out these workarounds.
Initial Workarounds–
1. Reboot your computer.
2. Disable or uninstall any antivirus from your computer.
Fix-1 Disable Windows Firewall-
Disabling the firewall on your computer may solve this issue.
1. Press Windows key+I to open Settings.
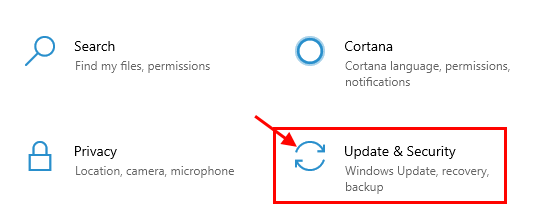
2. In the Settings window, click on “Update & Security“.

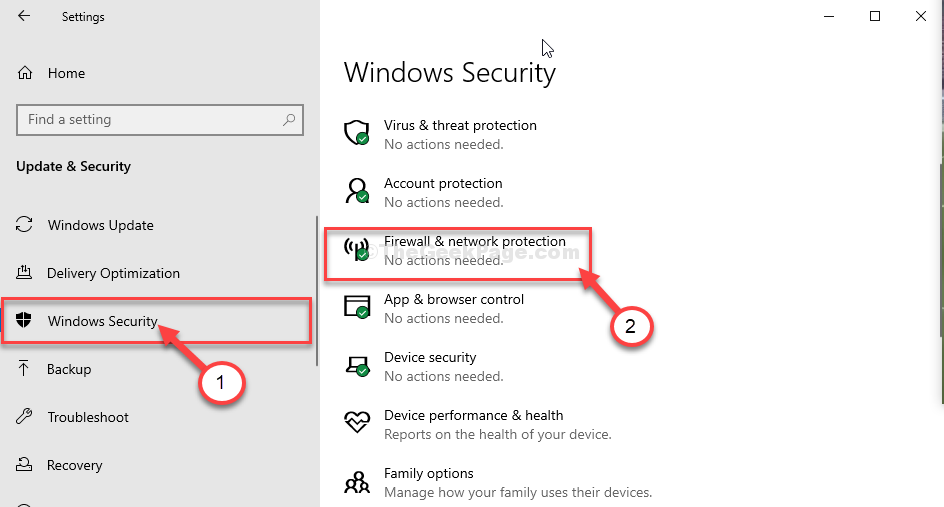
3. In the Settings window, on the left-hand side, click on “Windows Security“.
4. On the right-hand side, click on “Firewall & network protection“.

Windows Security window will be opened.
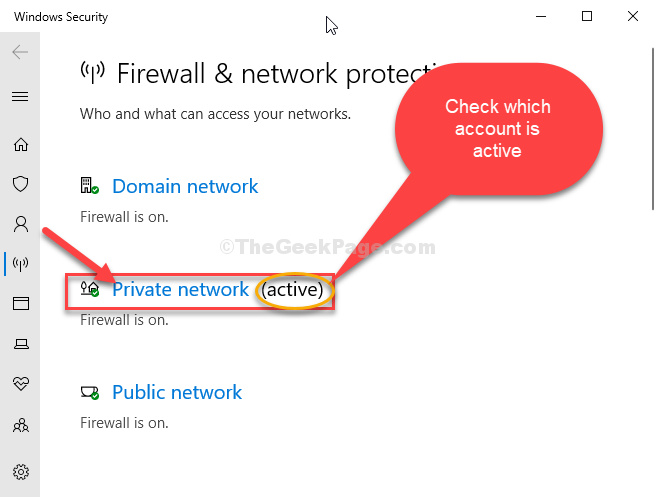
5. In the Firewall & network protection window, simply click on the network type beside which you will notice “(active)”

6. Now, scroll down through the settings window.
7. Then, toggle Microsoft Defender Firewall to ‘Off‘.

Close Settings window.
Now, try to print something and check if this works.
NOTE–
Windows Firewall provides a security barrier that protects you from different types of viruses, malware intrusions. Switching it off may make your pc vulnerable to such threats. So we suggest that you shouldn’t keep the firewall down for a prolonged period.
Fix-2 Run Printer Diagnostics-
Printer Diagnostics may detect the printing issue on your computer.
1. Press Windows key+R to open Run window.
2. To run the Printer Diagnostics, type or copy-paste this run command and hit Enter.
msdt.exe /id PrinterDiagnostic

3. Once the printer troubleshooter window appears, click on “Advanced“.

4. Make sure that the “Apply repairs automatically” option is checked.
5. Now, click on “Next“.

The troubleshooter will identify if there is any problem with the printing services.
6. Now, click on “Apply this fix” to apply the fix.

7. Finally, click on the “Close the troubleshooter” option to complete the troubleshooting process.

Reboot your computer.
After rebooting your computer, check if you are still facing the issue.
Fix-3 Disable Point and Print Restrictions-
Sometimes Point and Print restrictions policy can restrict the printing service connection to a random server.
1. Search for the “Edit Group Policy“.
2. A simple click on the “Edit Group Policy” in the search results.

3. Then you need to go here-
User Configuration > Administrative Templates > Control Panel > Printers

4. Now, on the right-hand side, double click on “Point and Print Restrictions“.

5. In Point and Print Restrictions window, set the policy to “Disabled“.
6. To save the settings, “Apply” and then on “OK“.

Once done, close the Local Group Policy Editor window.
Reboot your device.
After rebooting your computer, the printing device will work smoothly.