Windows Update keeps your system updated and protected al the time. If you see this error message “We couldn’t install this update, but you can try again (0x800f081f ).”, while installing an Cumulative Update or a feature update, it can become problematic. There are some good resolutions that should fix this issue. So, without wasting anymore time, jump right into this solutions to fix this Windows Update issue in no time.
Preliminary Workarounds –
1. If this is the first time, restarting the system should do the trick. After restarting, download & install the update. Do not let the computer go into hibernation or sleep mode. Check whether this helps.
2. Some of the Windows Updates are just update previews. In that case, you can skip that update.
Fix 1 – Test the compatibility from regedit
You can use the Registry Editor to identify whether your device is actually compatible with the recent update that you are trying to install.
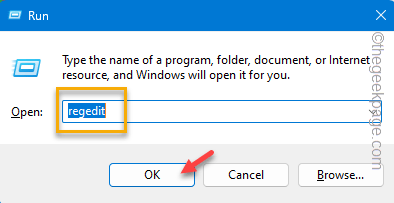
Step 1 – Using the Start key and R key call a Run box.
Step 2 – Next, just write down this word. Click “OK” to open it up.
regedit
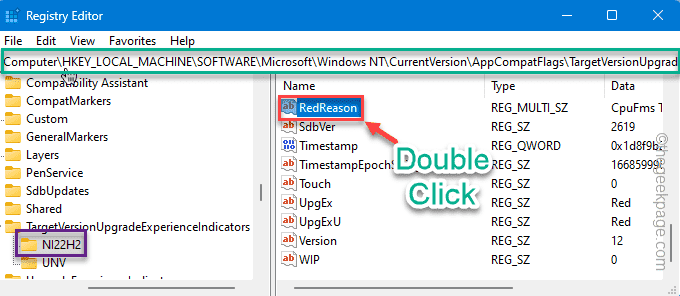
Step 3 – After opening the Registry Editor screen, head on to this point –
Computer\HKEY_LOCAL_MACHINE\SOFTWARE\Microsoft\Windows NT\CurrentVersion\AppCompatFlags\TargetVersionUpgradeExperienceIndicators\NI22H2
Step 4 – The left-hand pane will be filled with values. Look for “RedReason” value. Double-tap to edit it.
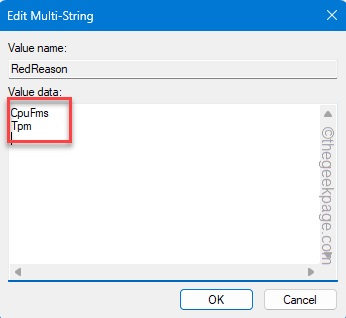
Step 5 – Check what is ‘Value Data’ stating.
If it shows “None” in the box, then there is not issue and you can install the update. Follow other solutions to fix this problem.
Otherwise, if you see “TPM UEFISecureBoot” or anything else, the machine doesn’t support the update and you can’t install that.
There is another check that you need to perform.
Step 6 – Go to this point –
HKEY_LOCAL_MACHINE\SOFTWARE\Policies\Microsoft\Windows\WindowsUpdate
Step 7 – On the right-hand pane of the same page, look whether you can see these two update components are present –
WUServer
WIStatusServer
Step 8 – If you can find those value there, right-tap each of them and tap “Delete” to remove thme.
Step 9 – Windows will automatically throw up a warning statement.
Step 10 – Tap “Yes” to delete those values.
Once you are through all the checks, exit Registry Editor point.
Restart your computer. Once the device boots up log in to your account and then retry installing the update.
Fix 2 – Check whether the update components are blocked
Windows Update or sub-sequent update components can get blocked via group policy. In that case, disable that group policy and retry the update process.
Step 1 – Write “gpedit” in the search box.
Step 2 – Then, click “Edit Group Policy” when you see that there to open it.
Step 3 – Get to this point following the left pane –
Computer Configuration > Administrative Templates > System
Step 4 – On the opposite side, if you look, you can locate the “Specify settings for optional component installation and component repair“.
Step 5 – Choose the “Enabled” option.
Step 6 – Tap “Apply” and “OK“.
Exit Group Policy after this.
Restart your system to apply the group policy there. Then, try to install the update once more.
Fix 3 – Download & Install from WU catalog
Download and install the update using the Windows Update catalog.
Step 1 – Hold the ⊞ Win+I keys. Choose “Windows Update“.
Step 2 – Yo will see that every update package has a number beside it. This is known as “KB” number.
Step 3 – Go to the Microsoft Update Catalog.
Step 4 – There, put the KB number that you have noticed before.
Step 5 – Tap “Search” to query for that particular update package.
Step 5 – Now you can see the particular update packages as a table format.
Based on the CPU architecture (x64 or ARM-based), tap “Download” to download that update.
Step 6 – Tap the .msu link to download it.
Usually, these update packages are larger in size. Exit the browser after downloading the package.
Step 7 – Now, double-tap the downloaded update package to run the installer.
This installer behaves as same as the WU native process. When the update files are installed on your system, restart as the update installer prompts.
Check if this solves.
Fix 3 – Run the WU troubleshooter
Your system has its own Windows Update troubleshooter that tracks down the update issue and fix it in the process.
Step 1 – After opening Settings, using Win+I shortcut key, get to the “System” tab.
Step 2 – Now, if you scroll down slowly, you may find “Troubleshoot” option. Open that up.
Step 3 – Now, click “Other troubleshooters” to open it.
Step 4 – Find “Windows Update” troubleshooter. Then, tap “Run” to initialize the troubleshooter.
Apply and test the solution.
Test whether this works or you are seeing Error Code 0x800f081f.
Fix 4 – Force-recreate the WU local cache
You can force-recreate the Windows Update local cache using the CMD terminal method.
Step 1 – Open the Run panel.
Step 2 – Write this in the box. Use Ctrl, Shift and Enter keys at once.
cmd
Step 3 – Input these codes one after another and hit Enter to put a stop on all the WU components.
net stop bits
net stop wuauserv
net start appidsvc
net start cryptsvc
Next, you have to execute these steps to change the name of the two WU folders.
Step 4 – Copy these two codes and paste them on the terminal page one after another. Then, hit Enter to rename those folders.
ren %systemroot%\softwaredistribution softwaredistribution.old1
ren %systemroot%\system32\catroot2 catroot2.old1
Step 5 – Run these four commands to start those stalled services.
net start bits
net start wuauserv
net start appidsvc
net start cryptsvc
Exit the Command Prompt screen, after running all those specified commands.
Fix 5 – Restart the Windows Update service
Windows Update service is one of the most-required for the WU process. Check if this helps you resolve.
Step 1 – Write “services” in the search box.
Step 2 – Then, tap “Services” to open it up.
Step 3 – Look for “Windows Update” service.
Step 4 – Then, double-tap it to open the Windows Update service.
Step 5 – Fix the ‘Startup type:’ to “Automatic“.
Step 6 – Click “Start” to start the service, provided the service hasn’t started yet.
Step 7 – After this, tap “Apply“. Finally, click “OK“.
Exit Services when you have set the Windows Update to start automatically, exit Services.
Check if this helps.
Fix 6 – Run a few file component checker scans
There are some scans that you should run that should help you resolve any issues regarding missing system files.
Step 1 – Type “cmd“.
Step 2 – As soon as you see “Command Prompt“, right-tap that and click “Run as administrator“.
Step 3 – Type this code and hit Enter to initiate a DISM scan.
DISM /Online /Cleanup-Image /RestoreHealth
Step 4 – Wait until DISM scan reaches 100% completion. Then, initiate this SFC scan to fix the problem.
sfc /scannow
Exit CMD terminal after this.
You won’t face the error 0x800f081f in Windows Update again.


