Update errors are nothing new in Windows machines. Update Error 0x80244002 is an error code that shows up when something is wrong with the Windows Update process and the machine is having some difficulty installing the updates. In this article, we have detailed solutions, which if you follow, you can easily fix the issue.
Fix 1 – Get the update package manually
Are you having a problem downloading a particular update package? You can directly get the standalone installer for that update.
Step 1 – Open Settings on your computer.
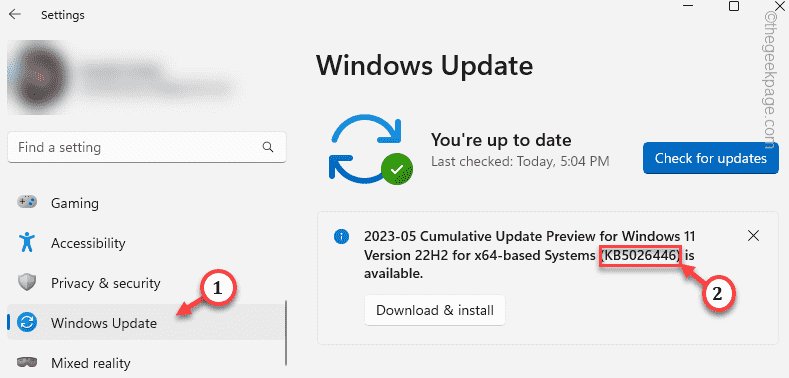
Step 2 – Open the “Windows Update” section. You will find a number beside the update that Windows is trying to download. We need this KB number.
Step 3 – Copy it from here.
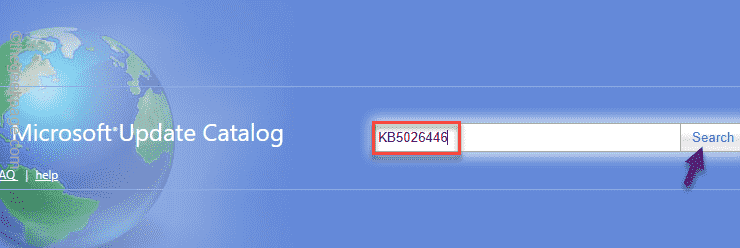
Step 4 – Go straight to the Microsoft Update Catalog.
Step 5 – There, put the KB number that you have copied before and click “Search” to query for that particular update package.
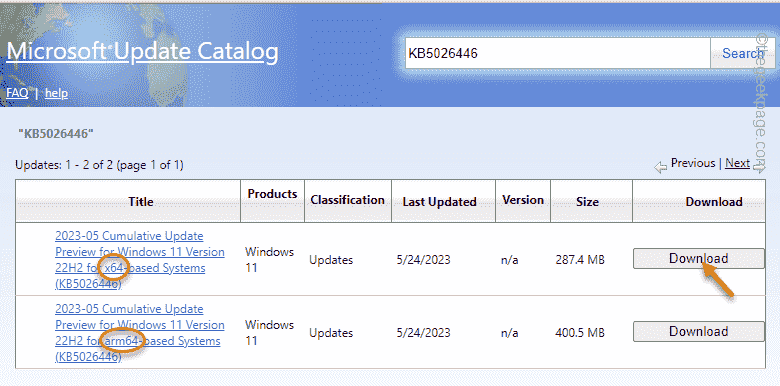
Step 6 – Now you can see the particular update packages in the results table.
Depending upon the system type you are using (x64 or ARM-based), click “Download” to download that update.
These update packages consume a lot of space and take some time to download it.
Once you have downloaded it, go to the location of that file.
Step 7 – Now, double-tap the downloaded update package to run the installer.
Just follow the on-screen steps to install the updates.
Fix 2 – Clear the SoftwareDistribution folder
Try deleting the contents of the Software Distribution folder which contains the Windows Update components.
Step 1 – Quickly open the Run box.
Step 2 – At the second step, paste this address. Click “OK“.
C:\Windows\SoftwareDistribution\Download
Step 3 – You will find several WU components. Select all of those and hit the bin icon to clean up the entire folder at once.
Close the Download folder.
Restart your system after this.
Fix 3 – Restart Windows Update-related services
Restart the Windows Update-related services to fix the issue.
Step 1 – Type “services” beside the Windows icon.
Step 2 – Tap “Services” to open it.
Step 3 – Go all the way down to the “Windows Update” service.
Step 4 – Directly right-tap the service and tap “Restart“.
Step 5 – Now, scroll up and find the “Background Intelligent Transfer Service” service. Then, right-click that service and use the “Restart” service.
This way, you can restart these services.
Fix 4 – Turn off the firewall and test
The firewall on your system may be blocking access to the Windows Update.
Step 1 – Quickly hold the Win+R keys at once.
Step 2 – Paste this and hit Enter.
firewall.cpl
Step 3 – If you look carefully, you can find the “Turn Windows Defender Firewall on or off” option. Using this option, you can disable the firewall.
Step 4 – Check which type of network you are using now.
Step 5 – Then, check the “Turn off Windows Defender (recommended)“. Click “OK” to turn off the defender.
Close that Control Panel page. Try to update the machine once more from the Settings.
Are you using a third-party antivirus? Then, you can pause or restrict the antivirus by following these steps –
1. Click the arrow symbol, laying on the bottom left corner of the taskbar.
2. Look for the antivirus app icon there. Directly, right-click that and tap “Pause antivirus” to pause the antivirus.

Now, try to update the system and check once more.
Fix 5 – Use the Windows Update troubleshooter
Windows Update troubleshooter can identify the defective cog in the WU system and fix it automatically.
Step 1 – Just type “troubleshoot“.
Step 2 – Then, click “Troubleshoot Other problems” to open it.
Step 3 – Look for the Windows Update troubleshooter. Tap “Run“.
Let the Windows Update troubleshooting algorithm find out the WU issue and fix it.


