Notepad missing from your Windows 10 or windows 11 PC? This can be really frustrating as most of the Windows users are addicted to using the traditional Notepad than the modern versions. While there are quite a few alternatives these days, there are still many users who are rather comfortable using the simple plain-text editor. A part of the Microsoft Windows OS for over the longest time now, Notepad has become an important feature for all users. It’s best used to remove formatting from text and hence, when this handy tool goes missing, it can be a challenge for its fans to adapt to its alternatives. While you can try installing the Notepad app through Microsoft Store, if it doesn’t help, you can use the fix below.
So, if you are looking for Notepad on your PC and unable to find it, here’s how you can fix the Notepad missing issue on your Windows 10 PC.
*Note – Before you proceed, make sure that you check if the .exe file for the Notepad is still in the system32 directory:
If not, proceed with the below method.
Solution 1 : By Installing Notepad Through Optional Features in Settings App
Case 1 – For Windows 10 Users
Notepad is now available as an optional feature in Windows 10 and hence, you can install it through Optional Features in the Settings app. Follow the below instructions to install Notepad:
Step 1: Press the Win + I keys together on your keyboard to launch the Settings app.
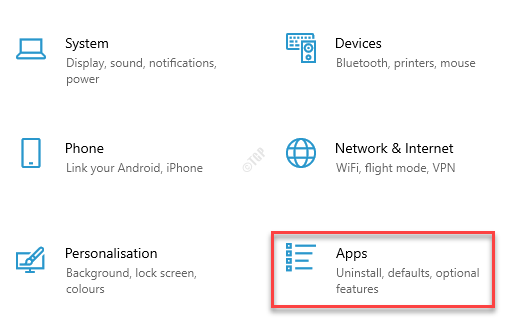
Step 2: In the Settings window, click on the Apps option.

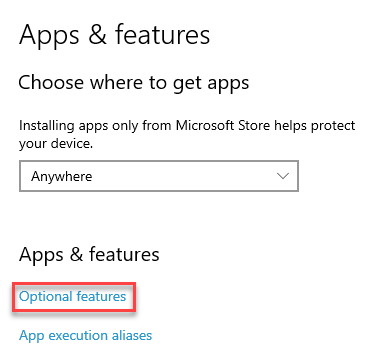
Step 3: Next, in the Apps settings window, go to the right side, scroll down and under the Apps & features window, click on the Optional features link.

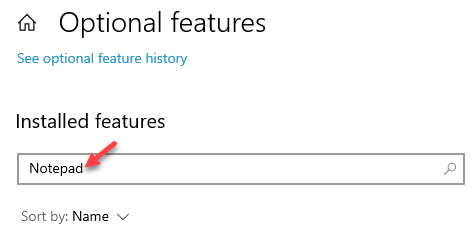
Step 4: In the Optional features window, go to the Installed features field and search for Notepad.

Step 5: If it appears in the search result, just Uninstall it
Now, Restart your computer . Now, Open settings > Apps > Optional Features Once again and go to step 6
If it doesn’t appear in the Installed features list
Step 6: click on Add a feature.

Step 7: Next, in the Add an optional feature window, type Notepad in the search field.
Now, check the box next to Notepad to select it and then click on the Install button below.

Now, wait for the installation to complete. Once it’s over, go to the Installed features section again and look for Notepad. You should now see it in the list.
Now, exit the Settings app and try launching Notepad normally and you should be able work with the usual Notepad again.
Case 2 – For Windows 11 Users
1- Search Optional Features in Windows search box.

2 – Now, Search Notepad in installed features and click on uninstall to remove it.
If it is not found , its ok, move to the next step.

3 – Now, click on View features.

4 – Now, search Notepad.
5 – Check the option of notepad which appears in search result.
6 -Click Next to install it.

Solution 2 : Using SFC / SCANNOW Command
1- Search cmd in windows search box.
2 – Now, right click and run as admin.

3 – Now, type the given below command and hit enter to execute the command.
SFC /SCANNOW
Wait for some time to get the command get executed fully.
Solution 3: Try running Notepad via run command
1- Press Windows key + R keys together to open run.
2 – Now, copy and paste the path given below and click OK to open notepad.
C:\Windows\notepad.exe
