Is the BitLocker Drive Encryption feature missing from the Control Panel on your side? The BitLocker Encryption, just as the name suggests, encrypts Windows 10/11 drives. But, if the feature isn’t available on the Control Panel page, you can’t use it to secure the system drives. Luckily, certain resolutions can help you mediate this issue and you can use the BitLocker Encryption in no time.
Workarounds –
1. Can’t find the BitLocker Encryption in the Control Panel? Search for it using the search box and open the “Manage BitLocker“.
2. This can just be a glitch. So, make sure to perform a machine reboot, before you jump to the next solution.
Fix 1 – Check whether your system supports BitLocker
BitLocker Encryption system is available only on the Windows 11/10 Enterprise, Business, and Pro versions, except the Home version of OS.
Step 1 – Hold the Win+I buttons for a few seconds to get back to the Run panel.
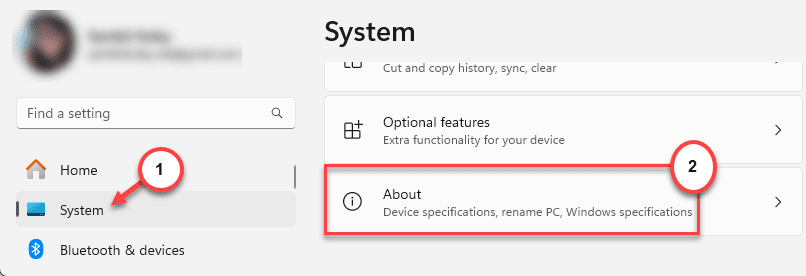
Step 2 – Go to the “System” when the Settings page appears.
Step 3 – Travel to the bottom of the page to find and open the “About” section.
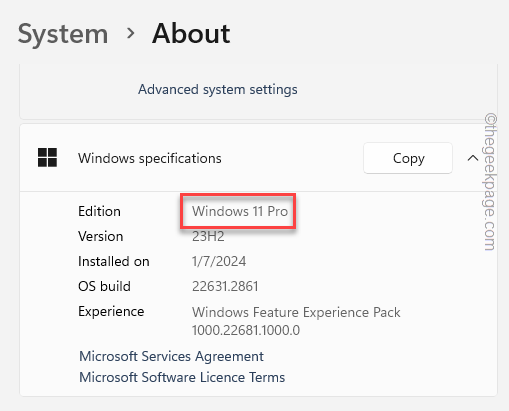
Step 4 – Here, you will see the Windows specifications in there
Step 5 – If it reads, Windows 11 Home or Windows 10 Home, you will never find the BitLocker Encryption feature, as the latter isn’t available on this version of Windows.
But, if you have got a Pro/Enterprise/Business version of the OS, and you still can’t find the BitLocker Encryption tool, follow the next solutions.
Fix 2 – Run the BitLocker service in manual mode
BitLocker Encryption services shouldn’t be set to run in Manual (Triggered start). It should be turned on automatically.
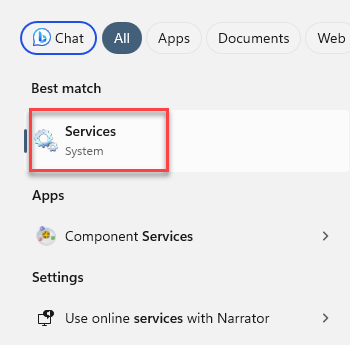
Step 1 – At first, search “services” using the search box.
Step 2 – In the search results, tap “Services” to open that up.
Step 3 – Quickly find the “BitLocker Drive Encryption” service on the utility page.
Step 4 – There, right-click the service and tap “Properties“.
Step 5 – Switch the ‘Startup type:’ to “Automatic (Delayed Start)” mode.
Step 6 – Do the needful to save these changes. To do that, tap “Apply” and “OK” in the same mode.
Exit the Services utility.
This modification in the BitLocker Drive Encryption only takes effect after the system restarts.
If you get any error while altering the startup type of the BitLocker Drive Encryption service, follow these steps –
Step 1 – You can run this through a cmdlet. Start by typing “cmd“.
Step 2 – Next, right-tap the “Command Prompt” and tap “Run as administrator” in the context menu.
Step 3 – When the terminal loads up, input this code in there and hit Enter.
sc config BDESVC start= demand
After executing this code, close the Command Prompt shell.
Fix 3 – Use the cmdlet
You can use the Command Prompt tools to directly access the BitLocker Encryption tool on your computer.
Step 1 – You will need access to the terminal with administrative rights. So, type “cmd” there.
Step 2 – Next, when you see the “Command Prompt“, right-tap “Run as administrator“.
Step 3 – As soon as the terminal elevates, paste this line and hit Enter.
control /name Microsoft.BitLockerDriveEncryption
Within moments of executing the command, the BitLocker Drive Encryption panel should load up.
This can be a pretty good workaround until the BitLocker Drive Encryption feature re-appears in the Control Panel.
Step 4 – If executing this command doesn’t do anything meaningful, you have to use this command to get access to the BitLocker Encryption panel.
manage-bde -status
This way, you can have an idea and information on the current state, conversion status, and lock status of the BitLocker Encryption on your device.
Fix 4 – Refresh the PC
If all the possible solutions have failed to retrieve the BitLocker Encryption tool, you should use the refresh option to get back the option in the Control Panel.
NOTE – Whether you refresh or reset the PC, all the apps will be deleted from your device. So, before you proceed, you should create a backup of the apps beforehand. Windows will present you with the list of apps that are going to be removed in the system refresh process. However, do not choose to reset the PC.
Step 1 – Hold down the Win+I buttons together for a brief few seconds.
Step 2 – Go to the “System” tab.
Step 3 – On the opposite side of the page, find and open the “Recovery” tool.
Step 4 – Find the Reset tools in there. Tap the “Reset PC” option.
Step 5 – As the Reset panel hovers on your screen, tap the “Keep my files” option.
Step 6 – In the next step of the process, opt for the “Local reinstall” selection.
This way, Windows will reinstall the OS without touching any of your files.
Step 7 – Finally, tap “Next“.
Allow a few moments for the system to analyze and list out all the apps that will get removed in due process.
Your computer will be rebooted and refreshed with the default version of Windows.
Now, you won’t have any trouble accessing the BitLocker Drive Encryption system on your system.


