The Mso.dll file is a very important file and is part of Microsoft Office and Microsoft Visual Studio. There are several issues associated with this file on the Windows system. Though the majority of the affected users have reported the “Mso.dll file is missing” or “Cannot file <location>\Mso.dll” message.
Fix 1 – Quick Or Online Repair MS Office
As the Mso.dll file is directly associated with MS Office, you should try to repair it.
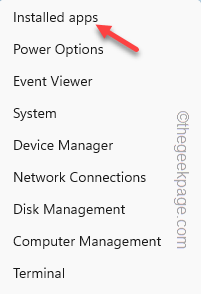
Step 1 – Just right-click the Windows icon and tap “Installed apps“.
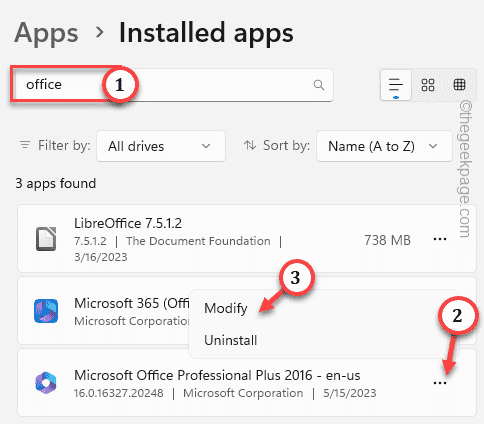
Step 2 – On the Installed apps on the right-hand pane, write “office“.
Step 3 – Once you see the Office app, click the three-dot menu and tap “Modify“.
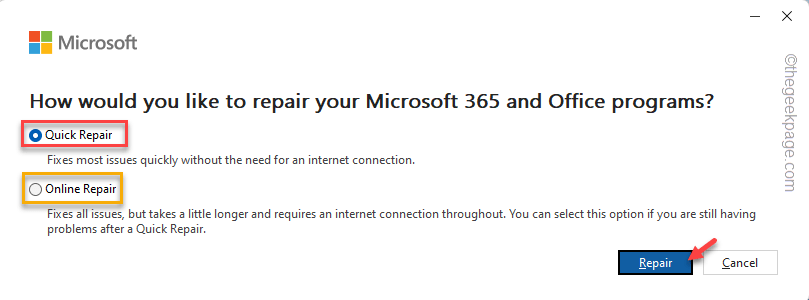
Step 4 – Now, just click “Quick Repair” to repair the MS Office apps.
You can additionally opt for the Online Repair option as well.
Step 5 – Then, tap “Repair” to start modifying the app.
This way, you can repair the Office package application. This will replace the missing MSO.dll file in its place.
So, reboot the computer and check again. Test if this helps.
Fix 2 – Run a full scan using Windows Security
You should test the system with a full Windows Security scan.
Step 1 – Write “security” directly on the search box.
Step 2 – Upon seeing the “Windows Security” tool, open it.
Step 3 – Open the “Virus & threat protection” tool to open it.
Step 4 – You can directly initiate a scan using the “Quick scan” option.
Step 5 – Otherwise, you can just use the “Scan options” to open a list of possible scanning options.
Step 5 – Choose the “Full scan” mode.
Step 6 – Hit the “Scan now” to scan it.
Wait until your whole system is scanned. This may take a while.
If Windows does that, quarantine the suspicious objects. This should get rid of the Mso.dll issue on your system.
Fix 3 – Test it with SFC, DISM code
MSO.dll is a valid Office file. So, you should try to fix it using the SFC, DISM scan.
Step 1 – Using the Win and the R keys, call upon a Run panel.
Step 2 – Then, type this there, and hit Ctrl, Shift, and Enter keys together.
Step 3 – After initiating the terminal as an administrator, directly input this command and hit Enter.
sfc /scannow
You can track the progress of this System File Checking tool scanning all the system files. Wait until it reaches 100%.
Exit the terminal after this and restart your computer.
Try to test whether you are still facing the MSO.dll issue or not.
Fix 4 – Uninstall and reinstall the Office package
Uninstall the Office package completely, and then reinstall it to fix the issue.
Step 1 – You have to open Settings to do this. So, use the Win+I keys together.
Step 2 – Head on to the “Apps“.
Step 3 – Then, you have to open the “Installed apps“.
Step 4 – Search “office” from the search box.
Step 5 – Next, tap the three-dot menu and click “Uninstall“.
Follow the steps on the Office Setup to uninstall it from your computer.
Download and reinstall the Office from Microsoft Office page. Otherwise, you can directly use the Microsoft 365 app to get it.


