Is the ReadyBoost tab not showing up on any drives on your system? Don’t worry. ReadyBoost, is the technology that uses the free space on your drives to make the system faster. But, if you can’t find the specific ReadyBoost tab in the File Explorer, these are the resolutions you need to follow to sort this out quickly.
Fix 1 – Compatible USB drive
There are specific USB drives that support ReadyBoost natively. Like the NTFS, FAT16 or FAT32 formatted drives support the ReadyBoost tech.
Step 1 – You have to check the drive type. So, open the File Explorer.
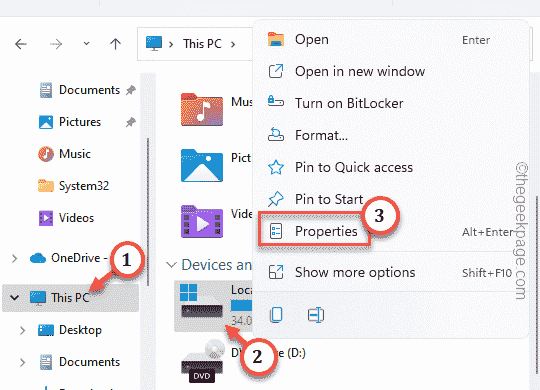
Step 2 – Go to the “This PC“. You will see all the drives. Now, right-click the drive and tap “Properties“.
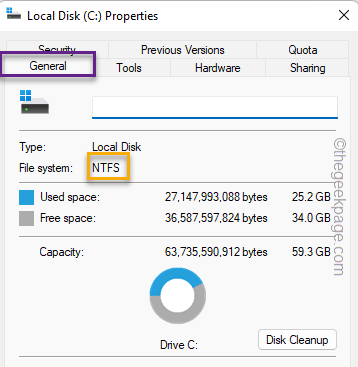
Step 3 – Go to the “General” tab.
Step 4 – Check the File System. If it is NTFS, FAT16, or FAT32, then you should find the ReadyBoost tab.
Follow other solutions to fix the issue.
Fix 2 – Update the USB drivers
Update the USB drives on your computer.
Step 1 – Press the Win key and the X keys at once.
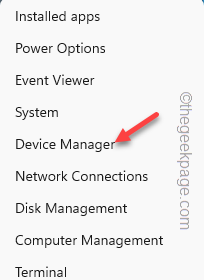
Step 2 – Select the “Device Manager” to open that.
Step 3 – After opening the Device Manager, expand the “Universal Serial Bus controllers“.
Step 4 – Just right-click the USB driver on the list and click “Update driver“.
Let Windows search and install the necessary drivers.
Additionally, you can check the Windows Update for these kinds of updates.
1. Open Settings and go to Windows Update.
2. Now, go to the “Advanced options“.
3. Expand the “Optional updates” section.
USB driver updates are streamed down this channel.
4. If you can see any such driver update, check that box and click “Download & install“.
Try to look for the ReadyBoost from that drive properties.
Fix 3 – Are you using an SSD?
Do you have an SSD+HDD configuration? ReadyBoost is quite old and may not be helpful in your case. Like, open the ReadyBoost on a machine with SSD. It will show you the “This device cannot be used for ReadyBoost. ReadyBoost is not enabled because this computer is fast enough to provide additional benefit.” message.
This means the machine is already so fast, ReadyBoost won’t be able to give much
Fix 4 – Windows version support
Several Windows versions do support the ReadyBoost like Windows 7, 8, 10, 11. But some older versions like Windows XP or if you are using Windows Server, you won’t see the ReadyBoost.
Fix 5 – Run a file checker scan
Sometimes all it takes is just a file-checking scan. You can run that from the terminal.
Step 1 – Use the Win+R keys at once.
Step 2 – Quickly type “cmd“. Use the Ctrl, Shift, and Enter these three keys together.
Step 3 – Subsequently, paste this line in there. After this, use the Enter key to run this SFC tool.
sfc /scannow
System File Checker will be initiated. Once it is completed, quit the terminal.
Check if this works.


