When your computer BIOS can’t locate or identify the actual bootable operating system while your system boots up, it will show you this error message – “Non-system disk Error or disk Error“. The system won’t be booting up normally at all until and unless you manually solve the issue first. This issue occurs when the BIOS tries to boot the OS from other drives instead of the actual system drive. The reasons are very limited but may differ from system to system. Just apply these fixes to your system and the system will be up and running in no time at all.
Fix 1 – Remove any additional drives
As the first solution, we suggest you remove any additional drives (like CD/DVD) from your system.
1. At first, press and hold the power button for 10 seconds to completely shut down your system.
2. Detach it from the power source.
3. Now, carefully remove any additional USB devices from your computer (including external HDDs).
4. Make sure there aren’t any CD or DVD discs in the disk tray.
5. Once you are sure there aren’t any disk/drives attached to your system, connect the power cable to your system.
6. Now, press the power button once to startup the system.
BIOS won’t find any other drives and boot from the system drive. This should fix your problem.
Fix 2 – Re-arrange the boot sequence
The main issue lies within the misconfigured boot sequence. So, why don’t alter it manually?
1. Shut down your computer.
2. Once you are sure that it is turned off, press the power button once to start it up.
3. When the manufacturer logo shows up, press and hold the “Delete” key on your keyboard to access the BIOS settings.
NOTE –
Keep in mind that this button to access the BIOS alters from manufacturer to manufacturer, even sometimes from model to model.
Keep your eyes open for the actual button to access BIOS while your computer boots up.

3. Now, go to the “Boot” tab.
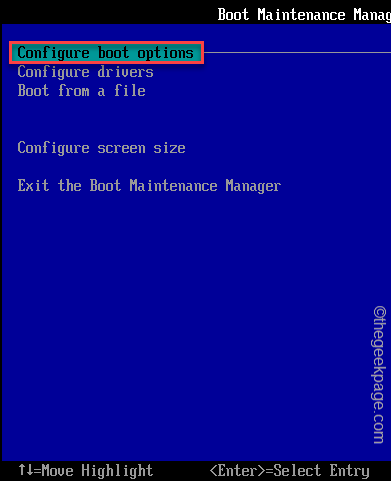
4. Then, select the “Configure boot options” with arrow keys and hit Enter to access it.

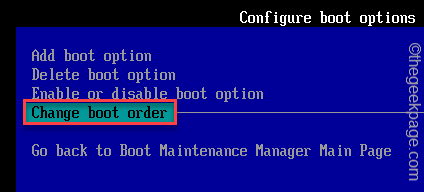
5. Then, scroll down to the “Change boot order” and hit Enter to access it.

5. You will see the list of bootable devices (like – HDD/SSD, CDROM drive, Network, USB devices).
6. Use the arrow key to select the HDD/SSD drive (that contains the Windows folder) and move it to the top.
7. Once you have done that, scroll down to select the “Commit changes and exit” option and hit Enter.

8. Finally, press the “F10” key to save this setting.

Your computer should boot up normally.
Fix 3 – Remove and reinstall Hard Drive
There is a possibility that the SATA/IDE connector to your motherboard has worn out or it is loose.
1. At first, switch off your system. Once it shuts down, disconnect the system from the power source.
2. If you are using a laptop, remove the battery from the back.
3. Then, open the casing/panel. For the laptop users, unscrew the back cover.
4. You will notice the HDD/SSD is connected to your motherboard with SATA/IDE cable connector.
5. Check the connection with your hands and if anything feels a bit loose, connect it correctly.
6. Remove the system disk.
7. Visually inspect the condition of the wire. If the connector seems worn out or damaged, you have to replace it with a new one.
8. After checking it, reinstall the system disk again.
9. Once you are done, close the casing. If you are using a laptop, screw up the back cover.
Fix 4 – Rebuild MBR
In some cases, the Master Boot Record can get corrupted. You have to manually rebuild it.
1. At first, switch off your system.
2. Then, switch it back on.
c. After that, once your system starts up, just press and hold the power button again to force shutdown your system.
d. Just repeat this task for 1-2 times more and for the 3rd time, let your computer boot up normally.
Your system will go to the ‘Automatic Repair’ mode automatically.
1. In the ‘Automatic Repair’ screen, you have to click on the “Advanced options“.

2. After that, just click on the “Troubleshoot“.

6. Then, you have to click on the “Advanced options“.

7. You will see many options on the next screen. But, you have to click on the “Command Prompt“.

8. Now, your computer will boot to the Command Prompt terminal.
10. Then, select your account and tap on “Continue” to finally get access to the terminal.

11. Now, paste these commands one by one and hit Enter. This will fix the Master Boot Record.
bootrec /fixmbr
bootrec /fixboot

12. Now, you can easily reconstruct the boot configuration directory. Just execute this code to do so.
bootrec /rebuildbcd

Once it is done, close the terminal.
13. Your system will boot into the first screen.
14. Then, click on “Continue“.

Let your computer boot into Windows 11. This fix should solve the ‘Non-system disk or disk error’ on your system.
Fix 5 – Set the system partition to active
Sometimes the system partition on your machine can go inactive. Follow these steps to re-activate it again.
1. Open the Window Recovery Environment following the steps mentioned before.
2. Once you are there, tap on the “Advanced options“.

3. Then, go this way to open the Command Prompt screen ~
Troubleshoot > Advanced options > Command Prompt
4. Next, log in with your administrative account and password to open the Command Prompt.

5. When the terminal appears, type this command and hit Enter.
diskpart

6. Now, type these commands one by one and hit Enter.
List disk
Select disk 0
NOTE –
In the “Select disk” command, the system disk is usually set to 0. But check the actual number from the list of disks and then put the number associated with your system drive.

7. Now, type these commands one by one and hit Enter to select the partition.
list partition
Select partition 1
NOTE –
Check the list of partitions to identity which is the “System” partition. Usually, it is partition 1. But, check your own list partition because it may differ.

8. Finally, execute this single line code to activate the partition.
active

Close the Command Prompt window. You will back to the first screen.
9. Tap on “Continue“.

Once you are done, you can normally use your machine. This should have fixed your issue.
Your problem should be solved.
Additional Tips –
1. If nothing is working out, test the hard disk with another computer. If it isn’t working well, you have to replace it with a new hard disk.
2. If your hard disk is performing well, you have to perform a clean installation of Windows 11.
How to do that? Don’t worry. You can easily perform a clean installation of Windows 11.