You turned on XMP to get the memory speed you paid for. Now Windows blue-screens with SYSTEM_THREAD_EXCEPTION_NOT_HANDLED, and it blames a file called ntoskrnl.exe.
Sometimes at the desktop. Sometimes an hour into a game. Never at a convenient moment.
Why This Happens
Ignore ntoskrnl.exe. It’s the Windows kernel — the core of the operating system. It’s not broken. It’s just the thing that was running when the crash happened, so it gets named on the death certificate.
Your RAM is the problem.
Here’s the thing about XMP. It is, technically, overclocking. DDR5 sticks are only guaranteed at their base speed, usually 4800MHz. That 6400MHz on the box is a stored profile telling your motherboard “try these settings.” And Intel and AMD never promised your particular CPU could handle it.
The weak link isn’t even the RAM. It’s the memory controller, which lives inside your CPU. Every chip is a little different — some run 6400 all day, some fall over at 6000. Same model, same box, different silicon. You get what you get.
So a bit flips somewhere in memory. Windows reads garbage where it expected an instruction. Blue screen.
One more thing worth knowing. Four sticks of DDR5 are much harder on the memory controller than two. Fill all four slots and even the rated speed can fail.
Fix 1 – Confirm XMP Is Actually the Cause
Before you spend an evening on this, prove the diagnosis. Turn XMP off. If the crashes stop, you know exactly what you’re dealing with.
1 – Restart the PC and press Delete repeatedly as it boots. On some boards it’s F2 — the boot screen tells you which.
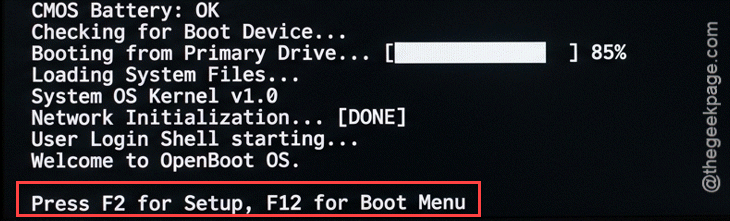
2 – Find the XMP setting. It’s usually right on the first page. AMD boards call it EXPO or DOCP.
3 – Set it to Disabled.
4 – Press F10 to save and exit.
5 – Use the PC normally for a day or two.
No crashes? Confirmed. Your RAM runs at 4800MHz now, which costs you maybe 3% in games — you will not feel it. But the fixes below will get your speed back, so keep reading.
Still crashing with XMP off? Then it isn’t the memory profile. Your RAM sticks may be faulty, or a driver is at fault. Run Windows Memory Diagnostic (press the Windows key and type it) before you go any further.
Fix 2 – Move Your RAM to the Right Slots
Two sticks in the wrong slots is the single most common cause of this, and it’s free to fix. Motherboards are designed for slots 2 and 4 when you’re only using two sticks.
1 – Shut the PC down. Not sleep — fully off. Then switch off the power supply at the back and unplug it.
2 – Hold the case power button for ten seconds to drain any leftover charge.
3 – Open the side panel and find the RAM slots next to the CPU.
4 – Count outward, away from the CPU. The slots are 1, 2, 3, 4. Your two sticks belong in slot 2 and slot 4 — the ones your board labels A2 and B2.
5 – Push the clips at the ends of each slot outward, lift the sticks out, and move them.
6 – Press each stick down firmly until both clips snap shut on their own. This takes more force than feels right. If you didn’t hear a click, it isn’t seated.
7 – Plug back in, power on, and enable XMP again.
Running four sticks? Pull two of them and use only slots 2 and 4. Four sticks of DDR5 at XMP speeds is asking a lot of any memory controller.
Fix 3 – Update the Motherboard BIOS
This one fixes more DDR5 stability problems than everything else combined. Board makers have shipped memory-compatibility updates constantly since DDR5 launched, and a board that’s a year old is running ancient memory code.
1 – Find your motherboard’s exact model name. It’s printed on the board itself, between the slots, and it’s on the box.
2 – Go to the maker’s support page for that model and download the newest stable BIOS. Skip anything marked beta.
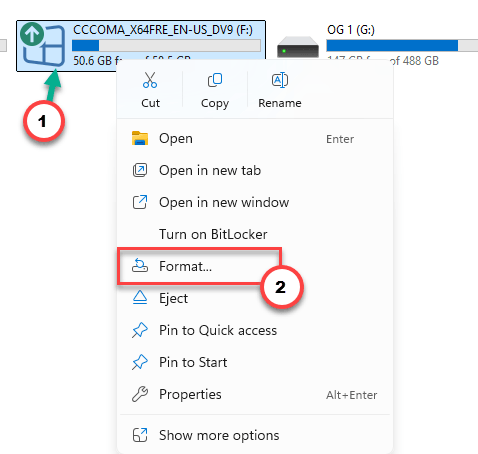
3 – Format a USB stick as FAT32. Right-click the drive in File Explorer, choose Format, and pick FAT32 from the dropdown.
4 – Unzip the download and copy the BIOS file to the USB stick.
5 – Restart into BIOS and open the built-in flash tool. ASUS calls it EZ Flash, Gigabyte calls it Q-Flash, MSI calls it M-Flash.
6 – Point it at the file on your USB stick and confirm.
7 – Do not touch anything for the next few minutes. The PC will reboot itself, possibly more than once. Losing power during a BIOS flash can leave the board unusable.
8 – When it’s done, go back into BIOS and turn XMP on again. A flash resets every setting to default.
Fix 4 – Disable Memory Fast Boot
Quick and often overlooked. Memory Fast Boot skips the memory training step at startup — the process where your board works out the exact timings to talk to your RAM. It reuses yesterday’s numbers instead. Fine until they stop being right, and then you get a random blue screen days later.
Boot into BIOS, look under Advanced Memory Settings or the Boot tab, and set Memory Fast Boot to Disabled. Save with F10.
Your PC now takes ten to thirty seconds longer to start, and it retrains the memory properly every time. Worth it.
Fix 5 – Drop the Memory Speed One Step
Your CPU’s memory controller can’t quite reach the speed on the box. So don’t make it. You lose a percent or two of performance and gain a machine that doesn’t crash.
1 – Boot into BIOS and enable your XMP profile.
2 – Find DRAM Frequency. It’s near the XMP setting, and it’ll show your rated speed.
3 – Change it one step down. From 6400MHz, that’s 6200MHz. Then 6000MHz if you need to go further.
4 – Press F10 to save and exit.
5 – Use the PC hard for a day. Game, render, compile — whatever normally triggers it.
Still crashing? Step down once more. Most DDR5 kits that misbehave at 6400 are rock solid at 6000.
Fix 6 – Nudge the Memory Voltage Up
The other direction: keep the speed, give the RAM a little more power to reach it. This is real overclocking territory, so go slowly and stay under the limits.
1 – Boot into BIOS with XMP enabled.
2 – Find DRAM VDD Voltage and DRAM VDDQ Voltage. On most boards they’re under an Advanced, Overclocking, or Tweaker menu.
3 – Note both current values. Write them down.
4 – Raise each one by 0.05V. If VDD reads 1.35V, set it to 1.40V.
5 – Never go past 1.45V. Above that you’re cooking the memory chips, and you can permanently damage them.
6 – Save with F10 and test for a day.
Extra voltage means extra heat. If your RAM has no heatsinks and lives under a big air cooler with no airflow, prefer Fix 5 over this one.
How to Prevent This
– Update your BIOS before you install RAM in a new build. Memory support improves with almost every release.
– Buy RAM off your motherboard’s QVL — the tested-compatible list on its support page. It exists precisely for this.
– Two sticks, not four. Every time. Get one 2x32GB kit instead of two 2x16GB kits.
– Test a new XMP profile with MemTest86 overnight. Better to find the instability while you’re asleep than during a raid.
– Remember what XMP is. Rated speed is a target, not a promise. Nobody owes you 6400MHz.
People Also Ask
How to fix stop code SYSTEM_THREAD_EXCEPTION_NOT_HANDLED 0x7e?
If you have XMP or EXPO enabled, turn it off first and see whether the crashes stop. That points at memory. Then move your two sticks to slots 2 and 4, update the motherboard BIOS, and if it persists, drop the memory speed one step. Without XMP on, suspect a driver instead.
Can faulty RAM cause ntoskrnl.exe errors?
Absolutely — it’s the most common cause. Windows reads a corrupted instruction from memory and the kernel crashes. The file name ntoskrnl.exe is just the kernel, so it’s not the problem, it’s the victim. Run Windows Memory Diagnostic or MemTest86 to check the sticks themselves.
How do I fix system thread exception not handled?
Depends what’s causing it. Recently enabled XMP? That’s your answer — disable it and confirm. Recently installed a driver? Boot into Safe Mode and roll it back. The blue screen usually names a file, and if that file ends in .sys, look it up. Ntoskrnl.exe means memory.