Several windows users have recently reported that they are facing an issue while using the keyboard or mouse that is connected via Bluetooth, it keeps going to sleep and the user has to wait for about 5-6 seconds before it wakes up. This is happening after a certain time of inactivity and this could be a few seconds or a few minutes for different users.
This is making users very frustrating as they are not sure what can be done and it is affecting their work on the system. The reasons behind this could possibly be one of the following:
- The Bluetooth Support Service is disabled on the system.
- The option “Allow the computer to turn off this device to save power” is enabled for either Bluetooth or keyboard/mouse.
- Outdated Bluetooth driver.
Don’t panic if you are also going through a similar or same situation, we have got the best solutions in this post which can easily solve this problem.
Workaround – Just make sure there is no defect or problem with the keyboard or mouse by disconnecting from the system and trying to connect to any other windows system. If it does not work even in other systems, you need to replace the keyboard/mouse with a new one.
Solution 1 – Check if Bluetooth Support Service is running
These kinds of problems arise on the system whenever there is some issue with the service associated with it like Bluetooth Support service in this case. So we recommend our users once check if the Bluetooth Support service is running or not and check its startup type.
Here are the steps explained below on how to check it.
Step 1: To open the Run command box, press together the Windows + R keys on the keyboard.
Step 2: After the Run box appears on the bottom left corner of the screen, type services.msc in it and hit Enter key.

Step 3: Now the services window opens on the system.
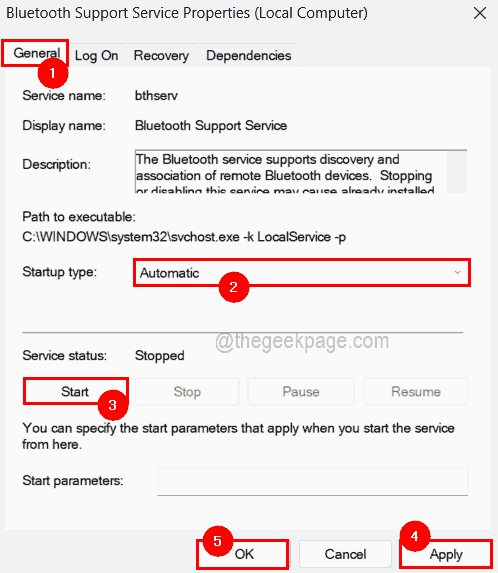
Step 4: Look for the Bluetooth Support Service from the list of services shown and double-click on it to open its properties window.

Step 5: In the General tab, select Automatic from the Startup type dropdown menu and click the Start button if the service is stopped.
Step 6: Finally tap on Apply and OK to make changes and close the Properties window.

Step 7: After this just restart the system once to make sure the changes get reflected and check if the problem got resolved.
Solution 2 – Perform the Power Troubleshooter
Running the troubleshooter is the best thing to do if there is any problem related to power management on the system. Since any device or system going to sleep means it is saving battery power. So we suggest running the power troubleshooter which tries to detect the issue and fix it.
Let us see how to perform the power troubleshooter on the windows system by following the steps below.
Step 1: Open the Run command box by pressing the Windows + X keys together to see the list of the start menu and then pressing the R key on your keyboard.
Step 2: Now type the following line and hit Enter key to execute it.
control.exe /name Microsoft.Troubleshooting

Step 3: This opens the Troubleshoot page on the system.
Step 4: Select the Other troubleshooters option as shown in the image below.

Step 5: Under the Other section, scroll down the page and you will find an option called Power. Please click its Run button to start performing the troubleshooting.

Step 6: Now perform the onscreen instructions and complete the process.
Step 7: While troubleshooting, it detects the problem and tries to fix it.
Step 8: After it is done, check if the issue still remains.
Solution 3 – Uncheck the “Allow the computer to turn off this device to save power” option
There is an option in the windows system to save the battery power by turning off the devices connected to them if it is idle or no activity. By default, Windows enables this option for all the possible devices connected externally like USB devices, other devices via Bluetooth, etc.
Let us ensure that this option is unchecked for the keyboard/mouse and Bluetooth device as explained below.
Step 1: Please open the device manager by right-clicking on the Start button on the taskbar.
Step 2: Then click the Device Manager from the list as shown below.

Step 3: After the device manager window opens up, double-click on the device that you have connected via Bluetooth either in Human Interface Devices, Mice and other pointing devices, Keyboards, System devices, Bluetooth etc.

Step 4: Once the properties window opens, go to its Power Management tab and uncheck the Allow the computer to turn off this device to save power checkbox and then click OK.

Step 5: After it is done, you can close the Device Manager window.
Solution 4 – Update the Bluetooth Driver
If the Bluetooth driver is out of date, it may act differently because it cannot properly associate with the system. So updating the Bluetooth driver is also another trick to solve this problem.
Follow the steps below on how to update the Bluetooth driver using the device manager.
Step 1: Press the Windows + R keys simultaneously to open the Run box.
Step 2: Type devmgmt.msc in the Run box and press Enter key.

Step 3: Now in the device manager window that just opened up, double-click on the Bluetooth to expand it and right-click on its adapter.
Step 4: Select Update driver from its context menu as shown in the below screenshot.

Step 5: Select Search automatically for drivers in the popped-up window as shown below.

Step 6: This will search for the update automatically and updates it.
Solution 5 – Disable USB Selective Suspend Settings in Power Options
A few windows users have resolved this issue by disabling the USB selective suspend settings in the power options window for a particular power plan. So we suggest our users try this method and see if this works for you too.
Here are the steps to be followed on how to do it.
Step 1: Open the Run box by pressing the Windows and R keys together.
Step 2: Then type powercfg.cpl in the textbox and hit Enter key.

Step 3: This opens the Power Options page on your system.
Step 4: Click Change plan settings of a particular plan which is selected currently.

Step 5: Now on the edit plan settings page, click Change advanced power settings.

Step 6: In the Advanced settings window, expand the USB settings > USB selective suspend setting.
Step 7: Disable both On battery and Plugged in options by selecting Disabled from the dropdown menu and finally click Apply and OK as shown below.

NOTE: If the USB settings option is missing in your advanced settings window, then follow these steps mentioned below to get it back.
- Open the registry editor by pressing Win + R keys and typing regedit and hitting Enter key.
Please accept the UAC prompt by clicking Yes.
- Now copy and paste the below line into the address bar and hit Enter key.
HKEY_LOCAL_MACHINE\SYSTEM\CurrentControlSet\Control\Power\PowerSettingsa737441-1930-4402-8d77-b2bebba308a3e6b7a6-50f5-4782-a5d4-53bb8f07e226 - After that, right-click on the right side of the editor window space and click New > DWORD (32-bit) Value.

- Rename it to Attributes and then double-click on it to open its edit window.

- Change the value of Value data to 2 and click OK.

- Close the registry editor window and restart the system.
- After the system boots up, you will get to see the USB settings option in Power Options’s Advanced settings window.