Print Spooler is a service in Windows 10 that keeps the print jobs rolling while managing the interactions with your printer. This can stop functioning at times, even after trying to restart your printer or your system.
However, there can be problems with the printer itself or any connection issues. But, once you know it’s not any of these issues, it has to be a problem with the Print Spooler on Windows 10. This leads to issues like your document getting stuck in the queue while the printing job is on. The worst is, if you try to cancel the job, it gets stuck forever.
Here are two easy ways by which you can start, stop, or restart Print Spooler in Windows 10.
Method 1: How to Start, Stop or Restart Print Spooler in Windows 10 Using Services
Step 1: Click on the Windows icons, type Services in the search box, and click on the result.
![]()
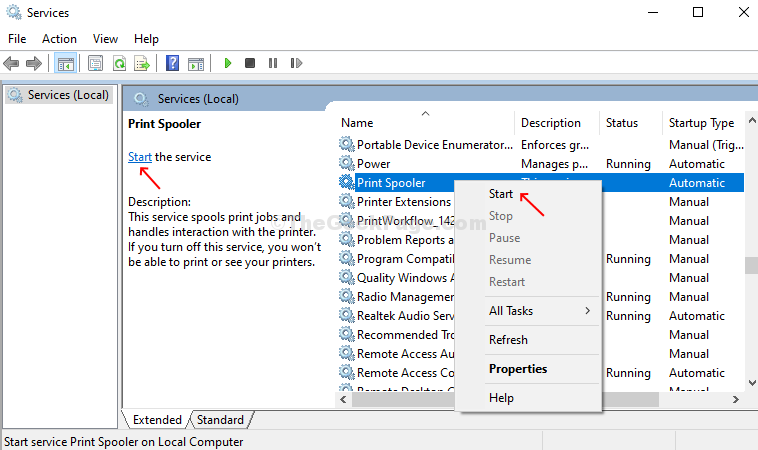
Step 2: In the Services window, go to the right side of the pane, scroll down and find Print Spooler from the list. When you single-click on it, on the left-hand-side pane you will find the description.
The Print Spooler is not showing in Running status currently. You can right-click on Print Spooler and Start the service from the right-click context menu, or you can click on Start the service on the left-hand side pane above the description.

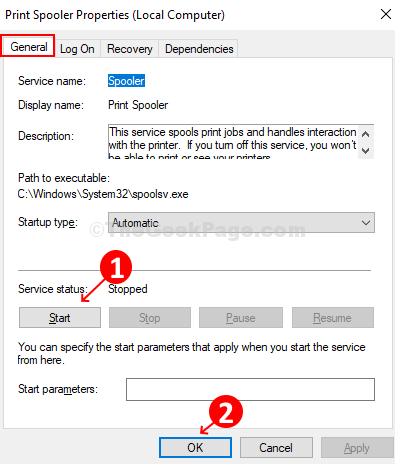
Step 3: Or, double-click on the Print Spooler option to Start the service. Under the General tab, go to the Service status option, and click on the Start button to start the Print Spooler. Press OK to save the changes.

Step 4: To restart the service, click on Restart the service on the left side of the pane., or right-click on the Print Spooler option from the list on the right, and click on Restart from the context menu.

Step 5: If the service was running, you can stop the service by clicking the Stop button on the left side of the pane, or simply right-click on the Print Spooler option and select Stop from the context menu.

Step 6: You can also double-click on the Print Spooler option and under the General tab, click on the Stop button to stop the service.

So, this is how you can Start the service. Check the printer, it should be working fine now. And, you can also follow the steps to Stop or Restart the service.
Method 2: How to Start, Stop or Restart Print Spooler in Windows 10 Using Task Manager
Step 1: Right-click on the Taskbar and click on Task Manager from the menu.

Step 2: In the Task Manager window, click on the Services tab and scroll down to look for Spooler. Check its status if its Running or not. It shows Stopped here.

Step 3: Right-click on Spooler and click on Start.

Step 4: Now when it shows Running status, right-click on it again and click on Restart to restart the Print Spooler service.

Your printer should be working perfectly fine now.
Step 5: To stop the service, right-click on Spooler and click on Stop to stop the service.

That’s about it! That’s how you can Start, Stop, or Restart the Print Spooler service using Task Manager.