The Quick Print feature in Microsoft Outlook works just as the name suggests it do. Quick print simplifies the otherwise tedious printing process of first previewing the email, choosing the printer and then, starting the final printing operation. If the quick print feature doesn’t work as intended, troubleshooting it should fix this.
Fix 1 – Change the default printer
The Quick Print feature will only work if the correct printer is set as the default printer on your system.
Step 1 – You must open the Settings to do this. Pressing the Win+I buttons should do this.
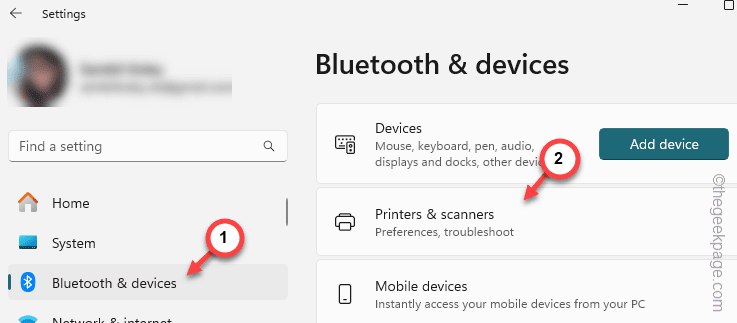
Step 2 – Later, open the “Bluetooth & devices” section from the left tab.
Step 3 – On the other hand, open the “Printers & scanners” device.
Step 4 – On the same side, you will find the printers and scanner devices. Tap the current working printer from the list to edit its settings.
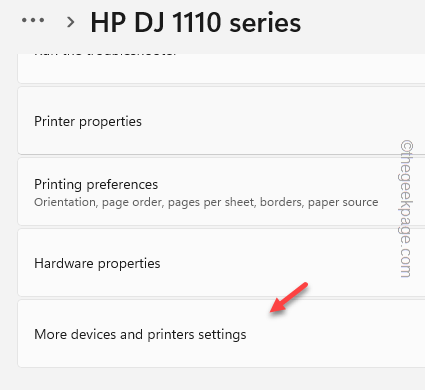
Step 5 – Finally, scroll down and the open the “More devices and printer Properties” option, at the bottom.
Step 6 – Next, find the printer in there.
Step 7 – Tap “Set as default” to set the printer as the default printer device of the system.
After setting the printer as the default printer driver, you can use the Quick Print function in Outlook.
Fix 2 – Change the Print Options
You may reset the Print Options settings in your Outlook client.
Step 1 – In the Outlook client, choose to open the “File” tab.
Step 2 – Open the “Print” option there and tap to open the “Print Options” menu.
Step 3 – From the Printer Name menu, set it to the main printer.
Step 4 – On the same Print page, check the “Print attached files. Attachments will print to the default printer only.” option.
Step 5 – Finally, tap the “Print” option.
After this, give the quick print feature another try. Test if this works or not.
Fix 3 – Try clearing the Outlook cache
Emptying the locally stored Outlook cache may fix the problem.
Step 1 – Right-click the Windows button. Wait till you see the context menu.
Step 2 – Next, open the “Run” panel.
Step 3 – This is the address where Outlook stores the cache. So, paste this and click “OK” to go there.
%localappdata%\Microsoft\Outlook
Step 4 – After getting access to the stored Outlook data, select all the components in there.
Step 5 – Delete all the components from there.
Next, relaunch the Outlook client. Try to reprint the document once again.
Fix 4 – Make sure the printer is online
There are some preliminary conditions the printer should meet for the quick print feature in Outlook to work.
Step 1 – Make sure the system is connected to the printer correctly.
Step 2 – Ensure the necessary stuffs like ink, paper is present in the proper places of the printer.
Step 3 – Shut down the printer using the button on the printer.
Step 4 – Switch on the printer.
Step 5 – Next, go this way –
Windows Settings > Bluetooth & devices > Printers & scanners
Step 6 – If you have multiple printers, choose the primary printer from there to open its settings.
Step 7 – Check what the ‘Printer Status:’ reads. If it says “Default, Offline” or “Offline“, the printer isn’t ready to use the quick print feature in Outlook.
If that’s the case, use the next solution to troubleshoot the printer.
Otherwise, if the printer shows up ‘Online’, you may try using the quick print feature in Outlook.
It should definitely work.
Fix 5 – Troubleshoot the printer
You must use the printer troubleshooter to troubleshoot the printer.
Step 1 – Next, right-tap the Windows icon and tap “Run“.
Step 2 – Type this and click “OK“.
control printers
Step 3 – This must take you to the Printers & Scanners section on your device.
Step 4 – Find the printer there and open that up.
Step 5 – On the next page, slide down to find and run the “Run the troubleshooter“.
Like other troubleshooters on your device, the printer troubleshooter runs a few diagnostics checks, restart several printer-related processes. You must follow the on-screen question based troubleshooting wizard to fix the fault of the printer, if there are any.
If the problem is printer oriented, you can use the quick print operation when the printer gets fixed.
Fix 6 – Disable the COM Add-ins of Outlook
Sometimes another third-party printer module can complicate things for a simple operation of the Quick Print in Outlook.
Step 1 – After opening the MS Outlook, go this way –
File > Options
Step 2 – There, in the Outlook Options panel, must be the “Add-ins” from the left column.
Step 3 – On the right-hand side, arrange the ‘COM Add-ins’ tab and tap “Go“.
Step 4 – Uncheck all the add-ins that you found there and click “OK“.
Once you have disabled the Add-ins in the Outlook, retry the quick printing a mail.
This time, you won’t face any problem.


