While printing something in your Windows 11, you may see this “The print spooler service is not running” error message. This problem is often caused by the unexpected stall of the Print Spooler service, which is essential for printing. Just enact these easy fixes to continue printing using your computer.
Fix 1 – Automate the Printer Spooler service
You have to automate the Printer Spooler service from the Services utility.
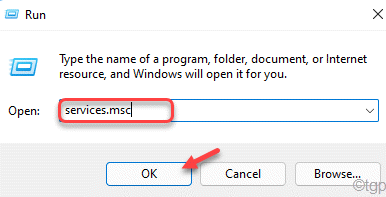
1. At first, press the Windows key+R keys together to access the Run terminal.
2. Then, type “services.msc” and click on “OK“.

This will open up the Services screen.
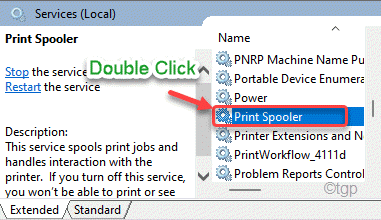
3. When the Services opens up, scroll down all the way to the “Printer Spooler” service.
4. Just, double-click on the service to access it.

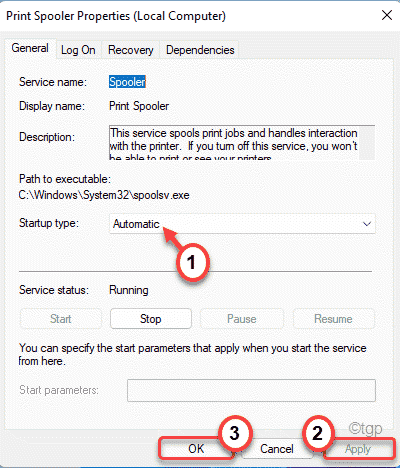
5. In the Printer Spooler Properties window, click on the ‘Startup type:’ drop-down and select the “Automatic” settings.
6. Then, click on “Apply” and click on “OK“.

This will set the Printer Spooler service to run automatically whenever the computer starts up.
Then, restart your computer. When your computer starts up, the Printer Spooler service will also start. Try to print anything.
Fix 2 – Uninstall the printer drivers and printer app
You have to uninstall the printer device from your computer along with all printer-related applications.
Step 1
You have to uninstall the printer-related softwares, first.
1. At first, right-click on the Windows icon and click on the “Run“.
2. After that, write “appwiz.cpl” and then, click on “OK“.

3. You will see the list of installed apps on the Programs and Features window.
4. Now, right-click on the printer-related software you see in the list, and then click on “Uninstall“.

Follow the on-screen instructions to finally uninstall it from your computer.
5. Same way. uninstall all the printer-related software.
Step 2
1. Press the Windows key+X keys together.
2. Then, click on the “Device Manager” to access the Device Manager on your computer.

3. In the Device Manager window, expand the “Print queues” section.
4. Then, right-click on the printer and click on “Uninstall device“.

5. Finally, click on “Uninstall” to confirm the action.

Then, close the Device Manager window.
After doing all these, restart your computer. Now, Windows will install the default printer driver for your system.
If this doesn’t solve the problem, go to your printer manufacturer’s website and download & install the printer driver for your system. This should stop the “The print spooler service is not running” message while printing anything.
Fix 3 – Remove spooler registry keys
If automating printer spooler service doesn’t work out for you, you can always remove the spooler registry keys.
1. At first, press the Windows keys+R keys together.
2. Then, type “regedit” and hit Enter to open the Registry Editor.

[
Important–
This is an advanced solution to this issue where you have to modify the registry. If you delete/modify a single key without any prior knowledge, your computer can be irreversibly broken. So, you should back up the registry database in a secure location.
a. After opening the Registry Editor, you will need to click on the “File” and then click on “Export“.
b. Save the backup in a secure place.

]
3. When the Registry Edit0r opens up, go to this key location –
For 32-bit system ~
HKEY_LOCAL_MACHINE\SYSTEM\CurrentControlSet\Control\Print\Environments\Windows NT x86\Print Processors\
For 64 -bit system ~
HKEY_LOCAL_MACHINE\SYSTEM\CurrentControlSet\Control\Print\Environments\Windows NT x64\Print Processors\
4. On the right-hand side, you will find a list of values, string values.
5. You have to remove everything from the right-hand side except the “winprint” value.

After deleting the values, close the Registry Editor. Then, restart your computer. After restarting your system, you try to print something. This should fix the printer spooler error message issue on your computer.
Fix 4 – Run the printer troubleshooter
If nothing is working out, you can run the printer troubleshooter to troubleshoot the printer.
1. Open the Settings on your computer.
2. Next, on the left-hand side, tap on the “System“.
3. Now, tap on the “Troubleshoot” on the left-hand side.

4. This will lead you to the Troubleshooter settings screen.
5. On the right-hand side, click on “Other troubleshooters“.

5. In the list of troubleshooters, scroll down and find the “Printer” troubleshooter.
6. After that, tap on “Run” to run the printer troubleshooter.

Now, follow the on-screen instructions to troubleshoot the printer issue you are facing.