Are you wondering what these System Interrupts are and why are they eating up most of the resources? Then don’t worry. In this article, we will discuss all there is to know about System Interrupts and also discover different ways to fix the High CPU Usage Caused by System Interrupts.
What are System Interrupts?
A System interrupt is a signal that is sent to a processor(CPU) to resume whatever it is doing and to take up the priority task that needs the intervention of the CPU. Mostly these interrupts are initiated by the external hardware. To make it clear let us consider few examples.
Consider a printer that is connected to the PC and working smoothly. Let’s say there is a paper jam in the printer, this creates a system interrupt, and the signal is sent to the CPU to resume whatever it is doing and say display this message to the user.
There will a lot of interrupts generated at a given time. When the I/O operation happens an interrupt is generated. That is when the key in the keyboard is pressed or when a mouse click is detected, a system interrupt is generated indicating intervention of the CPU is required for completing the process.
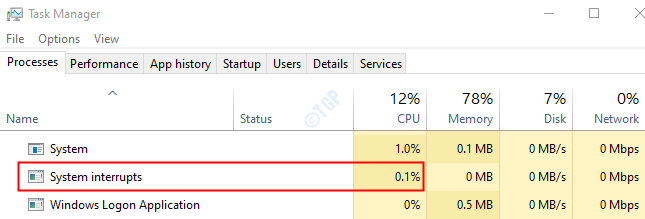
The System Interrupts are generated and taken care of in a fraction of a second. Usually, the CPU usage for these interrupts would be minimal. Somewhere between 0.1% -1%.

In case, the CPU usage of the system interrupts are more than 20% and stay there for a longer time, then this indicates some problem in the Hardware or the hardware drivers.
How to Fix High CPU Usage caused due to System Interrupts
Now that we know about the System Interrupts, let us see how to fix the high CPU usage caused due to them. Try the below general fixes before trying the specific fixes.
- Restart the System
- Check for any Viruses or Malware in the System
- Unplug and remove the external devices connected to the system like external USBs, Audio devices, etc.
- Even faulty laptop Chargers are known to cause high disk usage because of System interrupts. In this case, try replacing the charger.
In case these do not help, try the fixes listed below. It is better to execute the fixes in the below-given order.
Fix 3: Turn Off Internal Devices
At times, some internal devices are the culprit of this problem. So you can try disabling some of the devices one after the other and figure out which device is causing the problem. You can try disabling the following devices:
- Network Adapters
- Modems
- Add-on cards like DSL, TV Tuner cards stc.
- Sound devices
In order to disable the devices, do the following:
Step 1: Open Device Manager(Refer Steps 4,5 from Fix 1)
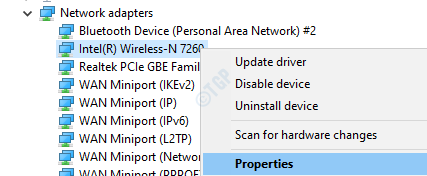
Step 2: Double click on Network adapter to expand the selection
Step 3: Right-click on your network adapter and choose Properties

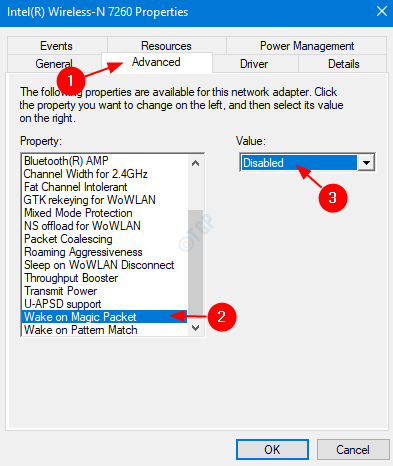
Step 4: Go to the Advanced tab
Step 5: Under the Property section, click on Wake on Magic Packet. Under the Value section, choose Disabled.

Step 6: Again, choose Wake on Pattern Match under the Property section. Choose Disabled from the Value section
Step 7: Click on OK

Step 8: Repeat the same steps for all the Network Adapters that can be disabled.
Now try if this fixes the issue with System interruptions. If not try the next fix.
Fix 2 – Update your Windows 10
1. Search Check for updates in windows 10 taskbar search and click on it.

2. Click on Check for updates.

3.Let updates be downloaded and installed if there are any.
4. Restart your PC.
Fix 3: Update the all the Hardware Drivers
Step 1: Open the Run Dialog and type ms-settings:windowsupdate and hit Enter.

Step 2: In the window that opens, click on Check for updates.
Step 3: Windows will check for any new updates. If any new updates are found, they will be shown. Check if there are any updates for Hardware drivers and install them
If there are any specific drivers that you want to update, then follow the below steps
Step 4: Open the Run Window by holding the keys Windows+r
Step 5: Enter devmgmt.msc, and hit OK

Step 6: Locate the required driver from the list and right-click on it. As an example, we will try to update the Microsoft AC Adapter

Step 7: In the appearing window, click on Search automatically for drivers.

Step 8: If there are any updates available, you will be notified. You can follow the on-screen instructions to update the drivers.
Step 9: Make sure all the Hardware drivers are updated using the above steps. Ensure that there is no Yellow exclamation mark on any of the hardware listed in the device manager.
Check if the issue still exists. I case it does, try the next fix.
Fix 4: Disable the USB Root Hubs from Device Manager
Step 1: Open Device Manager(Steps 4,5 from Fix 1)
Step 2: Scroll down and locate Universal Serial Bus controllers. Click on the arrow mark next to it to expand the selection
Step 3: Now we have to disable the USB Root Hubs. The mouse and keyboard will also be connected to the USB Root Hub. This Root Hub should not be disabled.
Step 4: Right-click on the USB Root Hub and choose Properties

Step 5: Go to the Power tab. Under Attached devices, it will show if the mouse and keyboard are connected

Step 3: From the above image we can notice that the mouse and keyboard are not connected to the Hub. So, we can disable that. To disable, right-click on USB Root Hub and choose Disable device.
NOTE: If there are more than one Root Hubs, all the root hubs have to be disabled.

Check if this solution resolves the issue. If not, try the next fix.
Fix 5: Disable Audio Effects
Step 1: Open the Run Dialog using holding the keys Windows and R together.
Step 2: Type the command mmsys.cpl and hit Enter key

Step 3: Make sure you are in the Playback tab.
Step 4: Click on the default device. In this case, it is LEN L24e-20
Step 5: Click on Properties

Step 6: Go to the Enhancement tab
Step 7: Tick on Disable all enhancements
Step 8: Click on Apply and then click on OK

Check if this fixes the issue. If not try the next fix.
Fix 6: Turn Off Windows Fast Startup
Many users have reported that disabling the Windows Fast startup has fixed the problems for them.
Step 1: Open the Run Dialog
Step 2: Enter control powercfg.cpl and press OK

Step 3: From the left-hand side, click on Choose what the power button does option

Step 4: Click on Change settings that are currently unavailable

Step 5: Under Shut down settings, untick the option Turn on fast startup(recommended)
Step 6: Click on Save changes

Now, check if the issue persists. In case it does, try the next fix.
Fix 7: Update the BIOS in your PC
NOTE: Please try this fix after trying all the other fixes. This method is complicated and also risky. A small mistake can damage the system. So please take a necessary backup of the device before proceeding.
First, we have to find the BIOS version of the system. To do so, follow the below steps:
Step 1: Press Windows key + R keys
Step 2: Type msinfo32 and press OK

Step 3: Note the BIOS version and System Model as shown below

Step 4: Now, visit the manufacturer’s website to download and extract the newest version of the BIOS.
Step 5: Once extracted, go directly to the BIOS (refer to the readme.txt file for instructions) or create a bootable DOS USB drive to update BIOS. Alternatively, you can also use a Windows-based application to update BIOS to the current version.
Step 6: Now, reboot your PC
That’s All
Thank you for Reading. We hope this article has been informative.