Like all other OS on devices worldwide, Windows 10 or Windows 11 also has a feature that can turn Off your screen after a preset time and put your computer to sleep when the user is away for a long time. But some users have recently complained about a bug in this feature that doesn’t put out the monitor after a specified time. There is nothing to worry about. Just a little tweak of your power plan settings and the problem will be solved in a jiff.
Recommended read: Windows 10 sleep mode not working
Fix 1 – Remove unused USB devices
The USB devices (like Xbox controller, joysticks, gamepad, etc) are considered to be the root of this issue as they tend to keep your computer up.
1. Unplug other USB devices except the problematic one. (Unplug all external usb devices, Gaming joystick / controllers / wireless keyboards etc). After that shutdown your computer and then start again normally.
2. Then, unplug the display cable from the back of the cabinet.
3. Wait for a while. Then attach the display cable back to your computer, again.
4. Once you have done that, wait and check if this works for you.
# To know what are the applications who can be behind this
1. Open Command Prompt as Administrator.
2. Run the command given below and hit enter key.
powercfg -requests
Note: The result will display all the applications which hinder sleep. Try to find the culprit from the result and uninstall it. If it seems to be originating from a software program you installed, uninstall it from control panel.
Fix 2 – Change the Sleep settings
You have to alter the sleep settings on your computer.
1. Press Windows key+R together, to launch a Run window.
2. Once the Run window, run this line by pasting it in the Run terminal and then clicking on “OK“.
control.exe powercfg.cpl,,3

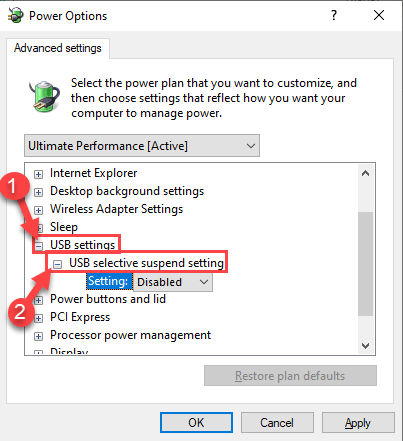
3. Once the Power Options window opens, look for the “USB settings“.
4. Next, expand the “USB selective suspend setting“.

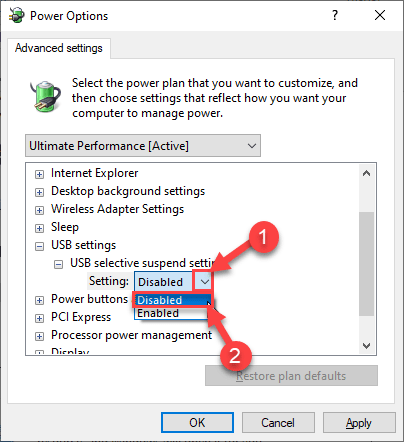
7. Click on the drop-down beside ‘Setting:’ and then select the “Disabled” settings from the drop-down.
[NOTE– If you are enacting this on a laptop device, you will notice two options, ‘On battery‘ and ‘Plugged in‘ settings.
You can easily “disable” both these options. ]

8. Once you have done all these, click on “Apply” and “OK“.

Close the Control Panel window.
Fix 3 – Track the culprit application preventing screen off
1. Search cmd in windows 10 search box.
2. Now, right click on cmd icon and click on run as administrator.

3. Now, copy the command given below and paste it in cmd window and hit Enter key.
powercfg -requests
4. If there are any programs you find which comes in the result, then it is preventing the display to turn off.
For example, in the screenshot given below, anydesk is preventing the display to turn off.

5. Once you have noted down the program, just press CTRL+SHIFT+ESC keys together to open task manager.
6. Locate the program and right click on it and click on end task.

7. Also, go to startup tab and then locate the program from the list and right click on the program icon and choose disabled, so that it do not start itself automatically after restart.

Fix 3 – Configure the display settings
You have to alter the sleep settings on your computer.
1. At first, right-click on the Windows icon and click on the “Run“.
2. Here, type this command and hit Enter.
powercfg.cpl

3. Once the Control Panel opens up, click on the “Choose when to turn off the display” on the left-hand side.

4. After that, set the ‘Turn off the display’ timer to “5 minutes” or any time you want to allow after which the computer screen will turn off.
5. Next, put the ‘Put the computer to sleep’ settings to “Never“. Though the screen turns off, your computer will be up and running.
6. Then, click on “Save Changes“.

Close the Control Panel and check further.
Fix 4 – Disable Power Management
You can configure your computer not to turn off certain USB devices.
1. Right-click on the Windows icon.
2. After that, click on the “Device Manager“.

3. Now simply expand the “Universal Serial Bus controllers“.
4. Then, right-click on the first USB device and click on “Properties“.

5. After that, go to the “Power Management” tab.
6. Then, uncheck the option “Allow the computer to turn off this device to save power“.

7. Click on the “Apply” and on “OK“.

8. Repeat the same steps for other USB devices listed under Universal Serial Bus controllers.

Close the Device Manager screen.
Test if this works on your computer or not.