The front jack on your computer cabinet is very useful as you can directly plug in your favorite headphone in a jiff. But what if you notice that the front jack is not working? Don’t worry. There are some pretty easy fixes available to sort out the issue quickly. All you have to do is follow our instructions on your machine.
Workarounds–
1. Try putting in another headphone (0r microphone) with the same port and check if that is working for you or not. If the headphone or microphone doesn’t work, there may be some issue with the port itself.
2. Restart the computer and try to plug in the headphone again.
Fix 1 – Set the audio device as the default
If you have multiple audio devices connected to your system, this problem may arise.
1. Press the Windows key+R to open up the “Run“.
2. After that, type “mmsys.cpl” and click on “OK“.

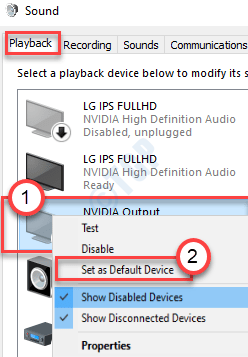
3. Once the Sound window opens up, go to the “Playback“* tab.
4. After that, right-click on the headphone that is connected to the front panel jack and click on “Set as default device“.

This should set the device as the default audio driver on your computer.
NOTE–
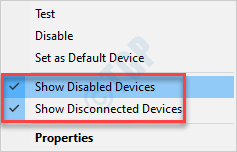
1. If you can’t see the HDMI Audio device in the Sound panel, follow these steps-
Once you have opened the Sound panel, right-click and check the options “Show Disabled Devices” and the “Show Disconnected Devices“.

2. If you are facing a problem with a microphone, follow these steps-
a. Go to the “Recording” tab.
b. Locate the microphone device. Right-click on it and click on “Set as default“.

This should fix the front panel jack issue that you are having.
Fix 2 : Turn Off the Front Panel Jack Detection
This method is for those using a Realtek sound card. Here’s how to fix the issue by disabling the front panel jack detection:
Step 1: Go to Start and type Realtek HD Audio Manager in the Windows search bar.

Step 2: Left-click on the result to open the Realtek HD Audio Manager window.
Navigate to the extreme upper right-side of the window and click on the folder icon.
Step 3: In the Connector Settings pop up, check the box next to the Disable front panel jack detection option.

Press OK to save changes.
Note: Alternatively if you can’t open Realtek HD audio manager, you have an option of disabling front panel jack detection through Registry editor also. Here is how to do so.
1. Press Windows key + R key together to open run.
2. Now, write regedit in it and click OK.

3.Now, before changing anything please click on file > export to create a Registry backup first, so that if any unwanted results appear , you can do file > import to revert the changes.
4. Now, after you have taken a backup, proceed to the following path in the registry editor. Just copy and paste the path in address bar of registry editor.
HKEY_LOCAL_MACHINE\SYSTEM\CurrentControlSet\Control\Class\{4d36e96c-e325-11ce-bfc1-08002be10318}
5. Now, expand all folders with name starting with 000.

6. Now, If there is a setting folder after expanding 000 named folders, expand those settings folder also. If after expanding those settings folder , you find a folder with name starting with Drv8186_DevType , then click on the setting folder once.
7. Once you have clicked and selected that settings folder, in the right side , right click and create a create a binary value named JackCtrl
8. Now, edit and modify its values by typing FF 82 40 00 in it.

9. Close the editor and reboot the PC
Fix 3 : Disable Front panel jack detection via registry (Another Method)
1. Press Windows key + R key together to open run.
2. Now, write regedit in it and click OK.

3.Now, before changing anything please click on file > export to create a Registry backup first, so that if any unwanted results appear , you can do file > import to revert the changes.
4. Now, after you have taken a backup, proceed to the following path in the registry editor. Just copy and paste the path in address bar of registry editor.
HKEY_LOCAL_MACHINE\SYSTEM\CurrentControlSet\Control\Class\{4D36E96C-E325-11CE-BFC1-08002BE10318}
5. Now, Just keep clicking on folder named 000* and on the right side locate DriverDesc and double click on it.
Now, if the value data is Realtek Audio, then we have to make changes in that 000* named folder.
In the screenshot below in my case , it appears in 0001

6. Now, once you are sure that it appears in which folder with names starting with 000*, expand that folder and click and select GlobalSettings.
7. Now, in the right side locate EnableDynamicDevices and set its value to 0.
simply type 00 00 00 00 from keyboard and click OK.
Note : – If EnableDynamicDevices is not present in right , just right click and create a Reg_Binary and name it as EnableDynamicDevices and then set its value to 00 00 00 00.
8. Close the editor and reboot PC.

Fix 4 – Restore default settings
Try restoring the default settings for the audio enhancements for the audio devices.
1. Right-click on the Windows icon and click on the “Run“.
2. After that, type “sysdm.cpl” and click on “OK“.

3. Once the System Configuration opens up, go to the “Hardware” tab.
4. Click on the “Device Installation Settings“.

5. After that, you need to check the “No (your device might not work as“ expected)” option.
6. Next, you have to click on “Save Changes“.

6. Open a Run window again.
7. Type “mmsys.cpl” and hit Enter thereafter.

8. When the Sound window appears, go to the “Playback” tab.
9. Double click on the audio device you are trying to use.

10. Then, click on the “Advanced” tab.
11. To restore the default settings, click on “Restore defaults“.

12. Then, go to the “Spatial Sound” (in some cases you may see the “Enhancement” tab) section.
13. Again a click on the Restore defaults” and everything will be restored to the default settings.

14. Click on “Apply” and click on “OK“.

Close all the opened windows and restart the system once. This should solve the problem.
Fix 5 – Update the sound card
Try updating the sound card driver on your computer.
1. Press the Windows key+R.
2. After that, type “devmgmt.msc” and click on “OK“.

3. When the Device Manager opens up, expand the “Sound, video and game controllers“.
4. After that, right-click on the audio device and click on “Update driver“.

5. After that, click on the “Search automatically for drivers“.

Try unplugging and plugging the audio device from the front panel jack. This should work out for you.
Fix 6 – Check the connection settings
If updating the audio drivers doesn’t work out for you, try checking the connection settings on your motherboard.
1. Switch off your computer. Unplug it from the power source.
2. Open the cabinet or casing from your machine.
3. Check out the connection of the motherboard and front panel jack.
Actually, you will notice some jumper wires connecting the motherboard ports with the front panel jack and the USB ports of the cabinet.
4. Make sure the jumper wires are connected properly.
Some users have suggested that reversing the face of the jack and motherboard ports have solved their issue. Check it out on your machine.
5. Put the casing back. Plug your computer into the power source.
Check if this fix works for you.
Fix 7 – Check for defects with the troubleshooter
If this is a software issue, you can try running the troubleshooter.
1. Press the Windows key+I keys together.
2. Then, click on the “Update & Security“.

3. On the left-hand side, click on the “Troubleshoot“.
4. Once the troubleshooter window appears on your screen, on the right-hand side, click on “Additional troubleshooters“.

5. In the list of troubleshooters, scroll down and click on the “Playing Audio“.
6. After that, click on “Run the troubleshooter“.

Let the troubleshooter run on your computer and fix the issue on your system.
This should have fixed your problem.
Fix 8 – Reinstall the audio driver
If this is a case of corruption of the audio driver, follow these steps.
1. At first, you have to press the Windows key+R keys together.
2. Once the Run window appears, write “devmgmt.msc” and click on “OK“.

3. You have to expand the “Sound, video and game controllers” section.
4. Now, to uninstall the particular adapter, right-click on the audio driver and then click on the “Uninstall device“.

5. Simply, click on “Yes” to confirm the uninstallation of the driver.

After that, simply restart your computer once. This will load the default driver for the Realtek Audio driver.
If the driver still isn’t there, follow these steps-
Open the Device Manager window.
a. In the Device Manager, click on “Action“.
b. After that, click on “Scan for hardware changes“.

Fix 9 – Use the ports at the back
Every PC has some extra ports at the back of the cabinet. These ports are usually at the motherboard. So, try plugging your headphone into that jacks instead of the ones at the front.
This should fix the issue.