In case if you are unable to locate the Realtek Audio HD Manager on your computer or it is not functioning properly, follow these fixes and the problem should be fixed easily.
How to Open Realtek HD Audio manager
Option 1 – Via File manager
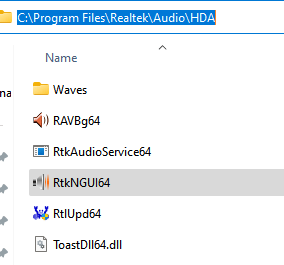
1) Browse to the location C:\Program Files\Realtek\Audio\HDA from address bar.
2) Locate and do a Double click on RtkNGUI64.exe to open Realtek HD audio manager

Option 2 – Control panel
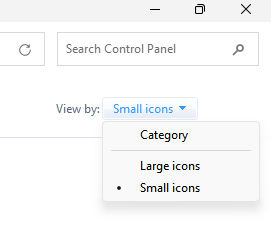
1 – Go to control panel.
2 – Select View by -> small icons

3 – Click on Realtek HD Audio manager from the list

Fix-1 Update Realtek Audio driver-
Updating the Realtek Audio driver will solve this issue on your computer.
1. Press Windows key+X. Then, click on “Device Manager“.

Device Manager window will be opened.
2. In Device Manager window, click on “Sound, video and game controllers” to expand it.
3. Now, right-click on “Realtek(R) Audio” and click on “Update driver” to update the device.

4. As the next step, you have to click on “Browse my computer for driver software“.

5. In the next window, click on “Let me pick from a list of available drivers“.

6. Now, select the “Realtek High Definition Audio” driver and then click on “Next” to start the installation process.

Close the Device Manager window upon completion of the installation process.
Reboot your computer to complete the installation process.
After rebooting your computer, you will find out the Realtek HD Audio Manager to be working fine.
Fix-2 Download Realtek Driver from Microsoft Update Catalog-
If you know the version of the Realtek Audio driver, you can download and install the latest version of the driver from Microsoft Update Catalog.
1. You can easily open the Device Manager by pressing the Windows key+X and then click on “Device Manager“.

Device Manager window will be opened.
2. In Device Manager window, click on “Sound, video and game controllers“.
3. Then, you need to double click on “Realtek(R) Audio” to analyze the driver version.

4. In the Audio Properties window, go to the “Driver” tab.
Then, note down the ‘Driver Date:‘ and the ‘Driver Version:‘.

Minimize the Device Manager window.
5. Go to Microsoft Update Catalog.
6. Enter the driver version in the Search box and then click on “Search” to search for all driver updates.

7. In the next window, check for the latest update of the audio driver and then click on “Download” just beside the driver.

8. A pop-up window will be opened. Click on the driver’s name ( will contain an extension “.cab“) to begin the downloading process.

The audio driver will be downloaded as a zip file.
9. Maximize Device Manager.
10. Now, right-click on “Realtek(R) Audio” and then click on “Update driver” to update the device temporarily on your computer.

11. Then, select the option “Browse my computer for driver software“.

12. In Browse for drivers on your computer window, click on “Browse” and navigate to the folder where you have just downloaded the update.
(Example– We have downloaded the update in the Downloads folder. So, we have to browse to that location.)
13. Click on the “Next” search and install the latest driver.

Once you have installed the driver you will need to restart your computer.
After rebooting your computer, you will find the Realtek Audio Manager.
Fix 3 – Download from REaltek’s website
You can also download latest realtek software from realtek official website.
Download the appropriate realtek software based on whether your system is 32 bit or 64 bit.
Fix-4 Run Audio Troubleshooter-
Running an audio troubleshooter may fix this issue on your computer.
1. Type “Update & Security” in the search box beside the Windows icon.
2. Then, click on the “Update & Security” in the elevated search result.

3. In the Update & Security window, click on “Troubleshoot” on the left-hand side of the window.
4. Now, scroll down through the right-hand side to find and click on “Playing Audio” and then click on “Run the troubleshooter“.

This troubleshooter will sort out any audio issues on your computer.
Check if you can find Realtek HD Audio Manager on your computer.