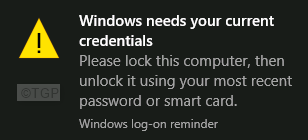
Many Windows users have reported issues with Windows prompting for their credentials repeatedly. When the right credentials are entered, the error message shown below is displayed.
Windows needs your current credentials
Even when the user locks the system and unlocks it with the right credential, the error continues to show up. Generally, this happens when the user unlocks the system using a pin. But this PIN was created using an earlier password, not the password that is used currently. Other causes for this issue are :
- Corrupt System Files.
- Incorrect policies in Group Policy Editor.
- Unverified User Account.
In this article let us discuss different ways to fix the Windows Needs Your Current Credentials error in Windows.
Fix 1: Change the Group Policy
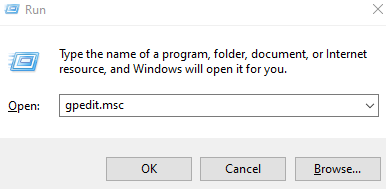
Step 1: Open the Run Terminal using Windows+R keys
Step 2: Type gpedit.msc and hit Enter
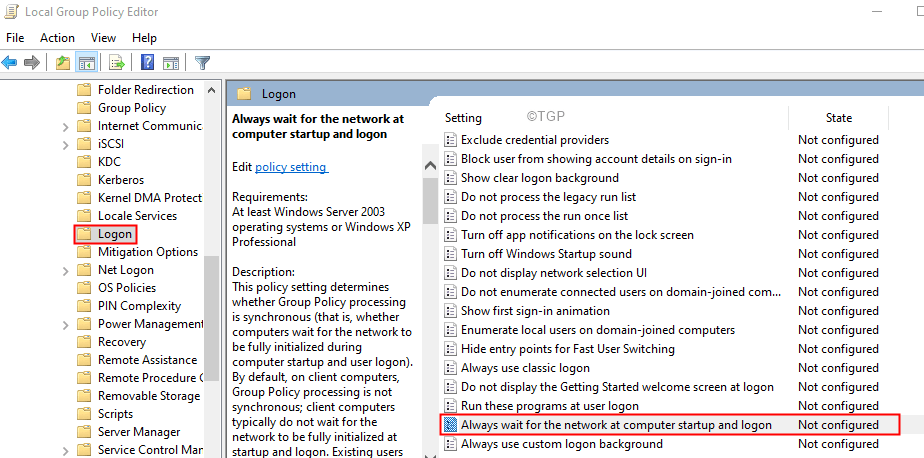
Step 3: In the Local Group Policy Editor, navigate to the below location from the left-hand side.Double-click on the selection in order to expand it.
Computer Configuration > Administrative Templates > System > Logon
Step 4: From the right-hand side, scroll down and double-click on Always wait for the network at computer startup and login option.
Step 5: In the appearing window, Check the Disable option to disable the setting.
Step 6: Click on Apply and then click on the OK button.
Step 7: Restart your system. Check if the error has been resolved. If not, try the next fix.
Fix 2: Verify the User again
For domain users, that is when you can log in using any machine from your organization. When you are not bound to use a single machine for your user account, verifying the user account has helped. In order to do so, follow the below steps:
Step 1: Click on the Start Symbol.
Step 2: From the left-most side, click on your User account.
Step 3: Click on Change Account Settings.
Step 4: Now, under the Verify your identity to sync passwords across your devices section, click on Verify.
Step 5: Follow the onscreen instructions and complete the process.
Fix 3: Remove and Re-add all Credentials from Credential Manager
Step 1: In the search bar next to the start symbol, type Credential Manager
Step 2: Click on the Credential Manager
Step 3: Select Windows Credentials
Step 4: In the appearing window, you will see a list of credentials.
Step 5: Remove all the credentials.
Step 6: To remove a credential, click on the credential name from the list. You will see that the option expands showing the options.
Step 7: Click on the Remove.
Step 8: In the confirmation dialog, click on Yes.
Fix 4: Upgrade to Windows Pro
Many users have reported that after upgrading their system from Windows 10 Home to Windows 10 Professional Edition, they were able to solve this problem. Here is a product key that can be used to Activate Windows 10 Pro Edition on trial.
Step 1: Open the Run Dialog.
Step 2: Enter the below command and hit Enter.
ms-settings:activation
Step 3: In the appearing window, click on the change product key.
Step 4: You will be prompted to enter a Product key, enter any of the following keys
Step 5: Click on the Next button.
Step 6: Follow the on-screen instructions and complete till you see the Start Upgrade option.
Step 7: Click on the Start Upgrade option and wait till the system is completely upgraded.
You will now be upgraded to Windows 10 Pro. But note that this is just a trial version and needs to be activated with a genuine Windows key.
Fix 5: Perform a Full System Scan
Step 1: Open the Run Dialog(Windows+R)
Step 2: Type ms-settings:windowsdefender, and Press OK.

Step 3: In Settings –> Update & Security –> Window Security widow that opens, click on Virus & threat protection

Step 4: From the appearing window, click on Scan options

Step 5: In the appearing window, click on Full Scan and click on Scan Now.

Step 6: Once the scan finishes, check if there are any threats and remove them from the system.
Step 7: Restart your System.
Fix 6: Perform a Clean Boot of your System
Step 1: Open the Run Dialog.
Step 2: Type msconfig and hit Enter

Step 3: In the General tab, choose Selective startup
Step 4: Ensure that Load system services and Load startup items are checked.

Step 5: Go to the Services tab
Step 6: Tick on Hide all Microsoft services and then click on Disable All button
Step 7: Click on Apply and then click on OK
Step 8: Restart your computer.
Fix 7: Perform a System Restore
If none of the above steps help, you can roll back to the previous System Restore point( if you have created one earlier).To do so ,
Step 1: Open Run Dialog using Windows+R
Step 2: Type rstrui.exe and press OK
Step 3: In the System Restore window, click on Next.
Step 4: In the appearing window, select the restore point to which you want to roll back and click on Next.
Step 5: Follow the on-screen instruction and wait for the system to be restored. Note that this might take a long time.
That’s All
We hope this has been informative. Kindly comment and let us know if any of the above fixes have helped to solve the issue.
Thank you for Reading.


