Many users are complaining about a bug that even when the screensaver is set to 15 minutes, windows 10 is automatically going to sleep even after 2 to 3 minutes of inactivity. This has puzzled a lot of windows 10 users. If you are also facing this problem and you do not want windows 10 to autoatcvially going to sleep mode within few minutes of being inactive, here we have provided working solutions to fix this problem.
Fix 1 – By editing registry editor
Note: Before using the registry editor take a backup of your registry settings by File > Export in the registry editor.
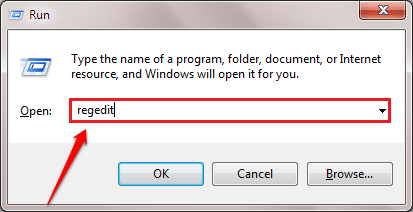
1. Press Window key + r key together to open run command box.
2. Type regedit in it and click OK.

3. Go to the following location in the registry editor.
HKEY_LOCAL_MACHINE\SYSTEM\CurrentControlSet\Control\Power\PowerSettings8C9FA8-0AAD-41ED-83F4-97BE242C8F20bc4a2f9-d8fc-4469-b07b-33eb785aaca0
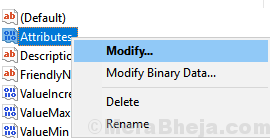
4. when you select 7bc4a2f9-d8fc-4469-b07b-33eb785aaca0 folder in the left pane, locate Attributes key in the right side.

5. Right click on the Attributes key and choose modify.

6. Now, change the value data to 2 and click OK.

7 – Now search Edit Power Plan in search box and click on edit power plan

8- Click on change advance power settings in the next window.

9. Now, click on sleep to expand it, then expand sleep after by clicking it and then put a longer duration such as 30 in settings (Minutes).
Similarly change Hibernate After and choose a larger time such as 30 or 60 minutes.
Note: – If you see any similar settings such as System unattended sleep timeout, set it to 30 minutes or larger also.

10. Click Apply and OK.
Fix 2 – Using Command Prompt
1. Search cmd in windows 10 search.
2. Right click on Command prompt icon and choose run as administrator.

3. Now, copy and paste the command given below in the command prompt window.
powercfg -attributes SUB_SLEEP 7bc4a2f9-d8fc-4469-b07b-33eb785aaca0 -ATTRIB_HIDE
This will add system unattended timeout feature in power options.
4. Press Windows key + R key together to open run command box.
5. Write powercfg.cpl in it and click OK.

6. Click on change plan settings from your selected plan.

7. Click on change advance power settings in the next window.

8. Now, Change system unattended sleep timeout settings to 60 seconds.

9. Click on Apply and OK.
Fix 3 – Using Slideshow settings
1. Press Windows key + I key together from your keyboard to open settings.
2. Click on Personalization.

3. Click on Lock screen from the left menu.
4. Click on Advanced slideshow settings from the right.

5. turn off the setting when my pc is inactive, show lock screen …

Fix 4 – Change slideshow settings
1. Press Windows key + I key together from your keyboard to open settings.
2. Click on Personalization.

3. Click on Lock screen from the left menu.
4. Click on screen timeout settings from the right side.

5. change the Screen and sleep settings to a higher time.

6. Now, Press Windows key + R key together to open run command box.
7. Write powercfg.cpl in it and click OK.

8. Click on change plan settings from your selected plan.

9. Click on change advance power settings in the next window.

10. Now, expand hard disk and again click on turn off hard disk after. now, change the settings to a higher value like 30 minutes

11. Again go to Settings > Personalization > Lock screen
12. Click on screen saver settings.

13. Make sure On resume, display logon screen setting is unchecked. also select None from the drop-down.
