GeForce Experience is a one-stop solution for all the NVIDIA users where they can optimize their games according to their choice, update the graphics driver to the latest version. But there is a particular issue of seeing the ‘Unable to retrieve settings’ message has been reported by some users. If you are seeing a similar message in NVIDIA GeForce Experience, follow our set of solutions mentioned in this article.
Fix 1 – Restore ApplicationOntology folder
1 – Make sure you have latest version of Geforce experience software installed on your PC.
2 – Close Geforce experience software if it is open
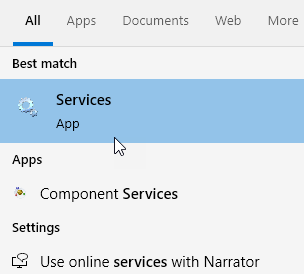
3 – Search services in Windows taskbar search box and click on it

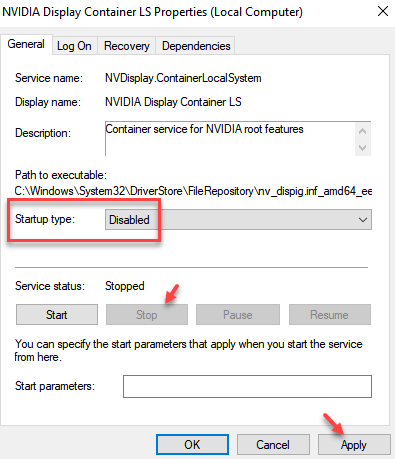
2 – Now, locate NVIDIA Display container service from the list and double click on it
3 – Now, Click on stop to stop the service .
Also, choose startup type as disabled and click on apply.

4 – Now, Press Windows and R key together to open RUN.
5 – Copy and paste the path given below to go the location
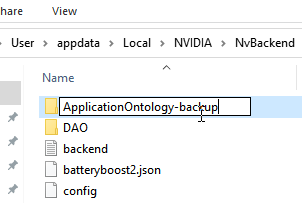
%userprofile%\appdata\Local\NVIDIA\NvBackend
6 – Rename , ApplicationOntology folder to something else.

7 – Now, download this zip file from here
8 – Unzip the file and Copy the ApplicationOntology and transfer it to the directory %userprofile%\appdata\Local\NVIDIA\NvBackend
9 – Again, open the services and this time choose startup type as automatic and click on start

10 – Open Geforce experience again.
Fix 2 – Empty the Temp folder
Clearing up the Temp may solve the problem on your computer.
1. Press the Windows key+R keys together.
2. After that, type this code and click on “OK” to access the Temp folder.
%temp%

4. Once the Temp folder appears, press ‘Ctrl+A‘ to select all the contents.
This will select all the files and folders inside the Temp folder.
5. After that, press the ‘Delete‘ key to clear everything from the Temp folder.

Once you are done, close the File Explorer window.
Try opening the GeForce Experience once again.
Fix 3 – Remove the scan locations
Sometimes corrupted scan locations in the GeForce Experience app may incur this error message.
1. You have to search for the “GeForce Experience“.
2. Then, click on “GeForce Experience” in the search results.

3. When the GeForce Experience opens up, click on the gear-shaped icon.
4. After that, click on the “GAMES“.
5. In the ‘SCAN LOCATION’ location, continuously click on the “REMOVE” to remove all the scan locations.
You may have to click on remove multiple times to remove all scan locations.

Close the GeForce Experience screen.
Now, close all the games running on your computer and make sure they are not running in background. You can press CTRL + SHIFT + Esc together to open task manager and then end task for games running in the background.
Now, Relaunch the GeForce Experience on your computer.
6. Click on the gear-shaped icon again to access the settings just like before.
7. After this, click on “GAMES“.
8. Click on “SCAN NOW” to scan for the games on your computer.
This should fix the issue on your computer.
Fix 4 – Turn off the antivirus
If you have installed an antivirus on your system that may block some GeForce Experience features. You have to disable the ‘real-time scanning’ process of the antivirus. Once you have disabled the antivirus briefly on your computer, try to access the GeForce Experience again.
Fix 5 – Uninstall and Re-Install the latest GeForce Experience
First of all Uninstall geforce experience software from your PC. Search Geforce Experience in search box and then right click and click on uninstall.

1. Search “Nvidia drivers” in Google search.
2. Click on the “Download Drivers|NVIDIA“.

8. Here you need to input your graphics driver information (like ‘Product type’, your ‘Operating System’, etc).
9. After that, just click on the “Search” to search for the latest driver.

Follow these steps to install the driver manually-
1. Go to the location where you have just downloaded the installer.
2. Double click on the offline installer.
![]()
3. When the NVIDIA Graphics Driver window opens up, click on “NVIDIA Graphics Driver and GeForce Experience“.
4. After that, click on “Agree and continue“.

5. Next to that, click on the “Custom installation“.
6. You have to click on “Next“.

7. Then you need to check the “Perform a clean installation” box.
8. A click on “Next” and the installation process will start.

Once you have installed latest geforce experience software on your PC, search geforce again and this time right click and run it as administrator.
Fix 6 – Restore Nvidia graphic card settings
1 – Open Nvidia Control panel.
2 – Now, click on manage 3d settings in the lefty menu.

3 – Now, in the right side, just click on restore button situated at bottom.

Your problem is solved for sure.
Fix 7 – Delete steam User data folder
If you have steam installed on your PC, then follow the steps.
1 – Go to C:\Program Files (x86)\Steam\userdata folder on your PC.
2 – Delete any folder which is not having all numbers in its name.

Now, try to open geforce settings again.