Google Meet is an extremely useful video conferencing service that is widely used by millions of users. Sometimes, it can get frustrating when Google Meet shows the error Camera is off, whereas your camera works perfectly fine with every other application. Though this is a very common problem, the solution is not at at all hard. Read on, to learn how to fix this annoying issue by following some very simple steps.
Method 1: Change Google Chrome Settings
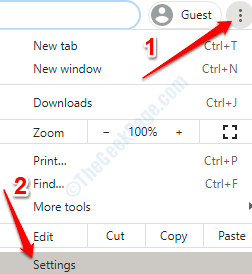
1. Open Google Chrome web browser. Now click on the three dots icon at the very top right corner of the page. From the menu that expands, click on the Settings option.
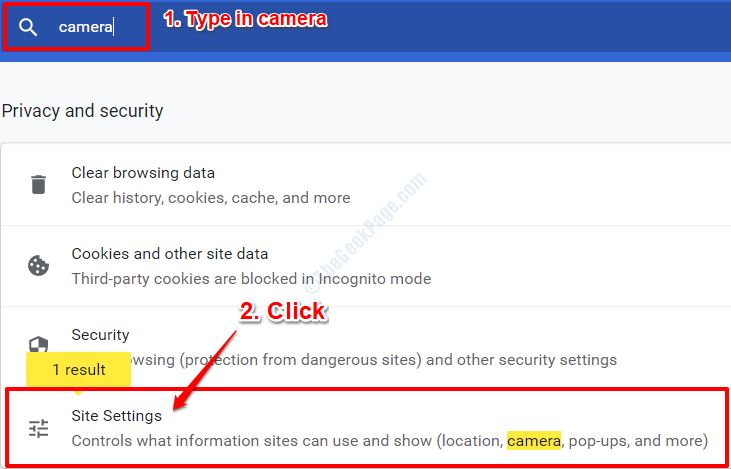
2. Now in the Google Chrome Search box, type in camera. You will now see an option that says Site Settings just like the one in the screenshot below. Click on it.
3. As next, scroll down all the way till you find the Permissions section. Click on Camera section to open the Camera settings.
4. As next, make sure the toggle button corresponding to the option Ask before accessing (recommended) is turned ON. If it is off, turn it ON.
5. Right under the Ask before accessing (recommended) option, you will see another section named Block. All the web applications that are denied permission to use your system camera get listed under this section.
Check if there is an entry https://meet.google.com:443 in this block list. If yes, then click on the arrow button associated with it, as shown below:
6. Now under the Permissions header, you will see the Camera section. Choose the option Allow from the drop down menu associated with it.
7. You can now go back to the Camera Settings page and you will now notice that Google Meet is moved from the Block list to the Allow list. That’s it. You can go back to the Google Meet web page and try refreshing the page to see if your camera is turning on fine. If not, head on to Method 2.
Method 2: Check camera settings
First of all , Make Sure Camera is not Off and the camera icon is not red at the bottom menu of Google meet. You can also press CTRL and E key together to quickly turn Off and Turn On the camera

1 – On the bottom menu of Google meet, Click on three vertical dots and click on settings


2 – Click on Video from left and make sure correct webcam source is provided in the dropdown. If that is not the case, change it to the cotrrect webcam camera.
Method 3: Change Windows Camera Settings
If the above method didn’t work, we have to do a bit of changes in your Windows 10 Camera settings. Follow the steps below to solve your problem in no time.
1. Press WIN + I keys together to open the Windows Settings application. When it opens up, locate and click on the tab that says Privacy.
2. Now in the left window pane, scroll down and find the section named App permissions. Now under App permissions section, find and click on the Camera option.
3. In the right window pane, you will now see a section that says Allow access to the camera on this device. Right below it, if you see the text Camera access for this device is off, then click on the Change button as shown in the screenshot below.
Now in a pop up, you will get a toggle button, Camera access for this device, which you have to turn ON.
4. Right under the above section, you will find another section Allow apps to access your camera. You have to turn the toggle button corresponding to this option also to ON state.
5. Finally, in the same window, look for the section Allow desktop apps to access your camera section. Here also, turn the toggle button to ON state as shown in the screenshot below.
6. That’s it. Your issue is, hopefully, now resolved. Go back to Google Chrome browser and refresh the Google Meet web page. Check if camera is turning on fine or not.
For Windows 11
1 – Search Camera Privacy settings in search box.
2 – Click on Camera Privacy settings from search

3 – Now, Make sure Camera Access is turned On and also Let apps access your camera is also turned ON.


