Are you getting this “Unable to initialize the GPU” error prompt in DaVinci Resolve? This problem won’t let you edit any videos in the program unless you take care the problem first. So, we have arranged this guide consisting of solutions to tackle this GPU issue in DaVinci Resolve. Just follow these solutions one by one and the video editor will recognize the GPU driver in no time.
Fix 1 – Turn off the battery saver
If you are using a laptop, the Battery Saver mode can
Step 1 – Close the error message in DaVinci and quit the app.
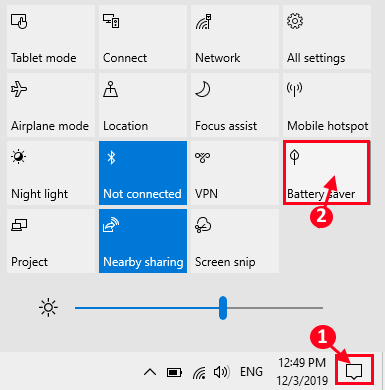
Step 2 – Tap the taskbar button in the bottom-right corner.
Step 3 – There should be a lot of options present there. Make sure to disable the “Battery Saver” feature.
Finally, go ahead and relaunch the DaVinci Resolve program on your system.
NOTE – The default “Power Saver” profile can induce the same effect as well.
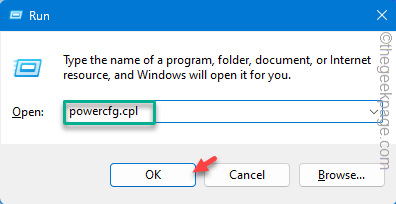
Step 1 – Quickly, press the Windows and the R hotkeys together.
Step 2 – Paste this there and click “OK“.
powercfg.cpl
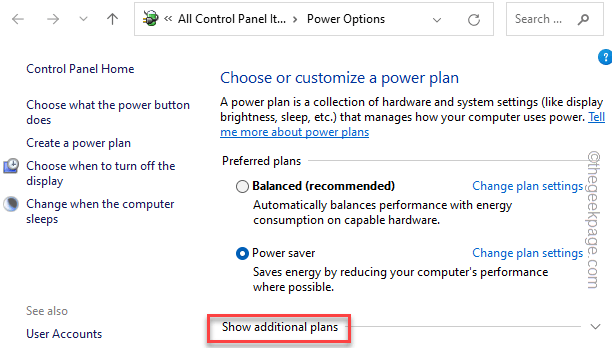
Step 3 – As this directly takes you to the Power Options page, check which power plan your machine is currently using.
Step 4 – Click the “Show additional plans” to expand that.
Step 5 – Choose the “High performance” mode.
After setting up the High Peformance power plan, try running the DaVinci Resolve app.
Fix 2 – Use High Performance mode for DaVinci Resolve
Set the DaVinci Resolve app to use the dedicated graphics card in the High-Performance mode.
Make sure to close the DaVinci Resolve before you do this.
Step 1 – To do this, go to the Windows Settings tab.
Step 2 – Next, go to the main “System” settings.
Step 3 – On the other hand of the Settings, scroll down and open the “Display” tab.
Step 4 – On the same side of the screen, open the “Graphics” option.
You have to customize the graphics preference of the DaVinci Resolve app.
Step 5 – So, set the ‘Add an app’ function to “Desktop app“.
Step 6 – Finally, tap “Browse“.
Step 7 – Now, get to the main location of the DaVinci Resolve app. You can locate the DaVinci Resolve app in the –
C:\Program Files\BlackmagicDesign\DaVinciResolve
Step 8 – Select the “DaVinci Resolve” app in there and finally, select “Add” to add that.
Once you have added the app, it should show up in Settings page.
Step 9 – Now, select the “DaVinci Resolve” entry in the list.
Step 10 – Finally, tap “Options“.
Step 11 – Now, set the graphics preference to “High performance” mode and tap “Save“.
Now, as you have configured the display card preference for the video editor, relaunch it and see the results.
It won’t report “Unable to initialize the GPU” message in there.
Fix 3 – Update the graphics card driver
As most of the DaVinci Resolve users have a dedicated GPU in their machine, update the GPU driver any one of these ways –
Process 1
These are the steps to update the GPU using the GeForce Experience app.
Step 1 – Use the search box to load the GeForce Experience app.
Step 2 – Switch to the “DRIVERS” tab.
Wait for a few seconds and the latest version of the GPU driver information should be visible on the screen.
Step 4 – Tap “Download” to download the listed version of the driver.
Wait patiently till the downloading process completes.
Step 5 – When the GPU driver is downloaded, in the same tab, click the “Express Installation” radio button.
Wait until the GeForce Experience completes the installation process. After installing the new GPU driver, you must restart the computer once before using DaVinci Resolve.
Process 2
Use the Device Manager to get the latest version of the GPU driver.
Step 1 – Go to the search bar. Type “device” in it.
Step 2 – Upon seeing the “Device Manager” open it up.
Step 3 – You will find all of your device drivers, click on “Display adapters” once.
Step 4 – Just right-click the display adapter and click “Update driver“.
Step 5 – After this, you have to click the “Search automatically for drivers” to permit Windows to find and install the latest driver for the display adapter.
In case if Windows can’t find the latest driver for the device, tap “Search for updated drivers on Windows Update“.
As the GPU drivers can appear through the Windows Update channels, install all the pending updates on your machine.
Sometimes, the Optional Updates may contain the display driver update.
1. Follow this path to reach there –
Settings > Windows Update > Advanced options
2. Open the “Optional updates” settings there.
3. Tick mark the display driver and tap the “Download & install” option to download and install the display driver.
This way, after getting the latest version of the GPU driver, test the DaVinci Resolve program.
Hope these have helped you sort the issue.


