Are you experiencing a completely black screen while trying to log into the GeForce Experience app? Whether it is just a simple graphics driver update or optimizing the games on your PC, you literally can’t do anything unless you log in to the GeForce Experience, first. This article should be helpful in your case to troubleshoot this black screen situation in the GeForce Experience console.
Fix 1 – Be connected to the internet
The entire log-in process needs you to be online. So, you must be online while logging into the GeForce Experience app.
Step 1 – Disconnect the router from the power output.
Step 2 – Give the router a few minutes.
Step 3 – Later, plug the router into the wall socket.
Step 4 – Start up the router and wait for it to connect to the internet.
Once you are online again, you can give the GeForce Experience a fresh try. This time, you won’t face any trouble in the login screen.
If you are still having the same issue with the GeForce Experience, you can try these steps –
Step 1 – Close the current instance of the GeForce Experience app. Disconnect the system from your regular router.
Step 2 – Next, start a hotspot on your phone.
Step 3 – Connect your system to the new network.
Step 4 – Start the GeForce Experience app and retry logging in again.
Fix 2 – Automate the NVIDIA Container service
The NVIDIA Container service should be running on your device.
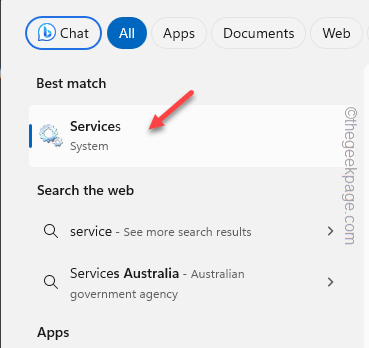
Step 1 – Tapping the Windows button should open the search box. Type “services“.
Step 2 – Next, open up the “Services“.
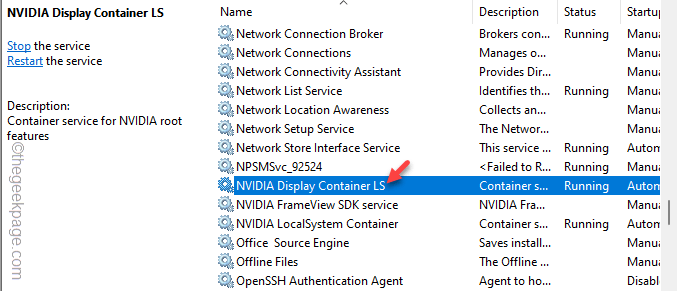
Step 3 – Look up for the “NVIDIA Display Container LS” service after getting to the list of services.
Step 4 – Open it up.
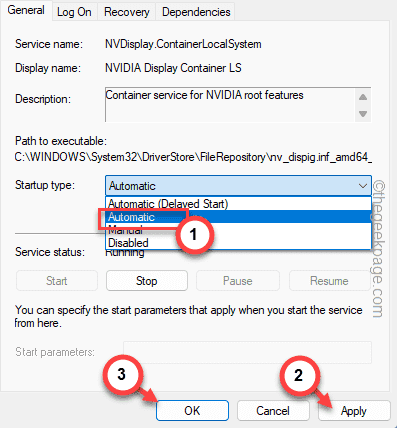
Step 5 – You should switch the ‘Service Status:’ to “Automatic” mode from the drop-down list.
Step 6 – Quickly, tap “Apply” and “OK“.
Step 7 – Next, right-click the “NVIDIA Display Container LS” service and tap “Start“.
If you see the ‘Start’ button is greyed out, that means the service is already running. So, you must close the Services page.
Give the login process another try. Check if that helps!
Fix 3 – Log in to the NVIDIA from a browser
Another way of working around this is to log into the NVIDIA GeForce Experience from a browser.
Step 1 – Open the NVIDIA tab on the browser page.
Step 2 – Tap the profile icon on the right-hand top to access the login page of the NVIDIA.
Step 3 – Now, you will get access to the NVIDIA log-in page.
Step 4 – Use the correct log-in option to log in with your account.
After this, return to the GeForce Experience app and test the login page.
Fix 4 – Flush the DNS settings
You can flush the current DNS settings on your system.
Step 1 – To do this, start a search for “cmd“.
Step 2 – Next, right-click “Command Prompt” and select “Run as administrator” in the context menu.
Step 3 – Paste these sets of commands to start flushing the DNS settings.
ipconfig /flushdns
ipconfig /release
ipconfig /renew
Once you have passed all the commands we have mentioned here, quit the Command Prompt terminal.
Later, close the GeForce Experience and restart your computer. When you are back after the system reboots, you may use the GeForce Experience and log into it.
Fix 5 – Uninstall and reinstall the GeForce Experience
Uninstall the GeForce Experience application from your system and install the current version of the app.
Step 1 – Begin by hitting the Windows button on the keyboard.
Step 2 – Next, right-click the “GeForce Experience” app.
Step 3 – Later, tap the “Uninstall” button in the context menu to open that up.
This should transfer your access to the Settings page.
Step 4 – There, inquire about “GeForce” using the search button.
Step 5 – Simply, tap the three-dot button next to the “GeForce Experience” app.
Step 6 – Later, click “Uninstall“.
This should remove the GeForce Experience from your device.
Step 7 – Now, you have to get the latest version of the GeForce Experience app
Step 8 – After this, click “Download Now” to download the GeForce Experience app package.
Step 9 – Follow through the steps in the installer and compelete the installation process.
After installing the latest version of GeForce Experience, try to log in to it.
Fix 6 – Use the correct date, time
A few users have pointed out the incorrect date/time settings to be the reason for this problem.
Step 1 – Open the Settings.
Step 2 – There, click the “Time & language” settings.
Step 3 – On the right-hand tab, open the “Date & time” menu.
Step 4 – Now, you must set the “Set time automatically” option to On mode.
Step 5 – According to your current location, you may select another time zone as well.
Do that and quit the Settings.
After this, retry using the same GeForce Experience app once more.
This time, you won’t face any problem during the signing in process.
Fix 7 – Update the GPU driver separetely
The main reason for logging into the GeForce Experience is to install the latest version of the GPU driver.
Step 1 – Go to the NVIDIA Driver Download section.
Step 2 – In this page, you can set the ‘Product type:‘, ‘Product Series:‘ and ‘Product‘ in the product panel according to the specification of your GPU, Windows version.
Step 3 – After setting these modifiers in place, tap “Download“.
Step 3 – It will automatically show you the latest version of the GPU driver.
Step 4 – Tap “Download” to download the driver.
Step 5 – After finishing the driver downloading process, open the downloaded driver package.
Step 6 – The first step of the Setup process is very important. You must choose the “NVIDIA Graphics Driver and GeForce Experience” menu.
Step 7 – Tap “Agree and continue” option to proceed.
Step 8 – On the following page, choose the “Express (Recommended)” mode.
Step 9 – Click “Next” to proceed.
Rest of the process is automatic and all you have to do is to wait for the installer to upgrade the GPU driver and install the latest version of GeForce Experience app.
Step 10 – When everything is done, you will be prompt to restart your device. So, choose the “Restart now” option.
Later, you won’t have any trouble logging into the GeForce Experience app.
Additonal Tips –
1. If you are still unable to log in to the GeForce Experience app, you can run the GeForce Experience app with administrative permissions and log in from there.
2.


