Suddenly you might notice that your system has become slower and upon further investigation, you might find that a process named svchost.exe, linked to Diagnostic Policy Service, is taking up lots of your CPU power and memory. Other symptoms include your system heating up soon or the laptop fan becoming too loud. Nothing in the error logs, no traces of the problem creator. Worried? Don’t be! Please follow the simple methods listed below, to solve this issue super quick.
Method 1: Delete the SRUDB.dat file from the SRU Folder
If the above 2 methods do not work, we have to delete the SRUDB.dat file from the sru folder. The SRUDB.dat file is related to Diagnostic Policy Service service. This file sometimes could grow extremely large and can cause a lot of memory consumption. When we delete this file, mostly the issue of Diagnostic Policy Service service taking up lots of CPU power goes away with it. Follow the simple steps listed below to achieve the same:
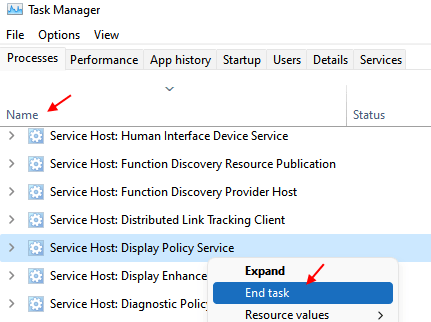
1 – Press CTRL + SHIFT + Esc keys together from your keyboard to open task manager.
2 – Now, click on name to sort all the processes by name in task manager (It will be easier to find)
3 -Now, Locate Service Host: Diagnostic Policy Service
4 -Right click and click on end task.

5 -you will get a UAC window asking for your confirmation on shutting down the system process Service Host: Diagnostic Policy Service. Make sure to check the checkbox Abandon unsaved data and shut down to make the Shut down button active and once it comes active, click on it.
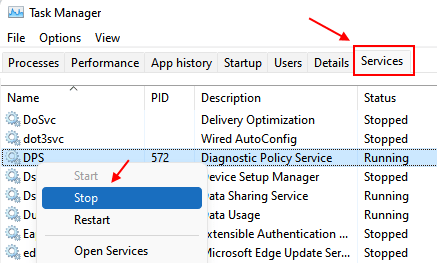
6 – Now, Go to the services tab.
7 -Now, locate DPS (Diagnostic Policy service) from the list.
8 – Right click and Click on stop to stop the service.

9 -Now, Launch the Run dialog box by pressing the WIN + R keys together. Once it opens up, copy paste the following and then press the Enter key.
%WinDir%\System32\sru
10 – You might now be notified that you do not have enough permissions to access the sru folder. In that case, just hit the Continue button.
11 – You will now be able to view all the files in the System folder sru. Locate and right click on the file that is named SRUDB.dat. From the right click context menu, click on the Delete option.
Delete the SRUDB.dat file.
That’s it. Now, your problem will be solved.
Method 2 – Change Power Plan
1 – Search Edit Power Plan in the search box of Windows computer.
2 -Now, click on Edit Power Plan.

3 – Now, Click on Change advanced power settings.

4 – Expand Wireless Adapter Settings and then double click on Power Saving Mode to expand it also.
Now, set Maximum performance for both On Battery and plugged in option.

Method 3: Stop the Process From Task Manager
The simplest of all the solutions is to stop the task from task manager and let it restart itself. Once it restarts, observe for a while and see if the problem is resolved or not.
1. Right click on an empty space in your taskbar and then click on the Task Manager option from the right click context menu.
2. By default, Task Manager would open up with the Processes tab. Under the processes tab, you have to scroll down and locate the section named Windows processes. Under Windows processes, you have to find the process named Service Host: Diagnostic Policy Service. Right click on it and then from the right click context menu, choose the option End task.
3. Now you will get a UAC window asking for your confirmation on shutting down the system process Service Host: Diagnostic Policy Service. Make sure to check the checkbox Abandon unsaved data and shut down to make the Shut down button active and once it comes active, click on it.
That’s it. The process will restart itself in a few seconds. Once it restarts, observe for a while and check if your problem is gone. If not, head on to the next method.
Method 4: Stop the Service from Services Manager
1. Bring up the Run window by pressing the keys WIN + R together. As next, in the Run command box, type in services.msc and then hit Enter key.
2. Now when the Services window launches, scroll down and find the service by the name Diagnostic Policy Service. Double click on this Service listing to open its Properties window.
3. We need to stop this service. For that, under the General tab, click on the Stop button as shown in the screenshot below. When you get notified that the Service has been stopped, you can press the OK button and exit.
Restart your PC and check if your problem is resolved or not.
Method 5: Create a Batch file
You can also create a batch file which b stops the service and show the user a prompt to delete the folder. After that, the service starts again
1 – Just copy the content given below in a notepad file
@echo off
echo ... Set DPS service start type to manual ...
echo.
sc config DPS start= demand

echo.
echo ... Find PID of DPS service ...

for /f "tokens=2 delims=[:]" %%f in ('sc queryex dps ^|find /i "PID"') do set PID=%%f

echo.
echo ... Kill DPS service
echo.

taskkill /f /pid %PID%


echo.
echo ... Delete sru Folder ...
echo.

rd /s "%windir%\system32\sru"

echo.
echo ... Set DPS service start type to auto ...
echo.
sc config DPS start= auto

echo.
echo ... Start DPS service ...

sc start DPS
echo.

pause
2 – Save the file as run.bat
do not forget to select All files in Save as Type option.
3 -Click on save

4 -Now, right click on the run.bat and run as administrator.