A limited network is one problem that is generally encountered by many users who use internet. It means that for sue there is a disrupted internet connection in your PC. Sometimes your PC might get an IP address to connect to the ISP and give you internet, but even then problems persist and the gateway to internet surfing and downloading is in jeopardy and inaccessible. Here are a few steps to follows that will solve your problem.
Step 1- Uninstalling extra Antivirus
The first step is to uninstall additional antiviruses that you’re using because they happen to the harbor a few settings which hinder or even block sharing of network in your PC.
Do this, close your browser if it’s opened, restart the PC and, check if the problem is fixed.
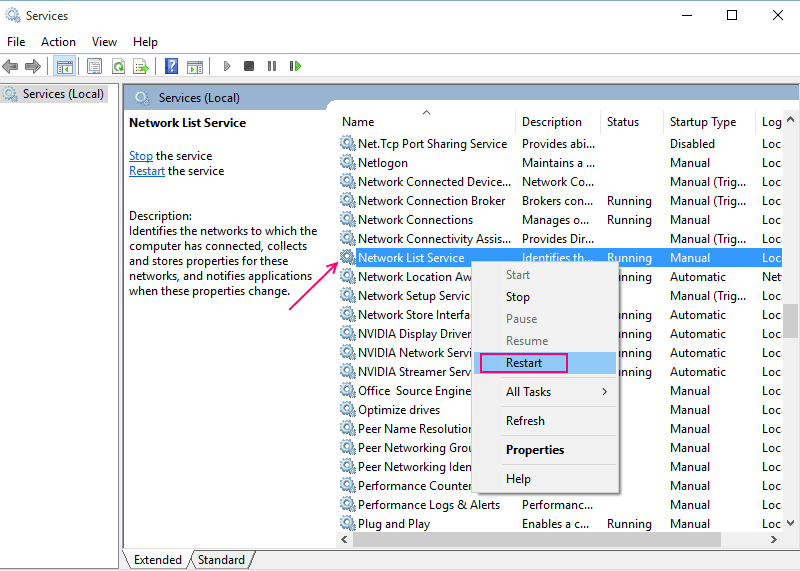
Step 2- Restarting Network List Service
-
In search box, search- services.msc.
-
In the services window that so opens, right click on ‘Network List Service’.
-
After this, click ‘Restart’.

-
If the problem isn’t fixed as yet, follow the following.
Step 3- Troubleshooting
-
Choose ‘Troubleshoot problems’ after right clicking on the Network icon.

-
Not after very long, after troubleshooting where PC is scanned for network connectivity a list of problems along with their IP addresses shall appear that be fixed to achieve Limited Network Yellow Mark in Windows 10.
Step 4- Turning off Firewall
-
For a limited feasible time disable the firewall.
-
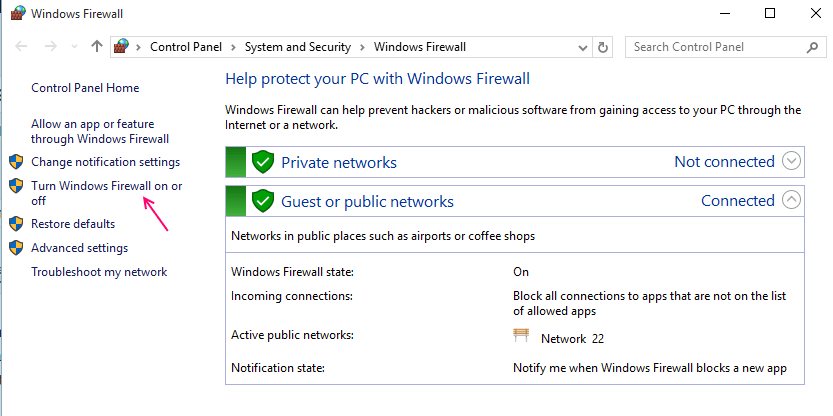
To turn off firewall, search firewall in the search box of taskbar.
-
In the window that so follows, left click on ‘Turn Windows Firewall on or off’ shown in the left hand side.
-
Select ‘Turn off the firewall’.

-
To save the final changes, click on ‘Ok’ button.
-
Restart your browser and see if the issue has been fixed.
Step 5- Updating NIC driver
-
Open ‘Device Manager’ by searching device manager in the taskbar search box.

-
In the window that follows choose ‘Network adapters’.
-
Open the network your machine uses and the click on ‘Update Driver Software’.

-
If any relatable updates shall be there, they will be installed automatically.
-
Restart your PC to check if you can access the Fix Limited Network Yellow Mark in Windows 10.
Step 6- Adding Gateway
-
Obtaining gateway is easy through Command Prompt.
-
Type ipconfig and hit Enter.
-
You’ll find your default gateway.
-
Now open ‘Open Network and Sharing Center’.
-
Choose ‘Change adapter settings’.
-
Click on your network connection.
-
In the new window that follows, double click on ‘Internet Protocol Version 4’.
-
Feed the IP addresses of gateway that you got in the Command Prompt.
-
Click on ‘Ok’ to Fix Limited Network Yellow Mark in Windows 10.
Removing the Yellow Mark from Network Icon in Windows 10
-
Open the Run box by simultaneously pressing the window and R keys. Type regedit in the box and click on ‘Ok’.
-
Affirm to user Account Control to show Registry Editor.
-
Follow the following path:
HKEY_LOCAL_MACHINE –> SOFTWARE –> Policies –> Microsoft –>Windows –>Network Connections
-
Right-click on any area in the vacant space and choose ‘New’ and then ‘DWORD Value’.
-
Rename it- NC_DoNotShowLocalOnlyIcon.
-
Double click to open the ‘Edit’. Once when opened feed number 1 in the Value data
-
Click Ok.
-
Close all windows and restart your PC to solve the Limited Network Yellow Mark in Windows 10.